Vista Normal

Hay nuevos artículos disponibles. Pincha para refrescar la página.
Ayer — 2 Julio 2024Salida Principal

Keebin’ with Kristina: the One with the Tasty Snacks Board

2 Julio 2024 at 14:00
Illustrated Kristina with an IBM Model M keyboard floating between her hands.

A pocket cyberdeck-looking thing with a screen and a thumb keyboard.
Image by [MakerM0] via Hackaday.IO
[MakerM0]’s LangCard is an entry into our 2024 Business Card Challenge that just so happens to fit the Keebin’ bill as well.

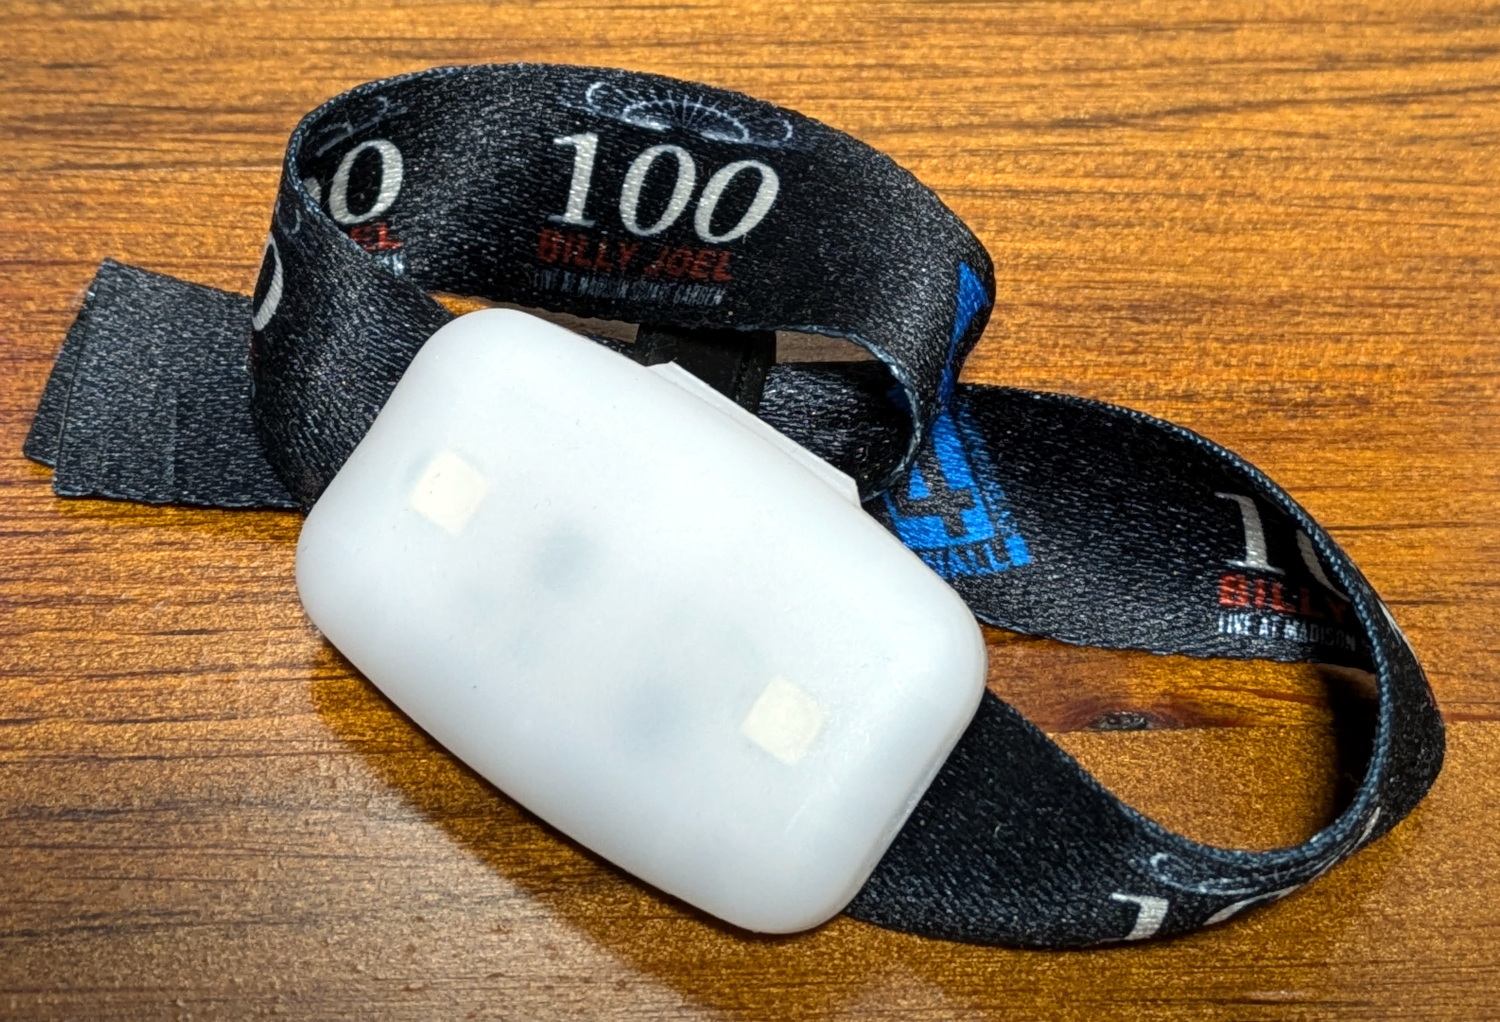
You might label this a pocket cyberdeck, and that’s just fine with me. The idea here is to have a full-keyboard development board for learning programming languages like CircuitPython, MicroPython, C++, and so on, wherever [MakerM0] happens to be at a given moment.

Open up the LangCard and you’ll find an RP2040 and a slim LiPo battery. I’m not sure what display that is, but there are probably a few that would work just fine were you to make one of these fun learning devices for yourself.

Calling All Tiny Keyboard Makers!

A very small keyboard with some coins and a 3D-printed piggy bank for size comparison.
Image by [sporewoh] via KBD
It seems that [sporewoh], who has been featured here before for building magnificent tiny keyboards, is holding a tiny keyboard design contest, which is being sponsored by PCBWay.

All the rules and such are available over on GitHub. Basically, you need to create a new design, publish the open-source design somewhere along with the source files, and, ideally, build a functional prototype. Entries are made official by sharing in the appropriate channel of [sporewoh]’s Discord.

Entries will be scored on novelty and innovation, size/portability, viability, reproducibility, and presentation. Submissions aren’t due until September 10th, so you have a bit of time to really think about what you’re going to do. The prizes include PCBWay credits as well as kits designed by [sporewoh]. How small can you go and still be able to type at least 20 WPM? That’s a requirement, by the way.

The Centerfold: It’s a Tasty Snacks Board

Le Chiffre 3D-printed small keyboard with mint chocolate chip space bars and a Ring Pop knob. Up close on the spacebar of a Le Chiffre 3D-printed small keyboard with mint chocolate chip space bars and a Ring Pop knob. Way up close on the spacebar of a Le Chiffre 3D-printed small keyboard with mint chocolate chip space bars and a Ring Pop knob. Up close on the Ring Pop knob of a Le Chiffre 3D-printed small keyboard with mint chocolate chip space bars and a Ring Pop knob. Ring Pop knob on a Le Chiffre 3D-printed small keyboard with mint chocolate chip space bars.

That’s right; we’ve got a gallery this time. I simply couldn’t decide which picture best conveyed the deliciousness of this thing. I mean, the first shot is a good thought, but you really don’t get right away that it’s a Ring Pop knob, and that’s vitally important information.

Anyway, this is a Le Chiffre that has been quite smoothly 3D-printed in marble filament. [CattiDaddi] says they got that by using a matte print bed. I wish I knew what keycaps those are, because that is a sneaky typeface they have going.

Do you rock a sweet set of peripherals on a screamin’ desk pad? Send me a picture along with your handle and all the gory details, and you could be featured here!

Historical Clackers: the Forgotten History of Chinese Keyboards

Four images showing the detail and output of the Chinese IPX keyboard.
The IPX keyboard. Image via IEEE Spectrum

Here is quite an interesting bit of history as it relates to China’s ability to survive the ravages of time, which pivots on their use of character-based script.

The story begins with a talk that took place decades ago, and follows the path of one audience member who came to change the course of Chinese keyboard history — a Taiwanese cadet named Chan-hui Yeh.

After graduating with a B.S. in electrical engineering, Yeh went on to earn an M.S. in nuclear engineering and a Ph.D. in electrical engineering. He then joined IBM, although it wasn’t to revolutionize Chinese text technologies; he was helping to develop computational simulations for large-scale manufacturing plants. But the talk stuck with him.

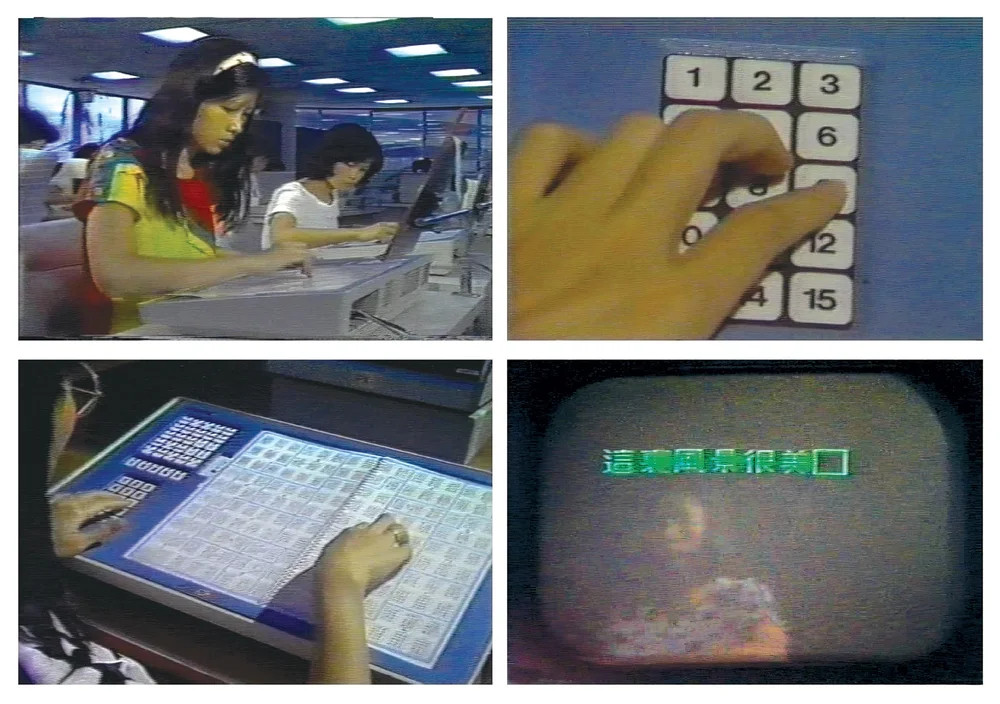
Yeh eventually quit his job and developed the IPX keyboard, which had 160 main keys with 15 characters each. A daughter keyboard was used to choose the character on a given key, and there were nearly 120 levels of “Shift” to change all the 160 keys’ character assignments.

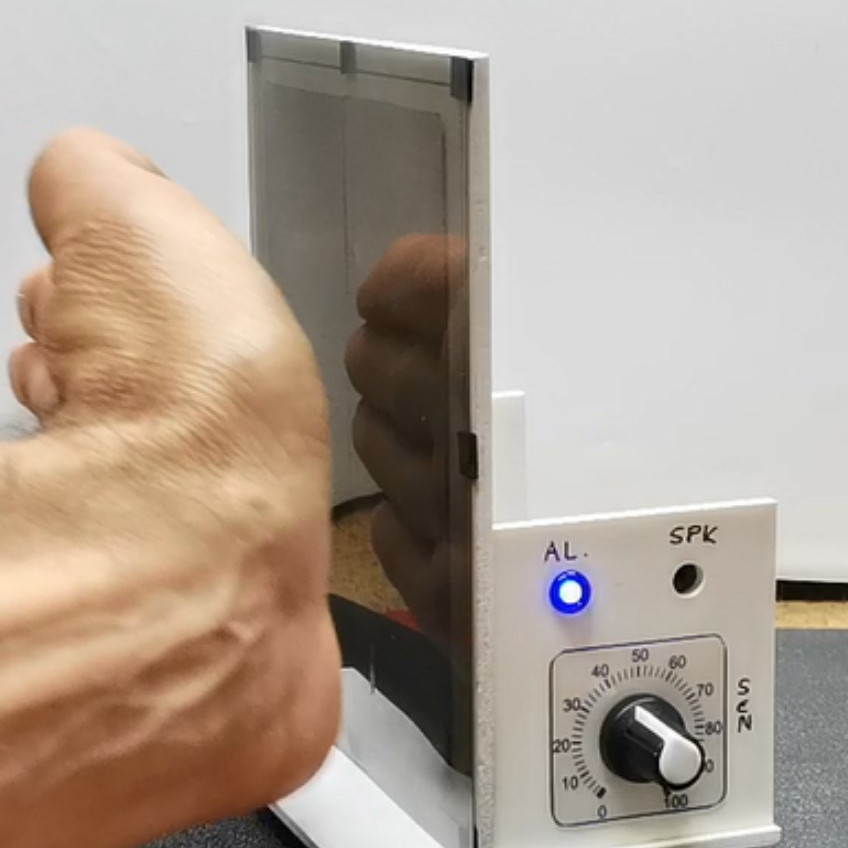
See that picture with the spiral-bound book? The 160 keys are underneath the book, and the user presses the pages to access the pressure pads beneath. The booklets had up to eight pages, each with 2,400 characters. The total number of potential symbols was just under 20,000.

The IPX keyboard is just the first of three interesting inputs described within this history. You owe it to yourself to devote time to reading this one.

Thanks to [juju] for sending this in!

ICYMI: One-Handed Keyboard Does It Without Chording

A pair of hands using a one-handed keyboard and a trackball mouse.
Image by [Dylan Turner] via Hackaday.IO
Usually when we talk about operating an entire keyboard with one hand and leaving the other free for mousing or holding a beer, chording — pressing multiple keys at once like on a piano — is very much on the table. Keyboards like the Infogrip BAT come to mind.

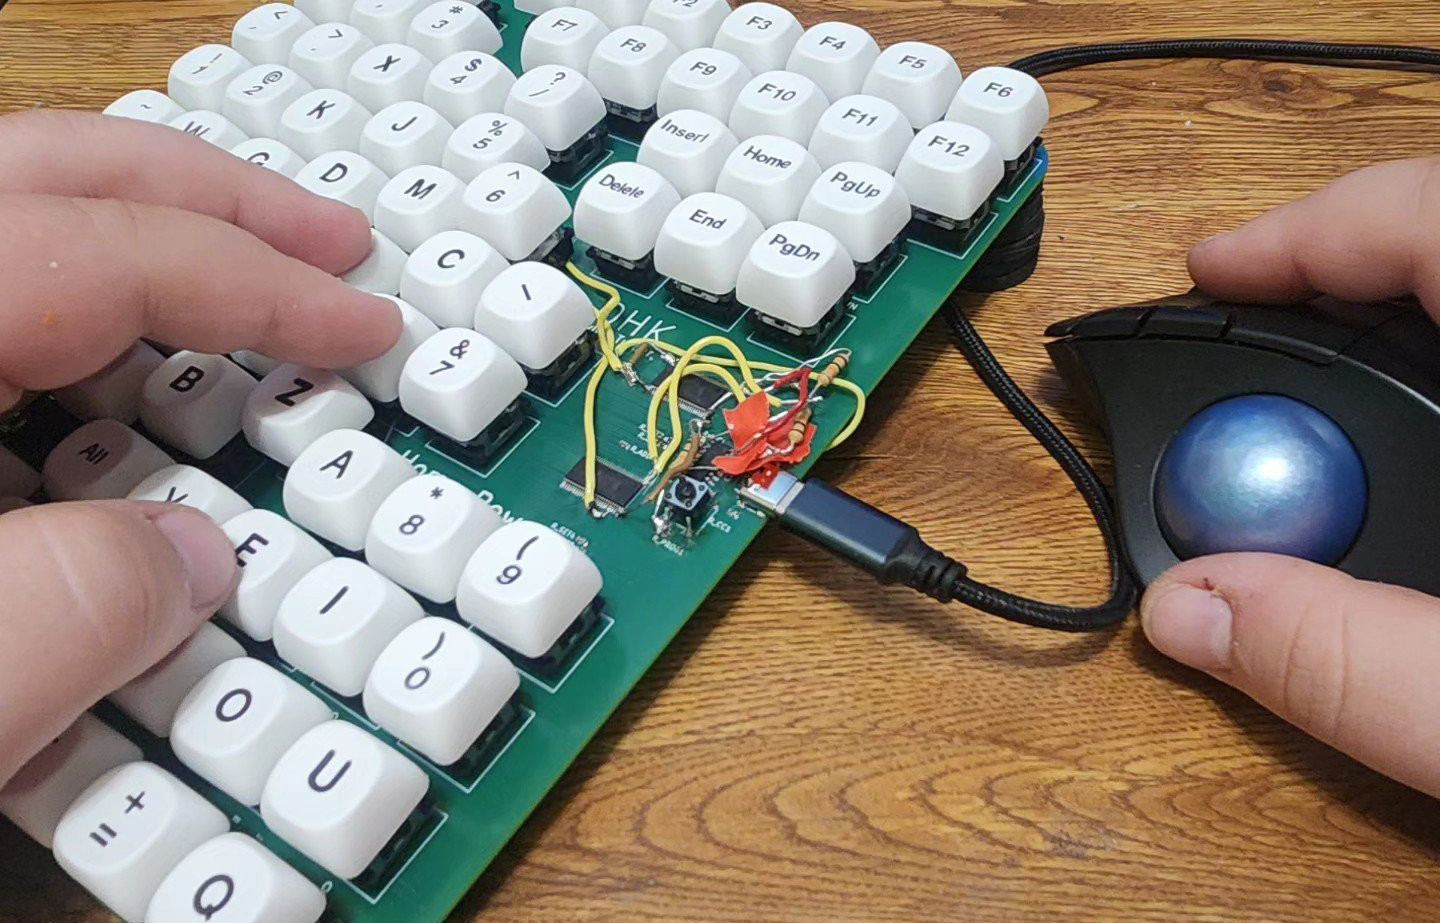
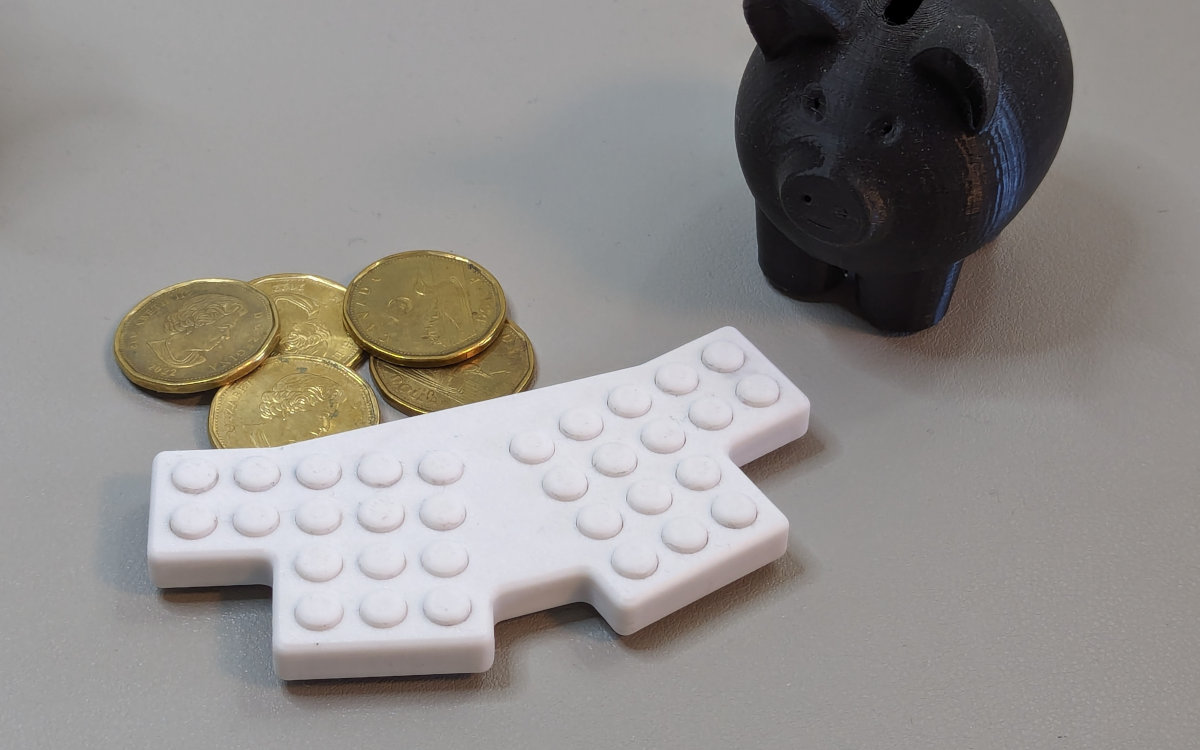
But that isn’t always the case. Take for example the one-handed PCD Maltron, which I think must have inspired [Dylan Turner]’s one-handed keyboard.

[Dylan]’s design puts 75 keys in close reach of one hand’s worth of fingers, and doesn’t let the thumb off easy like on a standard keyboard. All the Function keys are  there, and the arrow keys are in a familiar layout. There is even an Insert/Delete cluster. Everything is up on GitHub if you want to make your own.


Got a hot tip that has like, anything to do with keyboards? Help me out by sending in a link or two. Don’t want all the Hackaday scribes to see it? Feel free to email me directly.

Fork! Ladybird Browser and SerenityOS To Go Separate Ways

Por: Jenny List
2 Julio 2024 at 11:00

In the monthly Ladybird Browser update video which we’ve placed below, SerenityOS founder [Andreas Kling] announced an interesting development. The browser has been forked from the OS that has been its progenitor, and both projects will now proceed separately. This frees the browser from the SerenityOS insistence on avoiding external libraries, and allows it to take advantage of stable, fast, and mature open source alternatives. This is already paying dividends in compatibility and speed, and is likely to lead further towards a usable everyday browser as time goes by.

As the world of fully-featured web browser engines has contracted from a number of different projects to little more than Google’s Blink and Mozilla’s Gecko, Ladybird has found itself in an unexpected position. It is vital that the browser market retains some competition and does not become a Google monoculture, so while it might not seem so at first glance, the news of Ladybird going alone has the potential to be one of the most far-reaching open source stories of the year.

If you’d like to try Ladybird you’ll have to get your hands slightly dirty and build it yourself, but we’d expect ready-built versions to appear in due course. We took a look at an earlier version of Ladybird last year, as well as SerenityOS itself.

Meccano-based Hellschreiber Machine

2 Julio 2024 at 08:00

[ZXGuesser] has pulled off a true feat of Meccano engineering: building a Meccano Hellschreiber machine. The design is a close replica of the original Siemens Feld-Hell machine as documented here. What is Hellschreiber, you might ask? It’s a very neat method of sending written messages over the air by synchronizing a printing wheel on the receiving end with pulses generated on the transmitter. By quickly moving the print wheel up and down, arbitrary figures can be printed out. If you want to learn more about Hellschreiber, check out this excellent Hackaday post from almost a decade ago!

The Mastodon thread linked above goes into more detail about the difficulty in building this behemoth — and the slight regret of sticking with the authentic QWERTZ keyboard layout! In order to use the Hellschreiber mode, you have to keep up a steady rhythm of typing at about 2.5 characters per second, otherwise, the receiving end will see randomly spaced gaps between each letter. So while having to type at a steady speed [ZXGuesser] also had to work with a slightly different keyboard layout. Despite this difficulty, some very good quality output was generated!

Incredibly, the output looks just like the output from the original, century-old design. We think this is an absolutely incredible accomplishment, and we hope [ZXGuesser] doesn’t follow through on disassembling this amazing replica — or if they do, we hope it’s documented well enough for others to try their hand at it!

Thanks [BB] for the tip!

So Much Going On In So Few Components: Dissecting A Microwave Radar Module

Por: Jenny List
2 Julio 2024 at 05:00

In the days before integrated circuits became ubiquitous, providing advanced functionality in a single package, designers became adept at extracting the maximum use from discrete components. They’d use clever circuits in which a transistor or other active part would fulfill multiple roles at once, and often such circuits would need more than a little know-how to get working. It’s not often in 2024 that we encounter this style of circuit, but here’s [Maurycy] with a cheap microwave radar module doing just that.

On the board is an RF portion with a single transistor, some striplines, and an SOIC chip. Oddly this last part turns out to be an infra-red proximity sensor chip, so what’s going on? Careful analysis of the RF circuit reveals something clever. As expected, it’s a 3.18 GHz oscillator, but how is it functioning as both transmitter and receiver? The answer comes in the form of a resistor and capacitor in the emitter circuit, which causes the transistor to also oscillate at about 20 kHz. The result is that at different times in the 20 kHz period, the transistor is either off, fully oscillating at 3.18GHz and transmitting, or briefly in the not-quite-oscillating state between the two during which it functions as a super-regenerative receiver. This is enough for one device to effectively transmit and receive at the same time with the minimum of parts, there’s no need for a mixer diode as you might expect if it were it a direct conversion receiver. Perhaps in RF terms, it’s not particularly pretty, but we have to admit to being impressed by its simplicity. He goes on to perform a few experiments with the board as a transmitter or as a more conventional radar.

This isn’t the first such radar module we’ve looked at, here’s one designed from scratch. And we love regens, since they are so simple to build.

A DIY Proximity Sensor, Using Just Scrap Parts and Software

1 Julio 2024 at 23:00

[mircemk] shows how to create a simple non-contact proximity sensor using little more than an Arduino Nano board, and a convenient software library intended to measure the value of capacitors.

The prototype has a threshold set via potentiometer for convenience.

The basic idea is that it’s possible to measure a capacitor’s capacitance using two microcontroller pins and the right software, so by using a few materials to create an open-style capacitor, one can monitor it for changes and detect when anything approaches enough to alter its values past a given threshold, creating a proximity sensor.

The sensor shown here is essentially two plates mounted side-by-side, attached to an Arduino Nano using the Capacitor library which uses just two pins, one digital and one analog.

As configured, [mircemk]’s sensor measures roughly thirty picofarads, and that value decreases when approached by something with a dielectric constant that is different enough from the air surrounding the sensor. The sensor ignores wood and plastic, but an approaching hand is easily detected. The sensor also detects liquid water with similar ease, either in the form of pooled liquid, or filled bottles.

We’ve also seen a spring elegantly used as a hidden touch sensor that works through an enclosure’s wall by using similar principles, so the next time you need a proximity or touch-sensitive sensor in a project, reaching for the junk box might get you where you need to go. Watch [mircemk]’s sensor in action in the video, just below the page break.

Split A USB-C PD Port Into Three Port-ions

1 Julio 2024 at 20:00
The splitter with a 3D-printed case and three yellow cables coming out of it, powering two phones and one powerbank at the same time

There’s no shortage of USB-C chargers in all sorts of configurations, but sometimes, you simply need a few more charging ports on the go, and you got a single one. Well then, check out [bluepylons]’s USB-C splitter, which takes a single USB-C 5V/3A port and splits it into three 5V/1A plugs, wonderful for charging a good few devices on the go!

This adapter does things right – it actually checks that 3A is provided, with just a comparator, and uses that to switch power to the three outputs, correctly signalling to the consumer devices that they may consume about 1A from the plugs. This hack’s documentation is super considerate – you get detailed instructions on how to reproduce it, every nuance you might want to keep in mind, and even different case options depending on whether you want to pot the case or instead use a thermal pad for a specific component which might have to dissipate some heat during operation!

This hack has been documented with notable care for whoever might want to walk the journey of building one for themselves, so if you ever need a splitter, this one is a wonderful weekend project you are sure to complete. Wonder what kind of project would be a polar opposite, but in all the best ways? Why, this 2kW USB-PD PSU, most certainly.

AnteayerSalida Principal

An IBM M2 Keyboard Lives Again

Por: Jenny List
1 Julio 2024 at 11:00

There’s a mystique in old keyboard circles around the IBM Model M, the granddaddy of PC keyboards with those famous buckling spring key switches. The original Model M was a substantial affair with a sheet metal backplane that would probably serve well as a weapon in a zombie apocalypse and still allow writing a Hackaday piece afterward, but later on in the life of these ‘boards there was also a lighter version. The M2 as these models are dubbed has a few known problems, and [Anders Nielsen] scored one online that turned out to have dodgy capacitors. His video, below the break, takes us through the disassembly of his M2 and provides a relaxing tour of these not-quite-so-famous peripherals.

As you’d expect, three-decade-old plastic isn’t always in the best shape, so disassembly and unlatching all those little tabs has to be performed with care. The keys come off and the springs are on show, but we get a nasty shock when they all fall out of place as the top is removed. It appears the rookie mistake is to not turn the ‘board upside down before parting it. Replacing the caps is an easy process after all that, and we get a little dive into the 6805 processors used in model Ms.

If you have a model M of any description then you’re probably at home with the clack-clack-clack sound they make, but have you ever looked at its ancestor, the model F?

Almost Google Glass in 1993

1 Julio 2024 at 02:00

You might think Google Glass was an innovative idea, but [Allison Marsh] points out that artist [Lisa Krohn] imagined the Cyberdesk in 1993. Despite having desk in the name, the imagined prototype was really a wearable computer. Of course, in 1993, the technology wasn’t there to actually build it, but it does look like [Krohn] predicted headgear that would augment your experience.

Unlike Google Glass, the Cyberdesk was worn like a necklace. There are five disk-like parts that form a four-key keyboard and something akin to a trackpad. There were two models built, but since they were nonfunctional, they could have any imagined feature you might like. For example, the system was supposed to draw power from the sun and your body, something practical devices today don’t really do, either.

She also imagined a wrist-mounted computer with satellite navigation, a phone, and more. Then again, so did [Chester Gould] when he created Dick Tracy. The post also talks about a more modern reimagining of the Cyberdesk last year.

While this wasn’t a practical device, it is a great example of how people imagine the future. Sometimes, they miss the mark, but even then, speculative art and fiction can serve as goals for scientists and engineers who build the actual devices of the future.

We usually think about machines augmenting our intelligence and senses, but maybe we should consider more physical augmentation. We do appreciate seeing designs that are both artistic and functional.

An Open XBOX Modchip Enters The Scene

30 Junio 2024 at 20:00
Showing the modchip installed into a powered up Xbox, most of the board space taken up by a small Pi Pico board. A wire taps into the motherboard, and a blue LED on the modchip is lit up.

If you’ve ever bought a modchip that adds features to your game console, you might have noticed sanded-off IC markings, epoxy blobs, or just obscure chips with unknown source code. It’s ironic – these modchips are a shining example of hacking, and yet they don’t represent hacking culture one bit. Usually, they are more of a black box than the console they’re tapping into. This problem has plagued the original XBOX hacking community, having them rely on inconsistent suppliers of obscure boards that would regularly fall off the radar as each crucial part went to end of life. Now, a group of hackers have come up with a solution, and [Macho Nacho Productions] on YouTube tells us its story – it’s an open-source modchip with an open firmware, ModXO.

Like many modern modchips and adapters, ModXO is based on an RP2040, and it’s got a lot of potential – it already works for feeding a BIOS to your console, it’s quite easy to install, and it’s only going to get better. [Macho Nacho Productions] shows us the modchip install process in the video, tells us about the hackers involved, and gives us a sneak peek at the upcoming features, including, possibly, support for the Prometheos project that equips your Xbox with an entire service menu. Plus, with open-source firmware and hardware, you can add tons more flashy and useful stuff, like small LCD/OLED screens for status display and LED strips of all sorts!

If you’re looking to add a modchip to your OG XBOX, it looks like the proprietary options aren’t much worth considering anymore. XBOX hacking has a strong community behind it for historical reasons and has spawned entire projects like XBMC that outgrew the community. There’s even an amazing book about how its security got hacked. If you would like to read it, it’s free and worth your time. As for open-source modchips, they rule, and it’s not the first one we see [Macho Nacho Productions] tell us about – here’s an open GameCube modchip that shook the scene, also with a RP2040!

A Vintage AC Bridge Teardown

Por: Jenny List
30 Junio 2024 at 17:00

If you ever encounter a British engineer of a certain age, the chances are that even if they use a modern DMM they’ll have a big boxy multimeter in their possession. This is the famous Avo 8, in its day the analogue multimeter to have. Of course it wasn’t the only AVO product, and [Thomas Scherrer OZ2CPU] is here with another black box sporting an AVO logo. This one’s an AC bridge, one of a series of models manufactured from the 1930s through to the late 1940s, and he treats us to a teardown and restoration of it.

Most readers will probably be familiar with the operation of a DC Wheatstone Bridge in which two resistances can be compared, and an AC bridge is the same idea but using an AC source. A component under test is attached to one set of terminals while one with a known value is put on the other, and the device can then be adjusted for a minimum reading on its meter to achieve a state of balance. The amount by which it is adjusted can then be used as a measure of the difference between the two parts, and thus the value of an unknown part can be deduced.

In the case of this AVO the AC is the 50Hz (remembering that this is a British instrument) mains frequency, and the reading from the bridge is taken via a single tube amplifier to a rectifier circuit and the meter. Inside it’s a treasure trove of vintage parts with an electrolytic capacitor that looks as though it might not be original, with a selenium rectifier and a copper oxide signal diode in particular catching our eye. This last part is responsible for some reading anomalies, but after cleaning and lubricating all the switches and bringing up the voltage gently, he’s rewarded with a working bridge. You can see the whole story in the video below the break.

Test equipment from this era is huge, so perhaps not all of you have the space for something like this. Some of us have been known to own other AVO products though.

Root Your Sleep Number Smart Bed, Discover It Phoning Home

30 Junio 2024 at 14:00
A graphic representing the features of a Sleep Number smart bed, showing individually controlled heated zones

Did you know you can get a “smart bed” that tracks your sleep, breathing, heart rate, and even regulates the temperature of the mattress? No? Well, you can get root access to one, too, as [Dillan] shows, and if you’re lucky, find a phone-home backdoor-like connection. The backstory to this hack is pretty interesting, too!

You see, a Sleep Number bed requires a network connection for its smart features, with no local option offered. Not to worry — [Dillan] wrote a Homebridge plugin that’d talk the cloud API, so you could at least meaningfully work with the bed data. However, the plugin got popular, Sleep Number didn’t expect the API to be that popular. When they discovered the plugin, they asked that it be shut down. Tech-inclined customers are not to be discouraged, of course.

Taking a closer look at the hardware, [Dillan] found a UART connection and dumped the flash, then wrote an extensive tutorial on how to tap into your bed’s controller, which runs Linux, and add a service you can use locally to query bed data and control the bed – just like it should have been from the beginning. Aside from that, he’s found a way to connect this hub to a network without using Sleep Number’s tools, enabling fully featured third-party use – something that the company doesn’t seem to like. Another thing he’s found is a reverse SSH tunnel back into the Sleep Number network.

Now, it can be reasonable to have a phone-home tunnel, but that doesn’t mean you want it in your personal network, and it does expose a threat surface that might be exploited in the future, which is why you might want to know about it. Perhaps you’d like to use Bluetooth instead of WiFi. Having this local option is good for several reasons. For example, having your smart devices rely on the manufacturer’s server is a practice that regularly results in perma-bricked smart devices, though we’ve been seeing some examples of dedicated hackers bringing devices back to life. Thanks to this hack, once Sleep Number shutters, is bought out, or just wants to move on, their customers won’t be left with a suddenly dumbed-down bed they can no longer control.

[Header image courtesy of Sleep Number]

3D Printing with a Twist

30 Junio 2024 at 11:00

When we think about sending an STL off on the Internet for processing, we usually want someone to print it for us or we want mesh repair. But [Chuck] found an interesting project on GitHub from [Andrew Sink] that will let you add a variable amount of twist to any STL and then return it to you for printing or whatever else you use STLs for. If you don’t get what we mean, check out the video below.

The site that does the work initially loads a little gnome figure if you are too lazy to upload your own model. That’s perfect, though, because the little guy is a good example of why you might want to twist a model. With just a little work, you can make the gnome look in one direction or even look behind him.

[Chuck] shows how to use the tool for artistic effect by twisting his standard cube logo. The result is something that looks like it would be difficult to create, but could hardly be easier. The tool lets you rotate the object, too, so you can get the twist effect in the right orientation for what you want to accomplish. A great little tool for making more artistic 3D prints without learning new software. If you want some fun, you can try the version that uses sound from your microphone to control the twist.

If you’d rather twist in CAD, we can help. If you really want artsy 3D printing, you probably need to learn Blender.

Try Out MCUs With This Jumperable TSSOP20 Adapter

30 Junio 2024 at 05:00
Two of these boards next to each other, one showing the front, assembled, side with the MCU and supporting components soldered on, and the other showing the back, patch panel, side, with wires connecting the MCU pads to testpoints leading to the supporting components

There are so many new cool MCUs coming out, and you want to play with all of them, but, initially, they tend to be accessible as bare chips. Devboards might be hard to get, not expose everything, or carry a premium price. [Willmore] has faced this problem with an assortment of new WCH-made MCUs, and brings us all a solution – a universal board for TSSOP20-packaged MCUs, breadboard-friendly and adaptable to any pinout with only a few jumpers on the underside.

The board brings you everything you might want from a typical MCU breakout – an onboard 3.3V regulator, USB series resistors, a 1.5K pullup, decoupling capacitors, and a USB-C port. All GPIOs are broken out, and there’s a separate header you can wire up for all your SWD/UART/USB/whatever needs – just use the “patch panel” on the bottom of the board and pick the test points you want to join. [Willmore] has used these boards for the CH32Vxxx family, and they could, no doubt, be used for more – solder your MCU on, go through the pin table in the datasheet, do a little point-to-point wiring, and you get a pretty functional development board.

Everything is open-source – order a few of these boards from your fab of choice, and you won’t ever worry about a breakout for a TSSOP20 MCU or anything that would fit the same footprint. It could even be used in a pinch for something like an I2C GPIO expander. This is also a technique worth keeping in mind – a step above the generic footprint breakouts. Looking for more universal breakouts to keep? Here’s one for generic LCD/OLED panel breakouts.

Apple May Use Electrical Debonding For Battery Replacement

Por: Maya Posch
30 Junio 2024 at 02:00

As a result of the European Union’s push for greater repairability of consumer devices like smartphones, Apple sees itself forced to make the batteries in the iPhone user-replaceable by 2027. Reportedly, this has led Apple to look at using electroadhesion rather than conventional adhesives which require either heat, isopropyl alcohol, violence, or all of the above to release. Although details are scarce, it seems that the general idea would be that the battery is wrapped in metal, which, together with the inside of the metal case, would allow for the creation of a cationic/anionic pair capable of permanent adhesion with the application of a low-voltage DC current.

This is not an entirely wild idea. Tesa has already commercialized it in the electrical debonding form of its Debonding on Demand product. This uses a tape that’s applied to one side of the (metal) surfaces, with a 5 bar pressure being applied for 5 seconds. Afterwards, the two parts can be released again without residue as shown in the above image. This involves applying a 12V DC voltage for 60 seconds, with the two parts afterward removable without force.

Tesa markets this right alongside the pull tab adhesive strips which are currently all the rage in smartphones, with the opinions on pull strips during battery replacement strongly divided. A bottle of IPA is always good to have nearby when a pull tab inevitably snaps off and you have to pry the battery loose. In that regard electroadhesion for debonding would make life significantly easier since the times when batteries were not a structural part of smartphones are unlikely to return no matter how much we might miss them.

We covered electroadhesion previously, as you can make just about anything stick to anything, including biological tissues to graphite and metal, with potentially interesting applications in robotics and medicine.

Go Forth With This Portable Programmer

29 Junio 2024 at 23:00

When choosing a low-level language, it’s hard to beat the efficiency of Forth while also maintaining some amount of readability. There are open source options for the language which makes it accessible, and it maintains its prevalence in astronomical and other embedded systems for its direct hardware control and streamlined use of limited resources even though the language started over 50 years ago. Unlike 50 years ago, though, you can now take your own self-contained Forth programmer on the go with you.

The small computer is built on a design that [Dennis] built a while back called my4TH which has its own dedicated 8-bit CPU and can store data in a 256 kB EEPROM chip. Everything else needed for the computer is built in as well but that original design didn’t include a few features that this one adds, most notably a small 40×4 character LCD and a keyboard. The build also adds a case to tie everything together, with ports on the back for I2C and power plus an RS232 port. An optional battery circuit lets the computer power up without an external power supply as well.

Part of the appeal of Forth for systems like this is that it includes an interpreter and compiler in addition to the programming language itself, meaning that it has everything needed for a usable computer system built right in. For some more details on this unique language, or if you’d like to explore below the world of Python or C, check out [Elliot]’s discussion on the “hacker’s language.”. While Forth can tackle big problems, it can fit on tiny machines, too.

Building a Hydraulic System With 3D Printed SLA Resin Parts

Por: Maya Posch
29 Junio 2024 at 20:00
Showing off the 3D-printed hydraulics system. (Credit: Indeterminate Design, YouTube)

Hydraulics are incredibly versatile, but due to the pressures at which they operate, they are also rather expensive and not very DIY-friendly. This isn’t to say that you cannot take a fair shot at a halfway usable 3D-printed set of hydraulics, as [Indeterminate Design] demonstrates in a recent video. Although not 100% 3D-printed, it does give a good idea of how far you can push plastic-based additive manufacturing in this field.

Most interesting is the integration of the gear pump, 4-way selector valve, and relief valve into a single structure, which was printed with a resin printer (via the JLC3DP 3D print service). After bolting on the (also 3D printed) clear reservoir and assembling the rest of the structure including the MR63 ball bearings, relief spring valve, and pneumatic fittings it was ready to be tested. The (unloaded) gear pump could pump about 0.32 L/minute, demonstrating its basic functionality.

For the hydraulic cylinder, mostly non-3D printed parts were used, with a brass cylinder forming the main body. During these initial tests, plain water was used, followed by CHF11 hydraulic oil, with a pressure of about 1.3 bar (19 PSI) calculated afterward. This fairly low pressure is suspected to be caused by leaky seals (including the busted shaft seal), but as a basic proof of concept, it provides an interesting foundation for improvements.

Want a primer on hydraulics? We got you. MIT likes 3D printing with hydraulics, too (dead link, but the underlying paper link is still good).

Long-Term OctoPrint Stat Manipulation Uncovered

Por: Tom Nardi
29 Junio 2024 at 11:00

Developing free and open source software can be a thankless experience. Most folks do it because it’s something they’re passionate about, with the only personal benefit being the knowledge that there are individuals out there who found your work useful enough to download and install. So imagine how you’d feel if it turns out somebody was playing around with the figures, and the steady growth in the number of installs you thought your software had turned out to be fake.

That’s what happened just a few days ago to OctoPrint developer [Gina Häußge]. Although there’s no question that her software for remotely controlling and monitoring 3D printers is immensely popular within the community, the fact remains that the numbers she’s been using to help quantify that popularity have been tampered with by an outside party. She’s pissed, and has every right to be.

[Gina] discovered this manipulation on June 26th after taking a look at the publicly available usage stats on data.octoprint.org. She noticed that an unusually high number of instances appeared to be running an old OctoPrint release, and upon closer inspection, realized what she was actually seeing was a stream of bogus data that was designed to trick the stat counter. Rolling back the data, she was able to find out this spam campaign has been going on since late 2022. Tens of thousands of the users she thought she’d gained over the last two years were in fact nothing more than garbage spit out by some bot. But why?

Here’s where it gets interesting. Looking at the data being reported by these fake OctoPrint instances, [Gina] could tell the vast majority of them claimed to be running a specific plugin: OctoEverywhere. The perpetrators were clever enough to sprinkle in a random collection of other popular plugins along with it, but this specific plugin was the one most of them had in common. Sure enough this pushed OctoEverywhere to the top of the charts, making it seem like it was the most popular plugin in the community repository.

So what do the developers of OctoEverywhere have to say for themselves? In a statement that [Gina] posted on the OctoPrint blog, they claim they were able to determine a member of the community had performed the stat manipulation of their own accord, but as of this writing are unwilling to release this individual’s identity. A similar statement now appears on the OctoEverywhere website.

On June 27th, Gina Häußge, the developer behind OctoPrint, informed us of an incident involving the OctoPrint usage stats. Gina had observed that the stats were being manipulated to boost OctoEverywhere’s rankings.

We took the report very seriously and quickly started an investigation. Using private community channels, we determined a community member was responsible for manipulating the OctoPrint stats. We had a private conversation with the individual, who didn’t realize the impact they were having but apologized and promised never to do it again.

From a journalistic perspective, it would be inappropriate for us to leap to any conclusions based on the currently available information. But we will say this…we’ve heard more convincing stories on a kindergarten playground. Even if we take the statement at face value, the fact that they were able to figure out who was doing this within 48 hours of being notified would seem to indicate this person wasn’t exactly a stranger to the team.

In any event, the bogus data has now been purged from the system, and the plugin popularity charts are once again showing accurate numbers. [Gina] also says some safeguards have been put into place to help prevent this sort of tampering from happening again. As for OctoEverywhere, it slid back to its rightful place as the 6th most popular plugin, a fact that frankly makes the whole thing even more infuriating — you’d think legitimately being in the top 10 would have been enough.

On Mastodon, [Gina] expressed her disappointment in being fooled into thinking OctoPrint was growing faster than it really was, which we certainly get. But even so, OctoPrint is a wildly popular piece of software that has become the cornerstone of a vibrant community. There’s no question that her work has had a incredible impact on the world of desktop 3D printing, and while this turn of events is frustrating, it will ultimately be little more than a footnote in what is sure to be a lasting legacy.

Hosting Your Own PixMob Party Made Easy

Por: Tom Nardi
29 Junio 2024 at 05:00

Over the last few years, it’s been increasingly common for concertgoers to be handed a light-up bracelet from PixMob that synchronizes with the others in the crowd to turn the entire audience into a music visualizer. They’re a clever way of enhancing the concert experience, but unfortunately, they don’t do anything once you leave the show. Or at least, that used to be the case.

We’ve seen efforts to reverse engineer the IR (and occasionally radio) signals that drive these PixMob devices, but since we checked in last it seems like things have gotten a lot easier for the home gamer. [David Pride] has recently posted a brief write-up that shows how quickly and easily it is to get these devices fired up using nothing more exotic than an Arduino, an IR LED, and an audio sensor module.

With the audio sensor module connected to the Arduino’s digital input and the IR LED wired to digital out, all you need to do is flash firmware to the board and start playing some beats. The source code [David] has provided is a a remixed version of what’s previously been published by [Carlos Ganoza], which, in this case, has been tweaked to make the lighting patterns less random.

Presumably, this is to make the devices behave more like they do during an actual concert, but since nobody at Hackaday is cool enough to have seen a live musical performance in the last decade, we’re not really sure. All we can say is that the effect looks pretty sweet in the demo video.

Back in 2019, we saw a teardown of an early PixMob device, and by 2022, the efforts to reverse engineer their IR control protocol were well underway. We’re glad to see things have progressed to the point that you can piece together a transmitter from what’s in the parts bin, as it means at least some of these devices will have a lifespan longer than a single concert.

8MM Digitization For Anyone

Por: Jenny List
29 Junio 2024 at 02:00

There’s a pleasing retro analogue experience to shooting Super 8 film, giving as it does the feel of a 1970s home movie to your work. But once you’ve had the film developed, there’s a need for a projector to enjoy the result. Far better to digitize it for a more modern viewing and editing experience. [Elbert] has made a digitizer for 8mm film which takes the best approach, snapping each frame individually to be joined together in a video file as a whole.

The frame of the device is 3D printed, but some parts of a film transport must be higher quality than a printed part can deliver. These, in particular the sprockets, are salvaged from a film viewer, and the movement is powered by a set of stepper motors. The steppers are controlled by an ESP32, and the optics are provided by a USB microscope. All this is hooked up to a PC which grabs each image, and finally stitches them all together using ffmpeg.

As anyone who has dabbled in 8mm film will tell you, there is a lot in the quality of a film digitizer, and it’s often worth paying for a professional job from someone aimed at the film-making world rather than you local photographic print booth. It would be interesting to take a look at this device, and see whether its quality is worth pursuing. After all, some of us have been known to dabble in 8mm film.

❌
❌