Artificial intelligence (AI) seems to be doing everything these days. Making images, making videos, and replacing most of us real human writers if you believe the hype. Maybe it’s all over! And yet, we persist, to write about yet another job taken over by AI: creating video games.
The research paper is entitled “Video Game Generation: A Practical Study using Mario.” The basic idea is whether a generative AI model can create an interactive video game by first training it on an existing game.
MarioVGG, as it is called, is a “text-to-video model.” It hasn’t built the Mario game that you’re familiar with, though. It takes player commands as text inputs—such as “run, or “jump”—and then outputs video frames showing the result in the ‘game.’ The model was trained on a dataset of frame-by-frame Super Mario Brothers game play, combined with data on user inputs at the time. The model shows an ability to generate believable video output for given player inputs, including basic game physics, item interactions, and collisions. It’s able to do this in a chained way, so that it can reasonably simulate a player making multiple actions and moving through a level of the game.
It’s not like playing a real Mario game yet, by any means. Regardless, the AI model has shown an ability to replicate the world of the game in a way that behaves relatively consistently with its established rules. If you’re in the field of video game development, though, you probably don’t have a lot to worry about just yet—you probably moved past making basic Mario clones years ago, so you’ve got quite an edge for now!
Ah, tiles. You can get square ones, and do a grid, or you can get fancier shapes and do something altogether more complex. By and large though, whatever pattern you choose, it will normally end up repeating on some scale or other. That is, unless you go with something like a Penrose Wave Tile. Discovered by mathematician Roger Penrose, they never exactly repeat, no matter how you lay them out.
[carterhoefling14] decided to try and create Penrose tiles at home—with a 3D printer being the perfect route to do it. Creating the tiles was simple—the first step was to find a Penrose pattern image online, which could then be used as the basis to design the 3D part in Fusion 360. From there, the parts were also given an inner wave structure to add further visual interest. The tiles were then printed to create a real-world Penrose tile form.
You could certainly use these Penrose tiles as decor, though we’d make some recommendations if you’re going that path. For one, you’ll want to print them in a way that optimizes for surface quality, as post-processing is time consuming and laborious. If you’re printing in plastic, probably don’t bother using these as floor tiles, as they won’t hold up. Wall tiles, though? Go nuts, just not as a splashback or anything. Keep it decorative only.
As is so often the way, the build relies on tiny WS2812B-compatible LEDs in a 1 mm x 1 mm form factor. They’re mounted on a series of teeny interlocking PCBs that come together to build a cube that’s just 8 cubic centimeters in volume. Power is courtesy of a small lithium-ion cell that lives inside the cube. Data and power signals flow around the cube via solder connections along the edges of the faces of the cube. Running the show is an ATmega328P, the same microcontroller you’d find in an Arduino Uno. It’s responsible for sending out commands to the LEDs to create various animations.
We can’t speak to [Chris’s] claim about being the world’s smallest, but it is small. We’ve seen other builds in a similar vein, like this barely-larger D20 with a full 2400 LEDs, though. Video after the break.
The build is based around the STM32L4P5—far from the hottest chip in the world. Depending on the exact part you pick, it offers 512 KB or 1 Mbyte of flash memory, 320 KB of SRAM, and runs at 120 MHz. Not bad, but not stellar.
Still, [Gabriel] was able to push 1080p at a sort of half resolution. Basically, the chip is generating a 1080p widescreen RGB VGA signal. However, to get around the limited RAM of the chip, [Gabriel] had to implement a hack—basically, every pixel is RAM rendered as 2×2 pixels to make up the full-sized display. At this stage, true 1080p looks achievable, but it’ll be a further challenge to properly fit it into memory.
Output hardware is minimal. One pin puts out the HSYNC signal, another handles VSYNC. The same pixel data is clocked out over R, G, and B signals, making all the pixels either white or black. Clocking out the data is handled by a nifty combination of the onboard DMA functionality and the OCTOSPI hardware. This enables the chip to hit the necessary data rate to generate such a high-resolution display.
Static electricity often just seems like an everyday annoyance when a wool sweater crackles as you pull it off, or when a doorknob delivers an unexpected zap. Regardless, the phenomenon is much more fascinating and complex than these simple examples suggest. In fact, static electricity is direct observable evidence of the actions of subatomic particles and the charges they carry.
While zaps from a fuzzy carpet or playground slide are funny, humanity has learned how to harness this naturally occurring force in far more deliberate and intriguing ways. In this article, we’ll dive into some of the most iconic machines that generate static electricity and explore how they work.
What Is It?
Before we look at the fancy science gear, we should actually define what we’re talking about here. In simple terms, static electricity is the result of an imbalance of electric charges within or on the surface of a material. While positively-charged protons tend to stay put, electrons, with their negative charges, can move between materials when they come into contact or rub against one another. When one material gains electrons and becomes negatively charged, and another loses electrons and becomes positively charged, a static electric field is created. The most visible result of this is when those charges are released—often in the form of a sudden spark.
Since it forms so easily on common materials, humans have been aware of static electricity for quite some time. One of the earliest recorded studies of the phenomenon came from the ancient Greeks. Around 1000 BC, they noticed that rubbing amber with fur would then allow it to attract small objects like feathers. Little came of this discovery, which was ascribed as a curious property of amber itself. Fast forward to the 17th century, though, and scientists were creating the first machines designed to intentionally store or generate static electricity. These devices helped shape our understanding of electricity and paved the way for the advanced electrical technologies we use today. Let’s explore a few key examples of these machines, each of which demonstrates a different approach to building and manipulating static charge.
The Leyden Jar
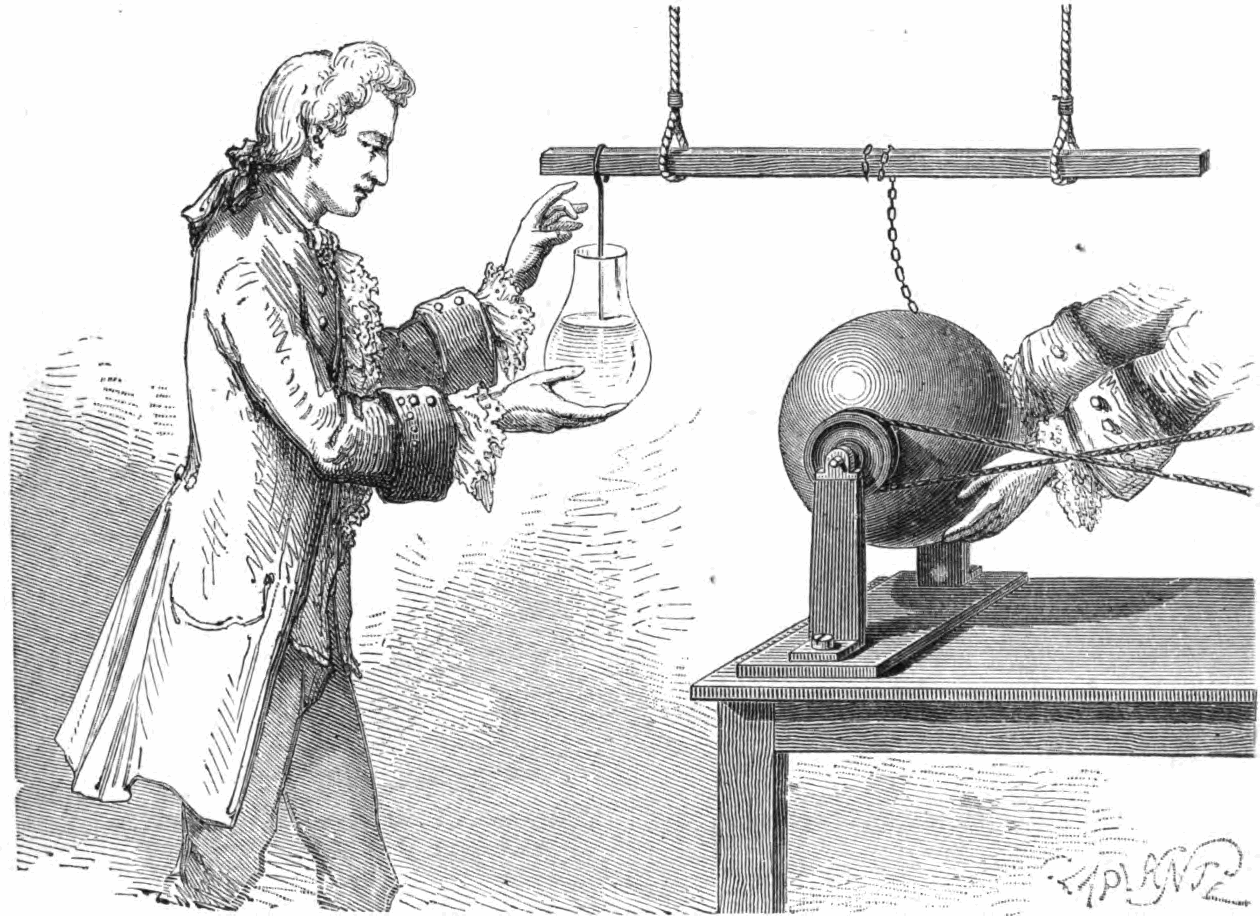
An 1886 drawing of Andreas Cunaeus experimenting with his apparatus. In this case, his hand is helping to store the charge. Credit: public domain
Though not exactly a machine for generating static electricity, the Leyden jar is a critical part of early electrostatic experiments. Effectively a static electricity storage device, it was independently discovered twice, first by a German named Ewald Georg von Kleist in 1745. However, it gained its common name when it was discovered by Pieter van Musschenbroek, a Dutch physicist, sometime between 1745 and 1746. The earliest versions were very simple, consisting of water in a glass jar that was charged with static electricity conducted to it via a metal rod. The experimenter’s hand holding the jar served as one plate of what was a rudimentary capacitor, the water being the other. The Leyden jar thus stored static electricity in the water and the experimenter’s hand.
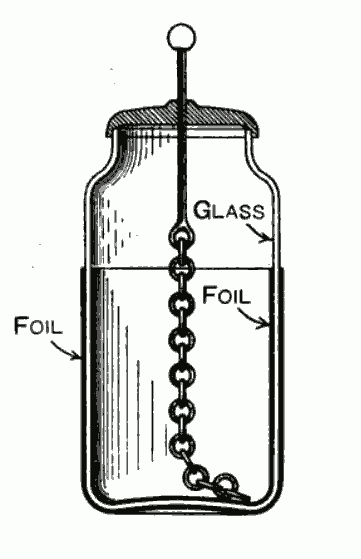
Eventually the common design became a glass jar with layers of metal foil both inside and outside, separated by the glass. Early experimenters would charge the jar using electrostatic generators, and then discharge it with a dramatic spark.
The Leyden jar is one of the first devices that allowed humans to store and release static electricity on command. It demonstrated that static charge could be accumulated and held for later use, which was a critical step in understanding the principles that would lead to modern capacitors. The Leyden jar can still be used in demonstrations of electrostatic phenomena and continues to serve as a fascinating link to the history of electrical science.
The Van de Graaff Generator
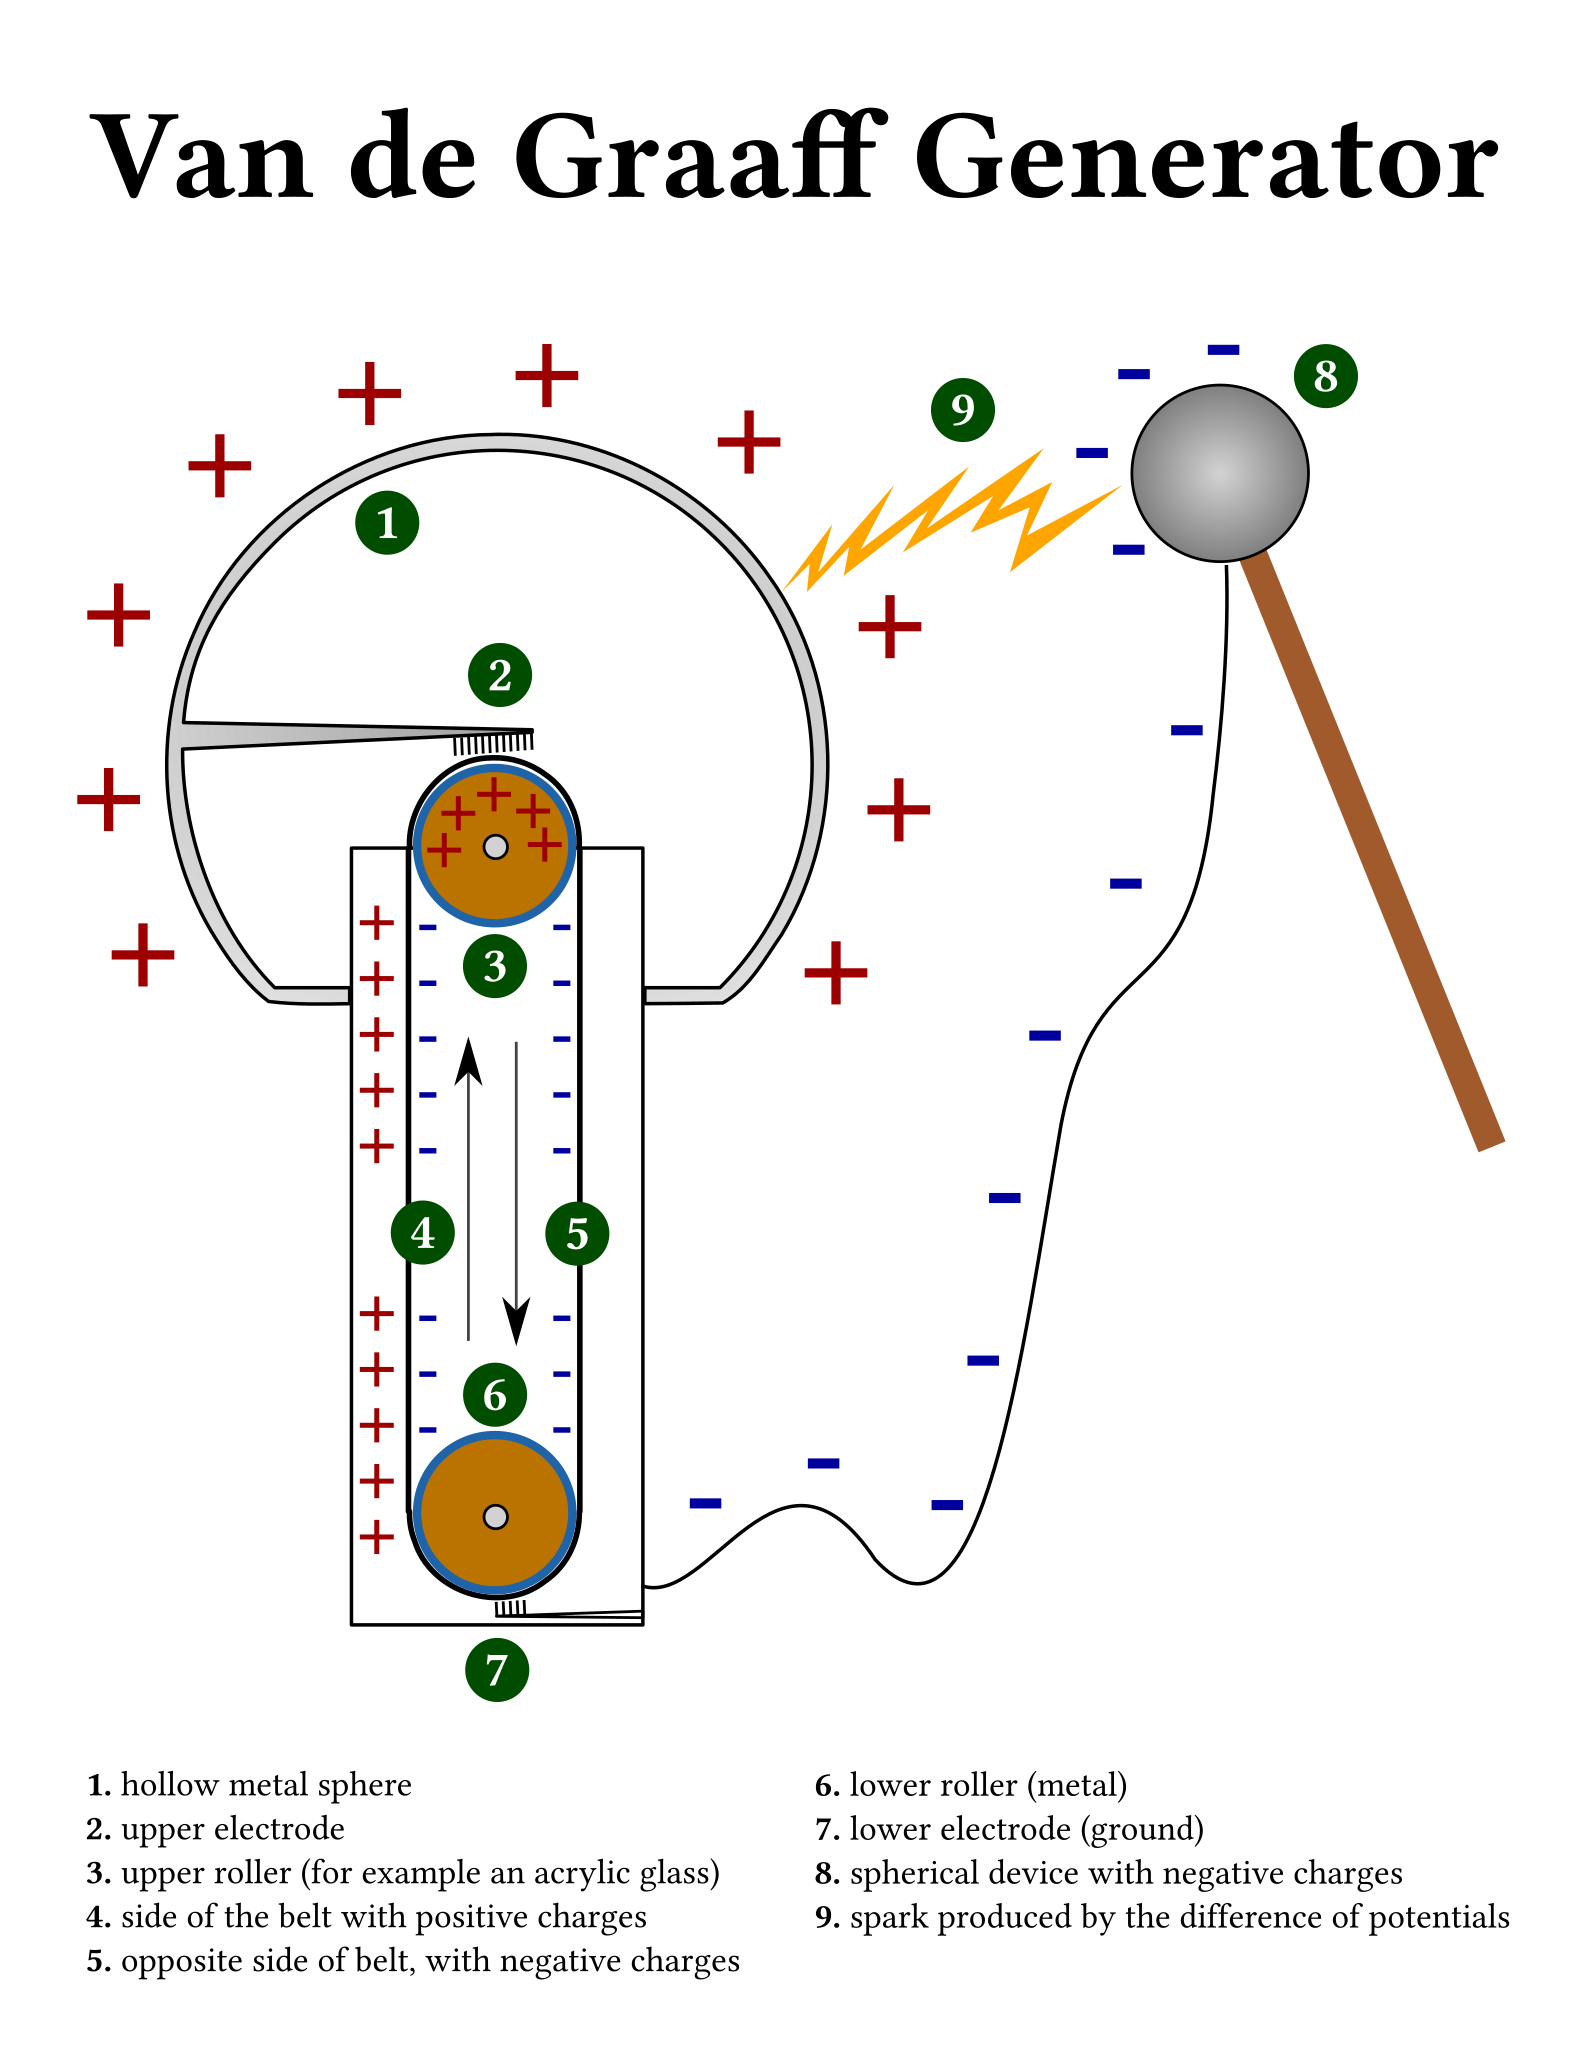
A Van de Graaff generator can be configured to run in either polarity, depending on the materials chosen and how it is set up. Here, we see the generator being used to feed negative charges into an attached spherical conductor. Credit: Omphalosskeptic, CC BY-SA 3.0
Perhaps the most iconic machine associated with generating static electricity is the Van de Graaff generator. Developed in the 1920s by American physicist Robert J. Van de Graaff, this machine became a staple of science classrooms and physics demonstrations worldwide. The device is instantly recognizable thanks to its large, polished metal sphere that often causes hair to stand on end when a person touches it.
The Van de Graaff generator works by transferring electrons through mechanical movement. It uses a motor-driven belt made of insulating material, like rubber or nylon, which runs between two rollers. At the bottom roller, plastic in this example, a comb or brush (called the lower electrode) is placed very close to the belt. As the belt moves, electrons are transferred from the lower roller onto the belt due to friction in what is known as the triboelectric effect. This leaves the lower roller positively charged and the belt carrying excess electrons, giving it a negative charge. The electric field surrounding the positively charged roller tends to ionize the surrounding air and attracts more negative charges from the lower electrode.
As the belt moves upward, it carries these electrons to the top of the generator, where another comb or brush (the upper electrode) is positioned near the large metal sphere. The upper roller is usually metal in these cases, which stays neutral rather than becoming intensely charged like the bottom roller. The upper electrode pulls the electrons off the belt, and they are transferred to the surface of the metal sphere. Because the metal sphere is insulated and not connected to anything that can allow the electrons to escape, the negative charge on the sphere keeps building up to very high voltages, often in the range of hundreds of thousands of volts. Alternatively, the whole thing can be reversed in polarity by changing the belt or roller materials, or by using a high voltage power supply to charge the belt instead of the triboelectric effect.
The result is a machine capable of producing massive static charges and dramatic sparks. In addition to its use as a demonstration tool, Van de Graaff generators have applications in particle physics. Since they can generate incredibly high voltages, they were once used to accelerate particles to high speeds for physics experiments. These days, though, our particle accelerators are altogether more complex.
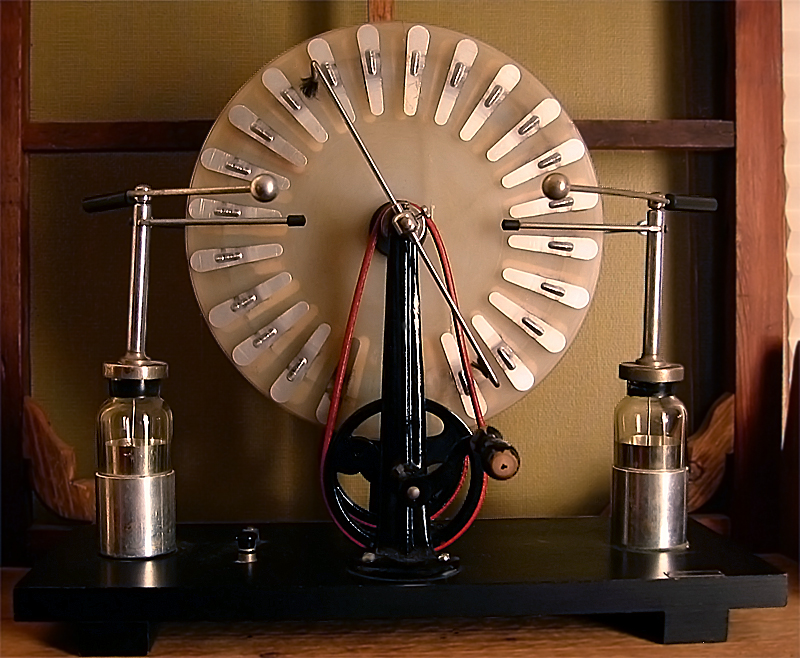
The Whimsical Wimshurst Machine
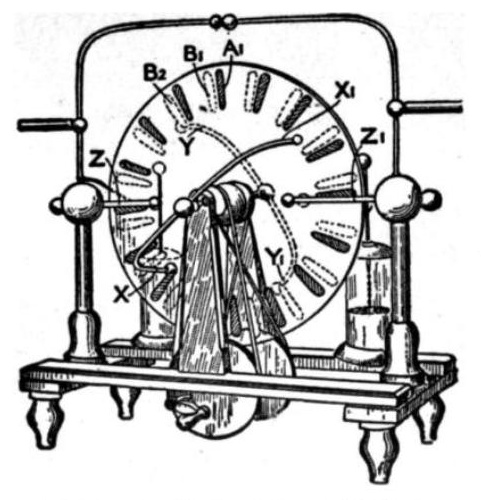
Two disks with metal sectors spin in opposite directions upon turning the hand crank. A small initial charge is able to induce charge in other sectors as the machine is turned. Credit: public domain
Another fascinating machine for generating static electricity is the Wimshurst machine, invented in the late 19th century by British engineer James Wimshurst. While less famous than the Van de Graaff generator, the Wimshurst machine is equally impressive in its operation and design.
The key functional parts of the machine are the two large, circular disks made of insulating material—originally glass, but plastic works too. These disks are mounted on a shared axle, but they rotate in opposite directions when the hand crank is turned. The surfaces of the disks have small metal sectors—typically aluminum or brass—which play a key role in generating static charge. As the disks rotate, brushes made of fine metal wire or other conductive material lightly touch their surfaces near the outer edges. These brushes don’t generate the initial charge but help to collect and amplify it once it is present.
The key to the Wimshurst machine’s operation lies in a process called electrostatic induction, which is essentially the influence that a charged object can exert on nearby objects, even without touching them. At any given moment, one small area of the rotating disk may randomly pick up a small amount of charge from the surrounding air or by friction. This tiny initial charge is enough to start the process. As this charged area on the disk moves past the metal brushes, it induces an opposite charge in the metal sectors on the other disk, which is rotating in the opposite direction.
For example, if a positively charged area on one disk passes by a brush, it will induce a negative charge on the metal sectors of the opposite disk at the same position. These newly induced charges are then collected by a pair of metal combs located above and below the disks. The combs are typically connected to Leyden jars to store the charge, until the voltage builds up high enough to jump a spark over a gap between two terminals.
It is common to pair a Wimshurst machine with Leyden jars to store the generated charge. Credit: public domain
The Wimshurst machine doesn’t create static electricity out of nothing; rather, it amplifies small random charges through the process of electrostatic induction as the disks rotate. As the charge is collected by brushes and combs, it builds up on the machine’s terminals, resulting in a high-voltage output that can produce dramatic sparks. This self-amplifying loop is what makes the Wimshurst machine so effective at generating static electricity.
The Wimshurst machine is seen largely as a curio today, but it did have genuine scientific applications back in the day. Beyond simply using it to investigate static electricity, its output could be discharged into Crookes tubes to create X-rays in a very rudimentary way.
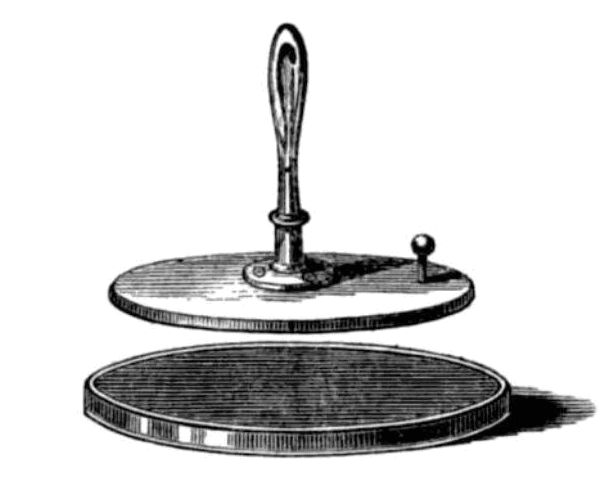
The Electrophorus: Simple Yet Ingenious
One of the simplest machines for working with static electricity is the electrophorus, a device that dates back to 1762. Invented by Swedish scientist Johan Carl Wilcke, the electrophorus consists of two key parts: a flat dielectric plate and a metal disk with an insulating handle. The dielectric plate was originally made of resinous material, but plastic works too. Meanwhile, the metal disk is naturally conductive.
An electrophorus device, showing the top metal disk, and the bottom dielectric material, at times referred to as the “cake.” The lower dielectric was classically charged by rubbing with fur. Credit: public domain
To generate static electricity with the electrophorus, the dielectric plate is first rubbed with a cloth to create a static charge through friction. This is another example of the triboelectric effect, as also used in the Van de Graaff generator. Once the plate is charged, the metal disk is placed on top of it. The disc then becomes charged by induction. It’s much the same principle as the Wimshurst machine, with the electrostatic field of the dielectric plate pushing around the charges in the metal plate until it too has a distinct charge.
For example, if the dielectric plate has been given a negative charge by rubbing, it will repel negative charges in the metal plate to the opposite side, giving the near surface a positive charge, and the opposite surface a negative charge. The net charge, though, remains neutral. But, if the metal disk is then grounded—for example, by briefly touching it with a finger—the negative charge on the disk can drained away, leaving it positively charged as a whole. This process does not deplete the charge on the dielectric, so it can be used to charge the metal disk multiple times, though the dielectric’s charge will slowly leak away in time.
Though it’s simple in design, the electrophorus remains a remarkable demonstration of static electricity generation and was widely used in early electrostatic experiments. A particularly well-known example is that of Georg Lichtenberg. He used a version a full two meters in diameter to create large discharges for his famous Lichtenberg figures. Overall, it’s an excellent tool for teaching the basic principles of electrostatics and charge separation—particularly given how simple it is in construction compared to some of the above machines.
Zap
Static electricity, once a mysterious and elusive force, has long since been tamed and turned into a valuable tool for scientific inquiry and education. Humans have developed numerous machines to generate, manipulate, and study static electricity—these are just some of the stars of the field. Each of these devices played an important role in furthering humanity’s understanding of electrostatics, and to a degree, physics in general.
Today, these machines continue to serve as educational tools and historical curiosities, offering a glimpse into the early days of electrical science—and they still spark fascination on the regular, quite literally. Static electricity may be an everyday phenomenon, but the machines that harness its power are still captivating today. Just go to any local science museum for the proof!
Sometimes there’s nothing more rewarding than pulling apart an old piece of hardware of mysterious origin. [saveitforparts] does just that, and recently came across a curious satellite system from a surplus store. What else could he do, other than tear it down and try to get it humming?
The device appeared to be satellite communication device for a tracking unit of some sort, complete with a long, thick proprietary cable. That led to a junction box with a serial port and an RJ45 port, along with some other interfaces. Disassembly of the unit revealed it contained a great deal of smarts onboard, including some kind of single-board computer. Comms-wise, it featured a cellular GPRS interface as well as an Orbcomm satellite modem. It also packed in GPS, WiFi, Xbee, Ethernet, and serial interfaces. It ultimately turned out to be a Digi ConnectPort X5 device, used as a satellite tracking system for commercial trucks.
What’s cool is that the video doesn’t just cover pulling it apart. It also dives into communicating with the unit. [saveitforparts] was able to power it up and, using the manufacturer’s software, actually talk to the device. He even found the web interface and tested the satellite modem.
Ultimately, this is the kind of obscure industry hardware that most of us would never come into contact with during our regular lives. It’s neat when these things show up on the secondary market so hackers can pull them apart and see what makes them tick. Video after the break.
MIDI is normally baked into the chipset of a synthesizer, or something you use a microcontroller to handle. But that’s not the only way to speak the language! [Kevin] decided to have some fun doing MIDI with discrete logic instead, with some pretty neat results.
[Kevin] had previously built a control voltage step sequencer called the Baby8, which relied on 4017 counter ICs. He later realized he could repurpose three of his old Baby8 PCBs to create something that could generate MIDI using nothing more than discrete logic. The stack of three boards generate a simple MIDI message—in this case, a two-byte Program Change command. At 8 bits per byte, plus a start and stop bit, that comes out to 20 bits in total. The bits to be sent are configured via the switches on the PCBs, and clocked out through the counter ICs via a clock running at the MIDI baud rate of 31,250 Hz.
Obviously, it’s not very practical to code your MIDI commands manually via DIP switches and then clock them out in this fashion. But—it does work, and you can do it! If you wanted to build an old-school logic circuit that just spits out simple short MIDI commands, this is one way to go about it.
These days, PCB fab houses are just about everywhere, and you can’t go buy a taco without walking past eight of them. Still, some out there still like to etch their PCBs at home. If that sounds like you, you might see some value in [Chris Borge]’s PCB agitator.
The design mostly relies on 3D printed parts, including the main body. It has a heavy base which is filled with concrete to keep it nicely weighed down on the table. A table for holding a PCB and fluid tank is then installed on top, via a bearing which allows it to pivot in one axis. An Arduino Nano commands the agitation of the table top, and hence the PCB etching tank, with a servo used to actually shift the table back and forth.
It’s a simple design — far simpler than some of the advanced coffee-making hardware we’ve seen recently. Regardless, it gets the job done, and done well! In testing, it accelerated [Chris]’s etching jobs significantly, we’re talking hours here. Meanwhile, if you don’t have a 3D printer on hand, you could always try building one out of junk instead!
The build began with a Burroughs 122P224 Nixie tube, and a HV8200 power supply. The latter component is key—it’s capable of turning voltages as low as 3 V into the 180V needed to power a Nixie. Then, an 18-position selector switch was pulled out of a resistance substitution box, and [Kevin] whipped up a basic DIY slip ring using some raw copper clad board.
Smoosh it all together, and what do you get? It’s a Nixie tube you can spin to change the number it displays. Useful? Hardly, unless you want to display varying glowing numbers to people at unreadable angles. Neat? Very. Just don’t touch any of the pins carrying 180 V, that’ll sting. Still, [Kevin] told us it’s pretty tucked away. “I’m totally comfortable touching it, but also would get sued into oblivion selling these on Amazon,” he says.
As [Kevin] notes in his post, the 2024 badge is all about the add-ons— and there’s actually a contest! We suspect [Kevin] will have a strong chance of taking out the Least Manufacturable title.
If you need more information about the Simple Add-On (SAO) interface, [Brian Benchoff] posted the V1.69bis standard on these very pages back in 2019. Apparently the S used to stand for something else. Video after the break.
QR codes are used just about everywhere now, for checking into venues, ordering food, or just plain old advertising. But what about data storage? It’s hardly efficient, but if you want to store your files in a ridiculous paper format—there’s a way to do that, too!
QR-Backup was developed by [za3k], and is currently available as a command-line Linux tool only. It takes a file or files, and turns them into a “paper backup”—a black-and white PDF file full of QR codes that’s ready to print. That’s legitimately the whole deal—you run the code, generate the PDF, then print the file. That piece of paper is now your backup. Naturally, qr-backup works in reverse, too. You can use a scanner or webcam to recover your files from the printed page.
Currently, it achieves a storage density of 3KB/page, and [za3k] says backups of text in the single-digit megabyte range are “practical.” You can alternatively print smaller, denser codes for up to 130 KB/page.
Is it something you’ll ever likely need? No. Is it super neat and kind of funny? Yes, very much so.
[Guy] found a nice wide 11-inch bar LCD that was the right aspect ratio to suit the “bumper sticker” aesthetic. It had an HDMI interface, so he decided to drive it with a Raspbery Pi Zero 2W. Power for the system was derived from 12-volt lines going to his vehicle’s rear view camera. For an enclosure, he simply stuck the Pi and a buck converter on the back of the display and heat shrinked the whole thing. He also threw some magnets in there to stick it to the car.
How does the screen know what song to display? Well, [Guy] already has his Spotify listens scrobbling to Last.fm. Thus, he just made a script that scrapes his Last.fm page, which runs on a Particle Boron microcontroller, which has a cellular connection of its own. The Boron gets the song data, and spits it over to the Pi via Bluetooth. Then the Pi generates an image for the display.
Oh, and there’s also a neat Easter Egg. In honor of brat summer, the background changes to #8ACE00 green if the system detects you’re listening to Charli XCX. Neat.
It’s a neat build with a lot of moving parts. We’re surprised we haven’t seen anything like this before though, it’s really rather fun. Also, how’s about that taste of the old Internet—when was the last time you heard somebody mention scrobbling? Gosh, we’re getting old.
It’s 2024, and there’s no getting around it. Grid energy is expensive. [Darrell] realized that a lot of his money was going on water heating, and he came up with a neat solution. What if he could hack in some solar power to slash his bills at a minimum of fuss? It worked so well for him, he’s whipped up a calculator to help others do the same.
[Darrell]’s idea was simple enough. He hooked up solar panels to just the bottom heating element of his hot water heater. This cut his power bill in half. His calculator is now up at pvh20.com, and it’s designed to help you figure out if it’s feasible for you. It takes into account your location, local power prices, and the amount of sun your area tends to get on a regular basis. It also takes into account the solar panels you intend to use and your water heater to determine how many panels you’ll need for properly hot water. Key all that in, and you’re well on your way to speccing a decent solar hot water setup. From there you’ll just need to buy the right stuff and wire it all up properly.
If you live in an area where the sun shines freely and the power is more expensive than printer ink, this could be a project well worth pursuing. Cheaper hot water is a grand thing, after all. [Darrell’s] calculator is really only the first step, and it doesn’t deal with the practicalities of installation, but that’s half the fun of a good project, right? Happy hacking!
We’ve seen a great many cat feeders over the years. Some rely on the Internet of Things, and some rely on fancy microcontrollers. [Larry Cook], on the other hand, built his using a simple 4060 binary counter chip.
The feeder is built out of old plywood, and the whole thing runs off an old 12-volt DC wall wart and a lead-acid battery to keep it going in a power outage. The dry cat food is stored in hopper above a drum, with the drum rotated by a 12-volt DC gearmotor. The gearmotor is activated on a schedule—either every 4 hours, or every 5.5 hours, depending on setting. There’s then a four-digit 7-segment display for counting the total number of feedings.
The manner of operation is simple. The 4060 binary counter slowly counts up to 8,196 on a 1.11 Hz or 0.83 Hz clock, for four hour or 5.5 hour operation respectively. When it hits that threshold, it fires the gear motor. The gear motor then rotates the drum for one revolution, dumping a preset amount of food. At the end of a revolution, it triggers a hall sensor which resets the circuit.
The best thing about this design? It’s been in service for ten years. [Larry’s] original video is a big contrast to his latest one, but it shows the same feeder doing the same job, all this time.
We love a good cat feeder, and it’s great to see one built with simple old-school parts, too. Video after the break.
Kitting out a full workshop can be expensive, but if you’re only working on small things, it can also be overkill. Indeed, if your machining tends towards the miniature, consider building yourself a series of tiny machines like [KendinYap] did. In the video below, you can see the miniature electric sander, table saw, drill press, and cut-off saw put through their paces.
Just because the machines are small, doesn’t mean they’re not useful. In fact, they’re kind of great for doing smaller jobs without destroying what you’re working on. The tiny belt sander in particular appeals in this case, but the same applies to the drill press as well. [KendinYap] also shows off a tiny table and circular saw. The machines are straightforward in their design, relying largely on 3D printed components. They’re all powered by basic DC brushed motors which are enough to get the job done on the small scale.
The build uses a 16×16 addressable LED matrix. [Jens] then ported some “Bouncy Bubbles” Processing code from Keith Peters to the Arduino Mega, and set it up to display on the matrix. An accelerometer was used to control the bouncing ball animations, while a second Arduino was then tapped to act as a musical synthesizer to add more vibes. The whole kit was then built into a 3D-printed housing with a nice hazy diffuser to give the LEDs a smoother, even look. [Jens] steps through how he got the diffuser just right, including a support structure that made all the difference to the aesthetic of the finished product. Getting diffusion right is key to making a nice LED project, and [Jens] got it very right here.
Once upon a time, RC planes were expensive models that took months to build and big money to equip with electronics. Since the 20th century though, powerful batteries have become cheap, as have servos and radio controllers. Combine them with a bit of old packing material and you can get a little RC trainer up and running for peanuts, as [Samm Sheperd] demonstrates.
[Samm] started referring to this as the “$5 trainer,” though he admits that it will cost more than that if you don’t have some bits and pieces laying around. He demonstrates how to cut cheap foamboard with a hot guitar string, and how to form it into a viable wing. That’s the most crucial part, with the fuselage and tail surfaces relatively simple by comparison. With that complete, it’s as simple as bolting on a motor, some servos, and control horns, and you’re up and running. You can even whip up a landing gear if you’re so inclined! Then, figure out your center of gravity, get it right, and then you’re pretty much ready to fly.
It’s a great primer on how to build a basic RC model, and if you do it right, it should have pretty forgiving handling, too. Plus, it’s so cheap that it should be easy to repair if you crash. Happy modelling! Video after the break.
The first step of designing the condiment cannon was deciding what it should fire. Little low-profile tubs of jelly ended up being the ideal. They were stout enough to survive high-speed flight, while their low height was good for aerodynamics. The cannon itself is built from metal and 3D-printed parts. Multiple iterations eventually landed on a flywheel launcher design with big brushless motors and large 6-inch discs. It sounds positively awful in action and can fling jam (jelly) packets at immense speed. From there, it was simply necessary to design a magazine feed system to enable high-speed full-auto jelly delivery.
If you’ve ever hucked ketchup packets at a brick wall, you’ve understood the joy of splattering condiments everywhere. This cannon is just a way to do that faster and more hilariously. We’ve seen other fun builds along these lines before, too. Video after the break.
Have you ever looked out the window at traffic and seen a giant crane driving alone the road? Have you ever wanted a little 3D printed version you could drive for yourself without the risk of demolishing your neighbors house? Well, [ProfessorBoots] has just the build for you.
The build, inspired by the Liebherr LTM 1300, isn’t just a little RC car that looks like a crane. It’s a real working crane, too! So you can drive this thing around, and you can park it up. Then you can deploy the fully working stabilizer booms like you’re some big construction site hot shot. From there, you can relish in the subtle joy of extending the massive three-foot boom while the necessary counterweight automatically locks itself in place. You can then use the crane to lift and move small objects to your heart’s content.
The video describes how the build works in intimate detail, from the gears and linkages all the way up to the grander assembly. It’s no simple beast either, with ten gearmotors, four servos, and two ESP32s used for control. If you really need to build one for yourself, [ProfessorBoots] sells his plans on his website.
[Scott Yu-Jan] is a big fan of the iPhone’s standby mode. Put the phone on charge horizontally, and it looks all stylish, with sleek widgets and clocks and stuff showing you information you presumably care about. [Scott] enjoyed this so much, in fact, he whipped up a custom charging dock to make the most of it.
The design was a collaboration with artist [Overwork], who mentioned the DN 40 alarm clock created by legendary designer [Dieter Rams]. [Overwork] sent [Scott] a draft inspired by that product, and he printed one up. It featured an integrated MagSafe charger to juice up the iPhone, and pressing into one side of the phone would pop it free. It was cool, but a little clumsy to use.
[Scott] liked the basic concept, but shows us how he iterated upon it to make it even nicer. He added in a wireless charger for AirPods in the back, gave the device adhesive feet, and a big chunky eject button to release the phone when desired.