What happens when an unfortunate bug ends up in a spider’s web? It gets bitten and wrapped in silk, and becomes a meal. But if the web belongs to an orb-weaver and the bug is a male firefly, it seems the trapped firefly — once bitten — ends up imitating a female’s flash pattern and luring other males to their doom.
Fireflies communicate with flash patterns (something you can experiment with yourself using nothing more than a green LED) and males looking to mate will fly around flashing a multi-pulse pattern with their two light-emitting lanterns. Females will tend to remain in one place and flash single-pulse patterns on their one lantern.
When a male spots a female, they swoop in to mate. Spiders have somehow figured out a way to actively take advantage of this, not just inserting themselves into the process but actively and masterfully manipulating male fireflies, causing them to behave in a way they would normally never do. All with the purpose of subverting firefly behavior for their own benefit.
It all started with an observation that almost all fireflies in webs were male, and careful investigation revealed it’s not just some odd coincidence. When spiders are not present, the male fireflies don’t act any differently. When a spider is present and detects a male firefly, the spider wraps and bites the firefly differently than other insects. It’s unknown exactly what happens, but this somehow results in the male firefly imitating a female’s flash patterns. Males see this and swoop in to mate, but with a rather different outcome than expected.
The research paper contains added details but it’s clear that there is more going on in this process than meets the eye. Spiders are already fascinating creatures (we’ve seen an amazing eye-tracking experiment on jumping spiders) and it’s remarkable to see this sort of bio-hacking going on under our very noses.
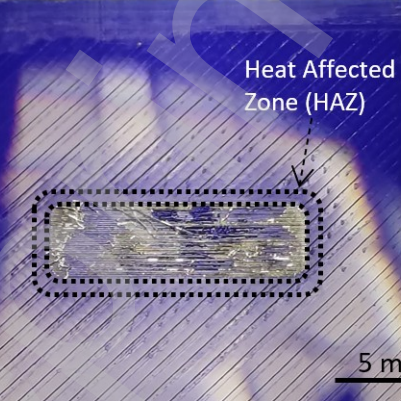
Ever needed a strong yet adhesive-free way to really stick PLA to glass? Neither have we, but nevertheless there’s a way to use aluminum foil and an IR fiber laser to get a solid bond with a little laser welding between the dissimilar materials.
A piece of sacrificial aluminum foil bonds the PLA to glass with a form of laser welding, with precise control and very little heat to dissipate.
It turns out that aluminum can be joined to glass by using a pulsed laser process, and PLA can be joined to aluminum with a continuous wave laser process. Researchers put them together, and managed to reliably do both at once with a single industrial laser.
By putting a sacrificial sheet of thin aluminum foil between 3D printed PLA and glass, then sending the laser through the glass into the aluminum, researchers were able to bond it all together in an adhesive-free manner with precise control, and very little heat to dissipate. No surface treatment of any kind required. The bond is at least as strong as any adhesive-based solution, so there’s no compromising on strength.
When it comes to fabrication, having to apply and manage adhesives is one of the least-preferable options for sticking two things together, so there’s value in the idea of something like this.
Still, it’s certainly a niche application and we’ll likely stick to good old superglue, but we honestly didn’t know laser welding could bond aluminum to glass or to PLA, let along both at once like this.
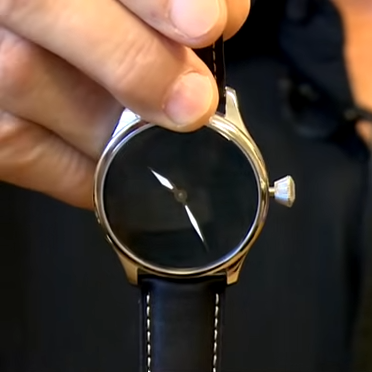
Researchers at the University of British Columbia leveraged an unusual discovery into ultra-black material made from wood. The deep, dark black is not the result of any sort of dye or surface coating; it’s structural change to the wood itself that causes it to swallow up at least 99% of incoming light.
One of a number of prototypes for watch faces and jewelry.
The discovery was partially accidental, as researchers happened upon it while looking at using high-energy plasma etching to machine the surface of wood in order to improve it’s water resistance. In the process of doing so, they discovered that with the right process applied to the right thickness and orientation of wood grain, the plasma treatment resulted in a surprisingly dark end result. Fresh from the plasma chamber, a wood sample has a thin coating of white powder that, once removed, reveals an ultra-black surface.
The resulting material has been dubbed Nxylon (the name comes from mashing together Nyx, the Greek goddess of darkness, with xylon the Greek word for wood) and has been prototyped into watch faces and jewelry. It’s made from natural materials, the treatment doesn’t create or involve nasty waste, and it’s an economical process. For more information, check out UBC’s press release.
You have probably heard about Vantablack (and how you can’t buy any) and artist Stuart Semple’s ongoing efforts at making ever-darker and accessible black paint. Blacker than black has applications in optical instruments and is a compelling thing in the art world. It’s also very unusual to see an ultra-black anything that isn’t the result of a pigment or surface coating.
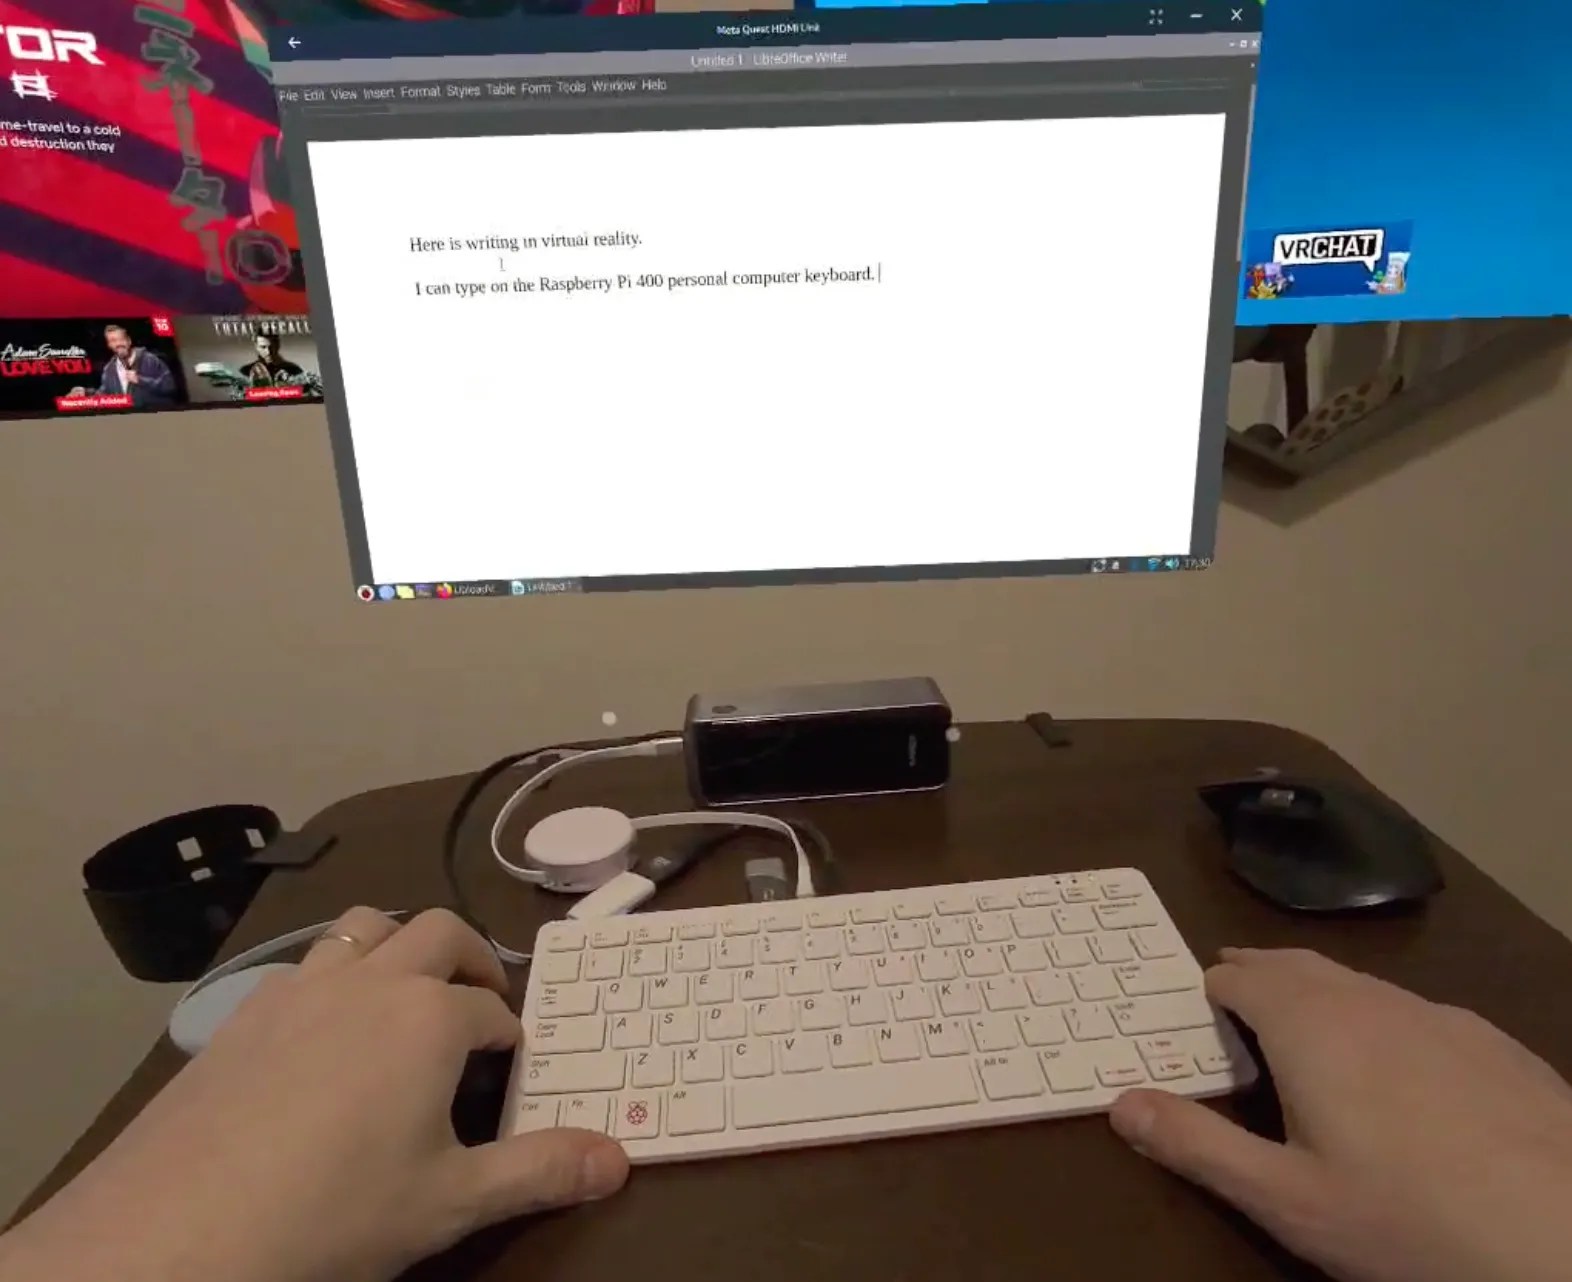
Meta’s Quest VR headset recently got the ability to accept and display video over USB-C, and it’s started some gears turning in folks’ heads. [Ian Hamilton] put together a quick concept machine consisting of a Raspberry Pi 400 that uses a VR headset as its monitor, which sure seems like the bones of a new breed of cyberdeck.
With passthrough on, one still sees the outside world.
The computer-in-a-keyboard nature of the Pi 400 means that little more than a mouse and the VR headset are needed to get a functional computing environment. Well, that and some cables and adapters.
What’s compelling about this is that the VR headset is much more than just a glorified monitor. In the VR environment, the external video source (in this case, the Raspberry Pi) is displayed in a window just like any other application. Pass-through can also be turned on, so that the headset’s external cameras display one’s surroundings as background. This means there’s no loss of environmental awareness while using the rig.
Video over USB-C is technically DisplayPort altmode, and both the video source and the USB-C cable have to support it. In [Ian]’s case, the Raspberry Pi 400 outputs HDMI and he uses a Shadowcast 2 capture card to accept HDMI on one end and outputs video over USB-C on the other.
As a concept it’s an interesting one for sure. Perhaps we’ll see decks of this nature in our next cyberdeck contest?
Here’s a novel ratchet mechanism developed by researchers that demonstrates how a single object — in this case a gear shaped like a six-pointed star — can rectify the disordered energy of its environment into one-way motion.
The Feynman–Smoluchowski ratchet has alternating surface treatments on the sides of its points, accomplished by applying a thin film layer to create alternating smooth/rough faces. This difference in surface wettability is used to turn agitation of surrounding water into a ratcheting action, or one-way spin.
This kind of mechanism is known as an active Brownian ratchet, but unlike other designs, this one doesn’t depend on the gear having asymmetrical geometry. Instead of an asymmetry in shape, there’s an asymmetry in the gear tooth surface treatments. You may be familiar with the terms hydrophobic and hydrophilic, which come down to a difference in surface wettability. The gear’s teeth having one side of each is what rectifies the chaotic agitation of the surrounding water into a one-way spin. Scaled down far enough, these could conceivably act as energy-harvesting micromotors.
3D scanning is important because the ability to digitize awkward or troublesome shapes from the real world can really hit the spot. One can reconstruct objects by drawing them up in CAD, but when there isn’t a right angle or a flat plane in sight, calipers and an eyeball just doesn’t cut it.
Scanning an object can create a digital copy, aid in reverse engineering, or help ensure a custom fit to something. The catch is making sure that scanning fits one’s needs, and isn’t more work than it’s worth.
I’ve previously written about what to expect from 3D scanning and how to work with it. Some things have changed and others have not, but 3D scanning’s possibilities remain only as good as the quality and ease of the scans themselves. Let’s see what’s new in this area.
All-in-One Handheld Scanning
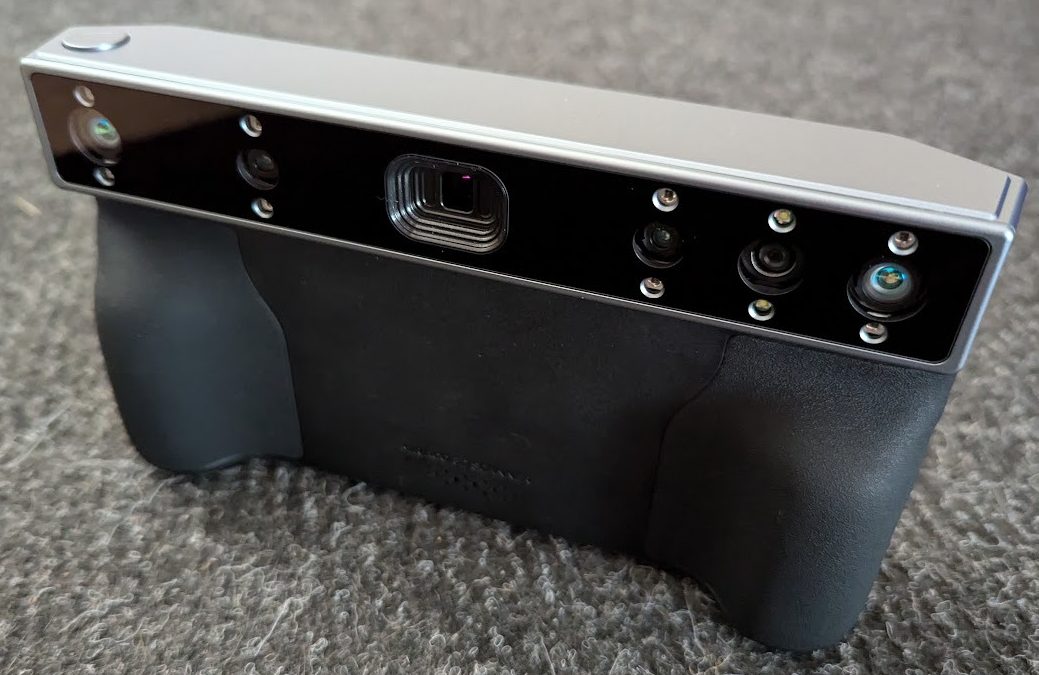
MIRACO all-in-one 3D scanner by Revopoint uses a quad-camera IR structured light sensor to create 1:1 scale scans.
3D scanner manufacturer Revopoint offered to provide me with a test unit of a relatively new scanner, which I accepted since it offered a good way to see what has changed in this area.
The MIRACO is a self-contained handheld 3D scanner that, unlike most other hobby and prosumer options, has no need to be tethered to a computer. The computer is essentially embedded with the scanner as a single unit with a touchscreen. Scans can be previewed and processed right on the device.
Being completely un-tethered is useful in more ways than one. Most tethered scanners require bringing the object to the scanner, but a completely self-contained unit like the MIRACO makes it easier to bring the scanner to the subject. Scanning becomes more convenient and flexible, and because it processes scans on-board, one can review and adjust or re-scan right on the spot. This is more than just convenience. Taking good 3D scans is a skill, and rapid feedback makes practice and experimentation more accessible.
Features
The MIRACO resembles a chunky digital camera with an array of sensors at the front and a large touchscreen on the back. As a nice touch, the screen can be flipped out to let the scanner be used in “selfie” mode.
The structured light pattern as seen in IR, projected from the front of the device.
At its core, the MIRACO is a quad-camera IR structured light sensor. A pattern of infrared light is projected, and based on how this known pattern is observed by cameras to land on an object, the object’s topology can be inferred and eventually turned into a 3D model.
This method is sensitive to both exposure and focal distance, but the MIRACO tries to cover these bases by offering near and far focal modes (for small and large objects, respectively) as well as a live preview from which the user can judge scan conditions on the fly. Since the human eye cannot see IR, and most of us lack an intuitive sense of how IR interacts with different materials, this last feature is especially handy.
It’s worth mentioning that the models generated by the MIRACO’s scans are 1:1 with real-world dimensions. Having 3D models scaled to match the object they came from is stupendously useful when it comes to anything related to objects fitting into or around other objects.
Limitations
3D scanning is in general still not a foolproof, point-and-shoot process. As with photography, there is both a skill and an art to getting the best results. An operator has to do their part to give the sensor a good view of everything it needs.
Conditions Have to be Right
One needs to scan in an environment that is conducive to good results. Some materials and objects scan easier than others.
The scanner is particularly picky about focal length and exposure settings, and can be sensitive to IR interference and reflections. In terms of scanning with the MIRACO, this means the projected IR should be bright enough to illuminate the object fully while not being so bright that it washes out important features.
IR isn’t visible, so this isn’t easy to grasp intuitively. Happily, there’s a live display on the screen for both exposure and focus distance. This guides a user to stay within the sweet spots when scanning. Better results come easily with a bit of experience.
Scans Are Only as Good as the Weakest Link
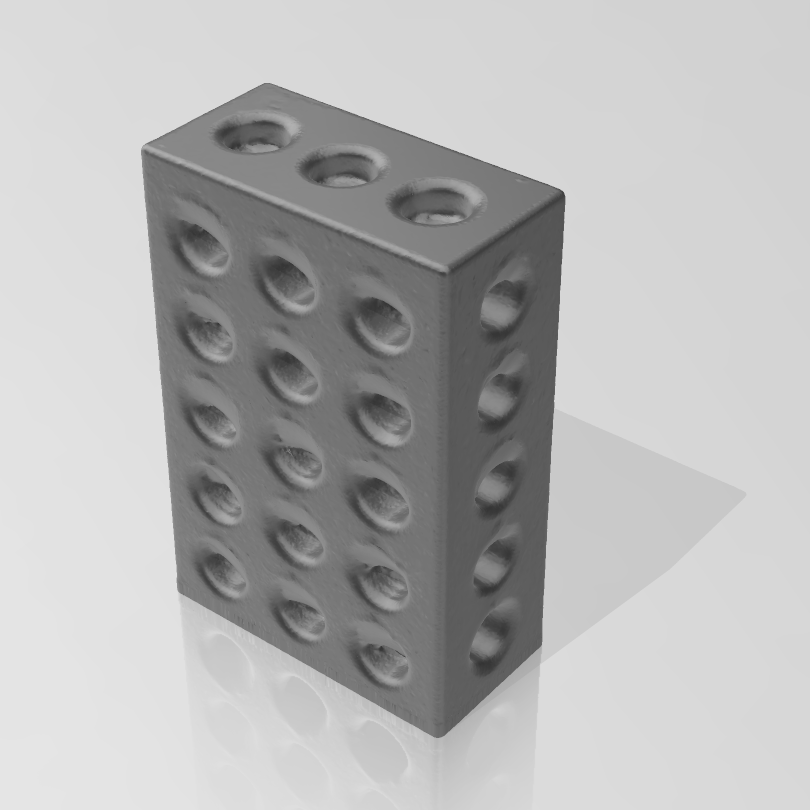
The scanner only models what it can see. The holes in this 1-2-3 block for example are incomplete.
There is a long chain of processes to go from raw sensor data to finished 3D model, and plenty of opportunity for scans to end up less than ideal along the way.
3D scanners like to boast about scan quality with numbers like “0.02 mm accuracy”, but keep in mind that such numbers are best cases from the raw sensor itself.
When it comes right down to it, a generated model can only be as good as the underlying point cloud. The point cloud is only as good as the sensor data, and the quality of the sensor data is limited by the object and its environment.
Also, a scanner can only scan what it can see. If an internal void or channel isn’t visible from the scanner’s perspective, it won’t be captured in a scan.
It is not hard to get useful results with a little practice, but no one will be pointing a box and pressing a button to effortlessly receive perfect scans down to the last fraction of a millimeter anytime soon. Have realistic expectations about what is achievable.
Basic Workflow of a 3D Scan
Here is the basic process for scanning an object with the MIRACO that should give a good idea of what is involved.
Job Setup and Scan
A highly reflective object like a polished 1-2-3 block is best treated with a matte finish before scanning. Here I used AESUB Blue vanishing scanning spray, which evaporates in about an hour.
A scan begins by configuring the scanner via touchscreen with some basics like choosing Near or Far mode, object type, and whether to track features or markers. Because the scanner only sees a portion of the object at a time, the software stitches together many images from different angles to build the point cloud that is the foundation for everything else. Alignment of these partial scans is done on the fly either by tracking features (unique shapes on the object) or markers (reflective dots that can be applied as stickers, or printed on a mat.)
If an object is excessively glossy or reflective or otherwise difficult for the scanner to see properly, treat it with a surface coating for better results. One option is dusting it with talcum powder, another is a purpose-made 3D scanning spray like AESUB offers.
With object and scanner ready, The MIRACO is pointed like a camera and moved around the object (or the object spun on a turntable) while trying to stay an optimum distance away for best results. The screen gives feedback on this process, including a live display as the device stitches scans together.
Processing Results
Results can be viewed on the device, and generally speaking, if the scan quality is good then the automatic one-click model processing will easily generate a reasonable 3D model. If there’s a problem, one can continue scanning or try again.
Scans can be exported in a variety of formats via USB or over Wi-Fi. If Revopoint’s Revo Scan software is installed, additional editing and processing options are available such as merging multiple separate scans of an object or fine-tuning processing steps.
Using The Resulting Model
The resulting 3D model (a mesh output like .STL, .3MF, or .OBJ) may require additional processing or editing depending on what one wishes to do with it. A mesh editing program like Blender is full-featured, but Microsoft’s 3D Builder is pretty handy for many common tasks when it comes to editing and handling meshes. Most slicer software for 3D printers can handle basic things as well.
Example Scans and Projects
Here are a few scans and prints I did to illustrate the sort of results you should expect with a tool like this. Each of these highlights an important aspect of scanning from the context of part design and 3D printing. The MIRACO is also capable of scanning large objects, though I focus on smaller ones here.
Scanning a Part, Designing a Socket for that Part
This first example demonstrates scanning an object (in this case, a fan) in order to design a socket in another piece that will fit it perfectly.
To do this, I scanned the fan (including attached cable) then manually traced its vertical footprint in CAD. This created a sort of cutout object I could use to make a socket. Objects with more complex shapes can be cut into slices, and each sliced traced individually.
I’d like to point out that because the scan is being used as a reference for a CAD sketch, imperfect or otherwise incomplete scans can still be perfectly serviceable as long as the right parts of the object are intact.
Scanning a Hole and Printing a Plug
This is a great way to show the different possibilities and features in action, such as the fact that scans are 1:1 with their real-world subject.
I roughly chopped a hole out of a chunk of packing foam, scanned the hole, then 3D printed a model of the hole to use as a plug. It fits perfectly, and its shape even accurately captured small details I hadn’t noticed.
Custom Ergonomic Grip
3D scanning is a great way to capture objects with complex shapes that cannot be modeled by calipers and squinted eyeballs alone. Wearables and handhelds are one example, and here I demonstrate creating a custom, ergonomic grip.
I use modeling clay to create a custom hand grip, then scan the result. The scan is easily edited in terms of separating into halves, making a central hole for mounting, and 3D printing the result.
Note that I scanned this object in color (which the MIRACO is capable of) but the color scan serves no real function here other than being more visual.
Remaining Challenges
So what’s not new in 3D scanning? The tools and software are certainly better and easier to use, but some things remain challenging.
Some Objects Scan Better Than Others
Scanning is still fussy about how a subject is framed and shot, as well as how reflective it is or isn’t. Taking these into account is part of getting good results.
3D Scanners Output Meshes, Not CAD Models
I’ve explained before how meshes are fundamentally different from what one is usually working with in a CAD program when designing physical parts. “Widen this hole by 0.5 mm” or “increase this angle by 5 degrees” simply aren’t the kind of edits one easily does with a mesh.
Converting a Mesh to a CAD Format Remains Imperfect
Turning an .stl into an .stp (for example) still doesn’t have great options. Tools exist, but the good ones are mostly the domain of non-free CAD suites; the kind with hefty price tags on annual licenses.
The good news is that meshes not only 3D print just fine, they also work easily with basic Boolean operations (merge, subtract, scale) and can be used as references when modeling a part. Having a scan that is scaled 1:1 to real-world dimensions is a big help.
What’s Your Experience?
3D scanning is still a process that depends on and benefits greatly from a skilled operator, but it’s getting easier to use and easier to experiment with.
Photogrammetry is still an accessible way to do 3D scanning that requires no special hardware, but it lacks immediate feedback, and the resulting 3D model will not be a 1:1 match to real-world dimensions.
Have you found 3D scanning useful for something? What was the best part? The worst? We’d love to hear about it, so share your experience in the comments.
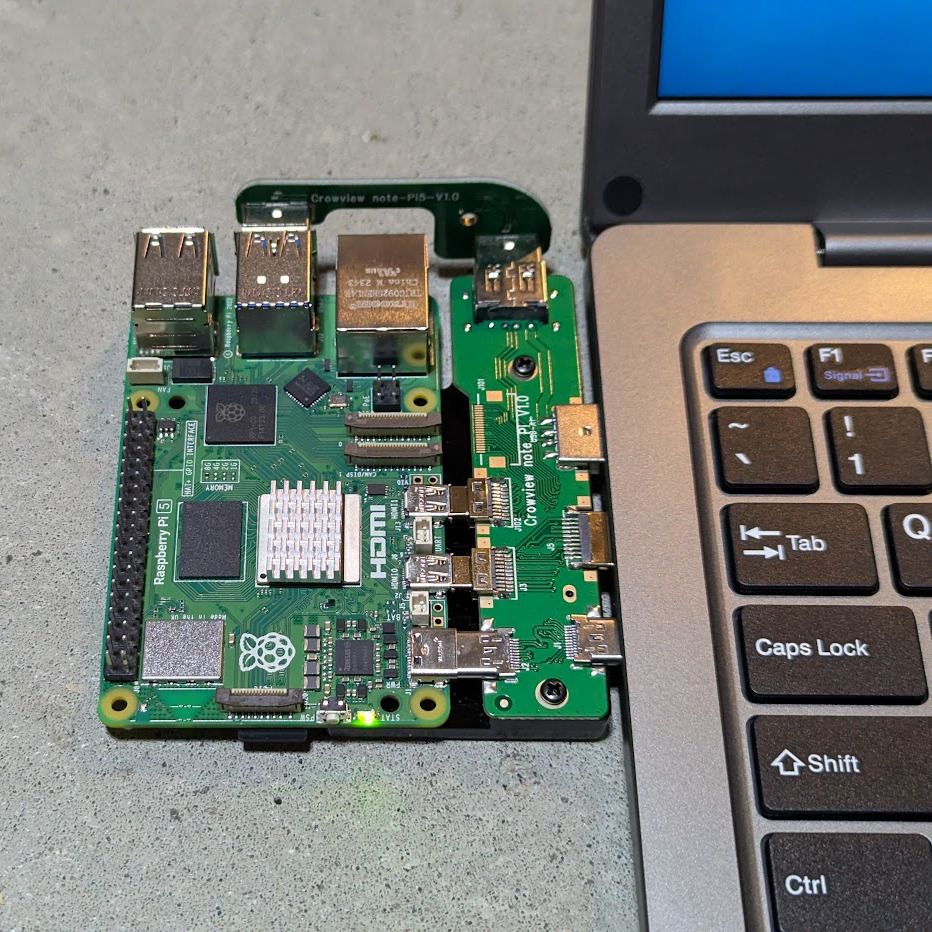
A spare monitor and keyboard are handy things to have around, but they’re a bit of a hassle. They are useful for hardware development, plugging in to headless servers, or firing up a Raspberry Pi or similar single-board computer (SBC). If that’s something you do and portability and storage space are important to you, then you may be interested in the CrowView Note.
I got an opportunity to test and provide feedback on an early version of this unusual device, which is functionally a portable spare monitor plus keyboard (and touchpad) without the bulk and extra cables. Heck, it’s even giving me ideas as the guts of a Cyberdeck build. Let’s take a look.
What It Is
It really looks like a laptop, but it’s actually a 14″ 1920 x 1280 monitor and USB keyboard in a laptop form factor.
There is also an integrated trackpad, speakers and mic, and a rechargeable battery. That makes it capable of providing its own power, and it can even function as a power bank in a pinch. There’s an HDMI input on one side, and on the other is a full-featured USB-C port that accepts video input via the DisplayPort altmode.
Pictured here is a Raspberry Pi 5 with optional PCB adapter to eliminate cables. The three ports (HDMI in, USB-C 5 V out, and USB-A for peripherals) provide all the board needs.
The CrowView Note is a pretty useful device for a workbench where one is often plugging hardware in for development or testing, because there’s no need to manage a separate monitor, keyboard, and mouse.
It is not a laptop, but attaching an SBC like a Raspberry Pi makes it act like one. The three ports conveniently located on the left-hand side (HDMI in, USB-C out for power to the SBC, and USB-A in for peripherals like keyboard and trackpad) are all that are needed in this case. Elecrow offers a “cable eliminator” PCB adapters to make the process of connecting a Raspberry Pi 5 or a Jetson Nano as simple as possible. The result is something that looks and works just like a laptop.
Well, almost. The SBC will still be a separate piece of hardware, whether connected by cables or by one of Elecrow’s PCB adapters. The result is OK for bench work, but especially in the case of the PCB adapter, not particularly rugged. Still, it’s a nice option and makes working on such boards convenient and cable-free.
What It Isn’t
Visually the CrowView note looks so much like a laptop that it bears repeating: this is not a laptop. There are no processing brains whatsoever inside. It’s a portable and rechargeable monitor, keyboard, mic, and speakers in a laptop form factor.
Also, it is not a laptop kit. It’s got all the right hardware to act like one, but there’s no way to truly securely or semi-permanently attach an SBC. Attaching an SBC like a Raspberry Pi 5 can be done with cables or one of Elecrow’s PCB adapters, but the result is more a convenience than something that would survive being loaded into a bag or backpack and carried around.
Use Cases, and Video Input Options
A device like this is handy for any situation that would require a spare monitor and keyboard, like configuring headless systems or working with development kits. An HDMI and USB cable are all that’s really needed to provide monitor and keyboard/touchpad functionality in this way, and the built-in rechargeable battery means it can power itself as well as attached hardware.
The USB-C port on the left is a 5 V output for exactly this purpose, but the one on the right side is a full-featured port that supports modes such as power delivery (PD) and DisplayPort video over USB-C. Devices that support video in this way include some mobile phones, and portable devices like Valve’s Steam Deck (shown here.)
The only catch for video over USB-C is that both the device and the cable must support it. The DisplayPort altmode is one of USB-C’s high-speed interfaces and requires the cable to have the right pairs connected, or it won’t work. (Since cables all look the same from the outside, this is where a USB cable tester comes in handy.)
The Electrow Note is rechargeable, light, and charges and handles just like a laptop. It’s far less bulky than a standalone monitor and keyboard/mouse. This makes it attractive for use on a crowded workbench, or in field work where portability is key.
Limitations and Quirks
In my testing of an early version of the device, I found a couple quirks that are worth keeping in mind.
One is that this device is a monitor and keyboard/mouse all in one, and they aren’t really completely independent devices. That is to say, if the monitor isn’t getting a useable video signal, the display goes to sleep and seems to take the keyboard and touchpad functionality with it.
For example, pressing CAPS LOCK won’t toggle the caps lock indicator light because the keyboard isn’t “awake” without a video signal. I was unable to use the device just as a USB keyboard/mouse and ignore plugging in the monitor. Similarly, with no valid input video signal functions like brightness adjustment or using the monitor’s OSD menu are inaccessible. (Input switching and battery level display do work, however.)
Related to the above, the interface for adjusting monitor functions is basic, and understanding how it works may save time and frustration. As with many laptops, the function key row doubles as device controls with F1 for video input selection, F5 and F6 adjusting brightness down and up, and so on. On the version I tested, the default configuration is to have the function key row act as monitor controls. To send a literal F1 keypress from the keyboard, one must press Fn+F1. It’s possible to swap this behavior, but the setting reverts at the next power cycle, which led to some head-scratching on my part while troubleshooting.
The CrowView Note’s interface — while functional — isn’t completely obvious at first. On a workbench, one might be plugging a device like this into hardware that may not be working as it should, and its quirks can compound troubleshooting headaches unless one knows what to expect.
Does It Have a Place On Your Workbench, Or In Your Next Project?
Tabletop space and storage space are at premiums for most of us. The CrowView Note is an attractive all-in-one alternative to separate devices, especially with its rechargeable battery. That it includes speaker and mic and can work as a USB power bank in a pinch is a nice touch.
How often do you find yourself needing to break out a monitor and keyboard, and what’s your favorite solution? Do you see a device like this as a space-saving tool, or more the basis of a hardware project like a cyberdeck build? Could you or have you DIYed something like this on the cheap? Let us know in the comments.
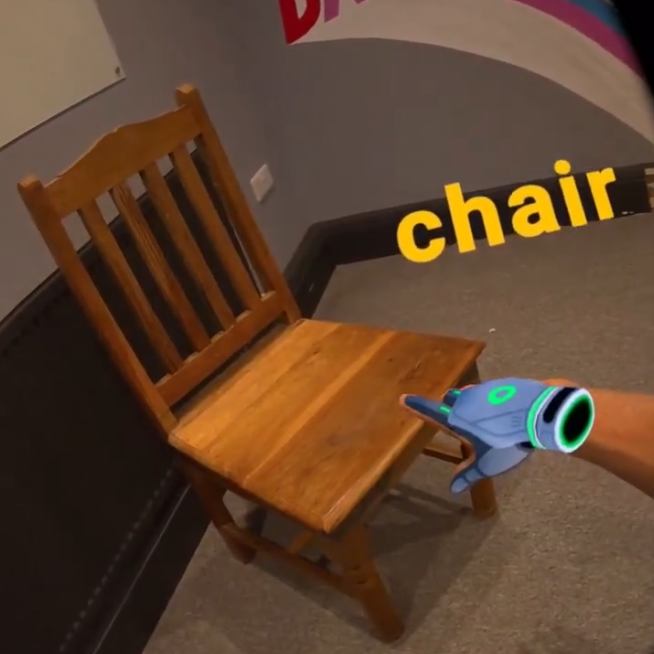
The view isn’t a pure camera feed (it includes virtual and UI elements) but it’s a clever workaround.
The demo shows object detection via MobileNet V2, which we’ve seen used for machine vision on embedded systems like the Raspberry Pi. In this case it is running locally on the VR headset, automatically identifying objects even though the app cannot directly access the front-facing cameras to see what’s in front of it.
The workaround is conceptually simple, and leverages the headset’s ability to cast its video feed over Wi-Fi to other devices. This feature is normally used for people to share and spectate VR gameplay.
First, [Gschwandtner]’s app sets up passthrough video, which means that the camera feed from the front of the headset is used as background in VR, creating a mixed-reality environment. Then the app essentially spawns itself a Chromium browser, and casts its video feed to itself. It is this video that is used to — in a roundabout way — access what the cameras see.
The resulting view isn’t really direct from the cameras, it’s akin to snapshotting a through-the-headset view which means it contains virtual elements like the UI. Still, with passthrough turned on it is a pretty clever workaround that is contained entirely on-device.
Meta is hesitant to give developers direct access to camera views on their VR headset, and while John Carmack (former Meta consulting CTO) thinks it’s worth opening up and can be done safely, it’s not there yet.
[saurabhchalke] recently released whisper.unity, a Unity package that implements whisper locally on the Meta Quest 3 VR headset, bringing nearly real-time transcription of natural speech to the device in an easy-to-use way.
Whisper is a robust and free open source neural network capable of quickly recognizing and transcribing multilingual natural speech with nearly-human level accuracy, and this package implements it entirely on-device, meaning it runs locally and doesn’t interact with any remote service.
Meta Quest 3
It used to be that voice input for projects was a tricky business with iffy results and a strong reliance on speaker training and wake-words, but that’s no longer the case. Reliable and nearly real-time speech recognition is something that’s easily within the average hacker’s reach nowadays.
We covered Whisper getting a plain C/C++ implementation which opened the door to running on a variety of platforms and devices. [Macoron] turned whisper.cpp into a Unity binding which served as inspiration for this project, in which [saurabhchalke] turned it into a Quest 3 package. So if you are doing any VR projects in Unity and want reliable speech input with a side order of easy translation, it’s never been simpler.
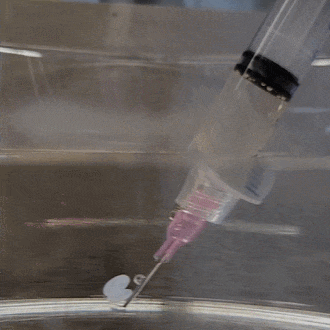
This property has been used to 3D print objects by using a syringe tip as if it were a nozzle in a filament-based printer. As long as the liquid is being printed into contact with a salt solution, the result is a polymer that solidifies upon leaving the syringe.
What’s also interesting is that the process by which the PNIPAM-based solutions solidify is entirely reversible. Researchers demonstrate printing, breaking down, then re-printing, which is an awfully neat trick. Finally, by mixing different additives in with PNIPAM, one can obtain different properties in the final product. For example, researchers demonstrate making conductive prints by adding carbon nanotubes.
While we’ve seen the concept of printing with liquids by extruding them into a gel bath or similar approach, we haven’t seen a process that prides itself on being so reversible before. The research paper with all the details is available here, so check it out for all the details.
We love close-up pictures of intricate work, and [w] hits the spot with a tiny joule thief in a fuse case (social media post, embedded below) powered by an old coin cell from a watch. It’s so tiny!
Ethernet transformers contain tiny coils.
A joule thief is a sort of minimum-component voltage booster that can suck nearly every last drop of energy from even seemingly-drained batteries, and is probably most famously used to light LEDs from cells that are considered “dead”.
Many joule thief designs feature hand-wound coils, which is great for junk box builds but certainly becomes more of a challenge for a tiny build like this one.
We really like that [w] salvaged a miniscule coil from an Ethernet transformer, most of which look like blocky SMD components from the outside but actually contain tiny coils.
The joule thief has been the basis of plenty of hacks over the years, and it’s always nice to see new twists on the concept.
Miniature 'Joule thief' in a fuse case powered by a 10 year old watch battery pic.twitter.com/flJHggDRc8
Data manipulation is at the heart of computation, and a system is said to be Turing-complete if it can be configured to manipulate data in a way that makes implementing arbitrary computation possible. [Keigo Oka] shared a proof that find and mkdir together are Turing-complete, which is to say, a system with only GNU’s find and mkdir has access to enough functionality to satisfy the requirements of Turing completeness, which ignores questions of efficiency or speed.
[Keigo Oka]’s first attempt at a proof worked to implement Rule 110, an elementary cellular automata configuration that has been shown to be Turing-complete, or ‘universal’, but has been updated to implement a tag system as it’s proof, and you can see it in action for yourself.
A safe haven to preserve samples of biodiversity from climate change, habitat loss, natural disaster, and other threats is recognized as a worthwhile endeavor. Everyone knows good backup practice involves a copy of critical elements at a remote location, leading some to ask: why not the moon?
A biological sample repository already exists in the form of the Svalbard global seed vault, located in a mountain on a remote island in the Arctic circle. Even so, not even Svalbard is out of the reach of our changing Earth. In 2017, soaring temperatures in the Arctic melted permafrost in a way no one imagined would be possible, and water infiltrated the facility. Fortunately the flooding was handled by personnel and no damage was done to the vault’s contents, but it was a wake-up call.
An off-site backup that requires no staffing could provide some much-needed redundancy. Deep craters near the moon’s polar regions offer stable and ultra-cold locations that are never exposed to sunlight, and could offer staffing-free repositories if done right. The lunar biorepository proposal has the details, and is thought-provoking, at least.
The moon’s lack of an atmosphere is inconvenient for life, but otherwise pretty attractive for some applications. A backup seed vault is one, and putting a giant telescope in a lunar crater is another.
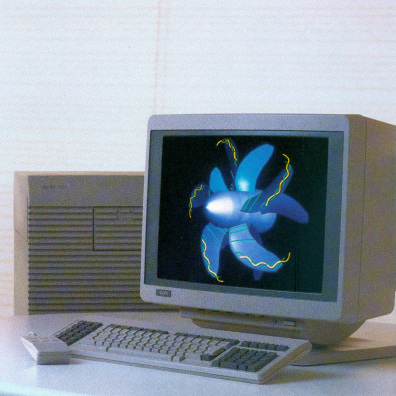
Ever heard of Apollo Computer, Inc.? They were one of the first graphical workstation vendors in the 1980s, and at the time were competitors to Sun Microsystems.
But that’s enough dry historical context. Feast your eyes on this full-color, 26-page product brochure straight from 1988 for the Series 10000 “Personal Supercomputer” featuring multiple processors and more! It’s loaded with information about their hardware and design architecture, giving a unique glimpse into just how Apollo was positioning their offerings, and the markets they were targeting with their products.
Apollo produced their own hardware and software, which meant much of it was proprietary. Whatever happened to Apollo? They were acquired by Hewlett-Packard in 1989 and eventually shuttered over the following decade or so. Find yourself intrigued? [Jim Rees] of The Apollo Archive should be your next stop for everything Apollo-oriented.
Vintage computing has a real charm of its own, but no hardware lasts forever. Who knows? Perhaps we might someday see an Apollo workstation brought to life in VR, like we have with the Commodore 64 or the BBC Micro (which even went so far as to sample the sound of authentic keystrokes. Now that’s dedication.)
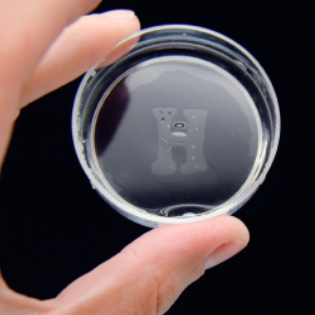
Here’s a short research paper from 2013 that explains how to create “hydroglyphics”, or writing with selecting surface wetting. In it, an apparently normal-looking petri dish is treated so as to reveal a message when wetted with water vapor. The contrast between hydrophobic and hydrophilic surfaces, which is not visible to the naked eye, becomes visible when misted with water. All it took was a mask, and a little treatment with a modified Tesla coil.
Plastics tend to be hydrophobic, meaning their surface repels water. These plastics also tend to be non-receptive to things like inks and adhesives. However, there is an industrial process called corona treatment (invented by Verner Eisby in 1951) that changes the surface energy of materials like plastics, rendering them more receptive to inks, coatings, and adhesives. Eisby’s company Vetaphone still exists today, and has a page describing the process.
What’s this got to do with the petri dishes and their secret messages? The process is essentially the same. By using a Tesla coil modified with a metal wire mesh, the surface of the petri dish is exposed to the coil’s discharge, altering its surface energy and rendering it hydrophilic. By selectively blocking the discharge with a nonconductive mask made from a foam sticker, the masked area remains hydrophobic. Mist the surface with water, and the design becomes visible.
The effects of corona treatment decay over time, but we think this is exactly the sort of thing that is worth keeping in mind just in case it ever comes in useful. Compact Tesla coils are fairly easy to get a hold of nowadays, but it’s also possible to make your own.
[Johannes] uses Stable Diffusion‘s SDXL Turbo to create a baseline image of “photo of a red brick house, blue sky”. The hardware dials act as manual controls for applying different embeddings to this baseline, such as “coral”, “moss”, “fire”, “ice”, “sand”, “rusty steel” and “cookie”.
By adjusting the dials, those embeddings are applied to the base image in varying strengths. The results are generated on the fly and are pretty neat to see, especially since there is no appreciable amount of processing time required.
The MIDI controller is integrated with the help of lunar_tools, a software toolkit on GitHub to facilitate creating interactive exhibits. As for the image end of things, we’ve previously covered how AI image generators work.
[Jeff Sandberg] has put a fair bit of effort into adding solar and battery storage with associated smarts to his home, but his energy usage statistics were incomplete. His solution was to read data from the utility meter using RTL-SDR to fill in the blanks. The results are good so far, and there’s no reason similar readings for gas and water can’t also be done.
[Jeff] uses the open source home automation software Home Assistant which integrates nicely with his solar and battery backup system, but due to the way his house is wired, it’s only aware of about half of the energy usage in the house. For example, [Jeff]’s heavy appliances get their power directly from the power company and are not part of the solar and battery systems. This means that Home Assistant’s energy statistics are incomplete.
Fortunately, in the USA most smart meters broadcast their data in a manner that an economical software-defined radio like RTL-SDR can access. That provided [Jeff] with the data he needed to get a much more complete picture of his energy usage.
While getting data from utility meters is conceptually straightforward, actually implementing things in a way that integrated with his system took a bit more work. If you’re finding yourself in the same boat, be sure to look at [Jeff]’s documentation to get some ideas.
[Ahron Wayne] succeeded in something he’s been trying to accomplish for some time: figuring out what’s inside a sealed Pokémon card packet without opening it. There’s a catch, however. It took buying an X-ray CT scanner off eBay, refurbishing and calibrating it, then putting a load of work into testing and scanning techniques. Then finally combining the data with machine learning in order to make useful decisions. It’s a load of work but [Ahron] succeeded by developing some genuinely novel techniques.
While using an X-ray machine to peek inside a sealed package seems conceptually straightforward, there are in fact all kinds of challenges in actually pulling it off. There’s loads of noise. So much that the resulting images give a human eyeball very little to work with. Luckily, there are also some things that make the job a little easier.
For example, it’s not actually necessary to image an entire card in order to positively identify it. Teasing out the individual features such as a fist, a tentacle, or a symbol are all useful to eliminate possibilities. Interestingly, as a side effect the system can easily spot counterfeit cards; the scans show up completely different.
When we first covered [Ahron]’s fascinating journey of bringing CT scanners back to life, he was able to scan cards but made it clear he wasn’t able to scan sealed packages. We’re delighted that he ultimately succeeded, and also documented the process. Check it out in the video below.
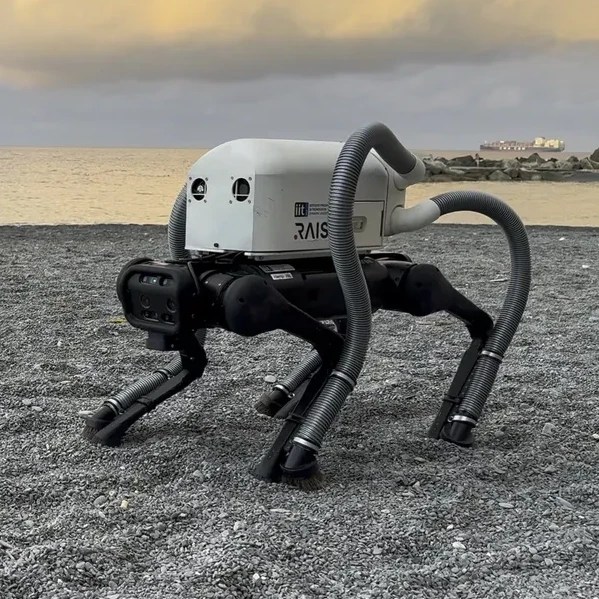
It would be better if humans didn’t toss cigarette butts on the ground in the first place, but change always takes longer than we think it should. In the meantime, researchers at the Italian Institute of Technology have used the problem as an opportunity to explore what seems to be a novel approach: attaching vacuum pickups to a robot’s feet, therefore removing the need for separate effectors.
VERO (Vacuum-cleaner Equipped RObot) is a robotic dog with a vacuum cleaner “backpack” and four hoses, one going down each leg. A vision system detects a cigarette butt, then ensures the robot plants a foot next to it, sucking it up. The research paper has more details, but the video embedded below gives an excellent overview.
While VERO needs to think carefully about route planning, using the legs as effectors is very efficient. Being a legged robot, VERO can navigate all kinds of real-world environments — including stairs — which is important because cigarette butts know no bounds.
Also, using the legs as effectors means there is no need for the robot to stop and wait while a separate device (like an arm with a vacuum pickup) picks up the trash. By simply planting a foot next to a detected cigarette butt, VERO combines locomotion with pickup.
It’s fascinating to see how the Mini Cheetah design has really become mainstream to the point that these robots are available off-the-shelf, and it’s even cooler to see them put to use. After all, robots tackling trash is a good way to leverage machines that can focus on specific jobs, even if they aren’t super fast at it.