MIDI is normally baked into the chipset of a synthesizer, or something you use a microcontroller to handle. But that’s not the only way to speak the language! [Kevin] decided to have some fun doing MIDI with discrete logic instead, with some pretty neat results.
[Kevin] had previously built a control voltage step sequencer called the Baby8, which relied on 4017 counter ICs. He later realized he could repurpose three of his old Baby8 PCBs to create something that could generate MIDI using nothing more than discrete logic. The stack of three boards generate a simple MIDI message—in this case, a two-byte Program Change command. At 8 bits per byte, plus a start and stop bit, that comes out to 20 bits in total. The bits to be sent are configured via the switches on the PCBs, and clocked out through the counter ICs via a clock running at the MIDI baud rate of 31,250 Hz.
Obviously, it’s not very practical to code your MIDI commands manually via DIP switches and then clock them out in this fashion. But—it does work, and you can do it! If you wanted to build an old-school logic circuit that just spits out simple short MIDI commands, this is one way to go about it.
These days, PCB fab houses are just about everywhere, and you can’t go buy a taco without walking past eight of them. Still, some out there still like to etch their PCBs at home. If that sounds like you, you might see some value in [Chris Borge]’s PCB agitator.
The design mostly relies on 3D printed parts, including the main body. It has a heavy base which is filled with concrete to keep it nicely weighed down on the table. A table for holding a PCB and fluid tank is then installed on top, via a bearing which allows it to pivot in one axis. An Arduino Nano commands the agitation of the table top, and hence the PCB etching tank, with a servo used to actually shift the table back and forth.
It’s a simple design — far simpler than some of the advanced coffee-making hardware we’ve seen recently. Regardless, it gets the job done, and done well! In testing, it accelerated [Chris]’s etching jobs significantly, we’re talking hours here. Meanwhile, if you don’t have a 3D printer on hand, you could always try building one out of junk instead!
The build began with a Burroughs 122P224 Nixie tube, and a HV8200 power supply. The latter component is key—it’s capable of turning voltages as low as 3 V into the 180V needed to power a Nixie. Then, an 18-position selector switch was pulled out of a resistance substitution box, and [Kevin] whipped up a basic DIY slip ring using some raw copper clad board.
Smoosh it all together, and what do you get? It’s a Nixie tube you can spin to change the number it displays. Useful? Hardly, unless you want to display varying glowing numbers to people at unreadable angles. Neat? Very. Just don’t touch any of the pins carrying 180 V, that’ll sting. Still, [Kevin] told us it’s pretty tucked away. “I’m totally comfortable touching it, but also would get sued into oblivion selling these on Amazon,” he says.
As [Kevin] notes in his post, the 2024 badge is all about the add-ons— and there’s actually a contest! We suspect [Kevin] will have a strong chance of taking out the Least Manufacturable title.
If you need more information about the Simple Add-On (SAO) interface, [Brian Benchoff] posted the V1.69bis standard on these very pages back in 2019. Apparently the S used to stand for something else. Video after the break.
QR codes are used just about everywhere now, for checking into venues, ordering food, or just plain old advertising. But what about data storage? It’s hardly efficient, but if you want to store your files in a ridiculous paper format—there’s a way to do that, too!
QR-Backup was developed by [za3k], and is currently available as a command-line Linux tool only. It takes a file or files, and turns them into a “paper backup”—a black-and white PDF file full of QR codes that’s ready to print. That’s legitimately the whole deal—you run the code, generate the PDF, then print the file. That piece of paper is now your backup. Naturally, qr-backup works in reverse, too. You can use a scanner or webcam to recover your files from the printed page.
Currently, it achieves a storage density of 3KB/page, and [za3k] says backups of text in the single-digit megabyte range are “practical.” You can alternatively print smaller, denser codes for up to 130 KB/page.
Is it something you’ll ever likely need? No. Is it super neat and kind of funny? Yes, very much so.
[Guy] found a nice wide 11-inch bar LCD that was the right aspect ratio to suit the “bumper sticker” aesthetic. It had an HDMI interface, so he decided to drive it with a Raspbery Pi Zero 2W. Power for the system was derived from 12-volt lines going to his vehicle’s rear view camera. For an enclosure, he simply stuck the Pi and a buck converter on the back of the display and heat shrinked the whole thing. He also threw some magnets in there to stick it to the car.
How does the screen know what song to display? Well, [Guy] already has his Spotify listens scrobbling to Last.fm. Thus, he just made a script that scrapes his Last.fm page, which runs on a Particle Boron microcontroller, which has a cellular connection of its own. The Boron gets the song data, and spits it over to the Pi via Bluetooth. Then the Pi generates an image for the display.
Oh, and there’s also a neat Easter Egg. In honor of brat summer, the background changes to #8ACE00 green if the system detects you’re listening to Charli XCX. Neat.
It’s a neat build with a lot of moving parts. We’re surprised we haven’t seen anything like this before though, it’s really rather fun. Also, how’s about that taste of the old Internet—when was the last time you heard somebody mention scrobbling? Gosh, we’re getting old.
It’s 2024, and there’s no getting around it. Grid energy is expensive. [Darrell] realized that a lot of his money was going on water heating, and he came up with a neat solution. What if he could hack in some solar power to slash his bills at a minimum of fuss? It worked so well for him, he’s whipped up a calculator to help others do the same.
[Darrell]’s idea was simple enough. He hooked up solar panels to just the bottom heating element of his hot water heater. This cut his power bill in half. His calculator is now up at pvh20.com, and it’s designed to help you figure out if it’s feasible for you. It takes into account your location, local power prices, and the amount of sun your area tends to get on a regular basis. It also takes into account the solar panels you intend to use and your water heater to determine how many panels you’ll need for properly hot water. Key all that in, and you’re well on your way to speccing a decent solar hot water setup. From there you’ll just need to buy the right stuff and wire it all up properly.
If you live in an area where the sun shines freely and the power is more expensive than printer ink, this could be a project well worth pursuing. Cheaper hot water is a grand thing, after all. [Darrell’s] calculator is really only the first step, and it doesn’t deal with the practicalities of installation, but that’s half the fun of a good project, right? Happy hacking!
We’ve seen a great many cat feeders over the years. Some rely on the Internet of Things, and some rely on fancy microcontrollers. [Larry Cook], on the other hand, built his using a simple 4060 binary counter chip.
The feeder is built out of old plywood, and the whole thing runs off an old 12-volt DC wall wart and a lead-acid battery to keep it going in a power outage. The dry cat food is stored in hopper above a drum, with the drum rotated by a 12-volt DC gearmotor. The gearmotor is activated on a schedule—either every 4 hours, or every 5.5 hours, depending on setting. There’s then a four-digit 7-segment display for counting the total number of feedings.
The manner of operation is simple. The 4060 binary counter slowly counts up to 8,196 on a 1.11 Hz or 0.83 Hz clock, for four hour or 5.5 hour operation respectively. When it hits that threshold, it fires the gear motor. The gear motor then rotates the drum for one revolution, dumping a preset amount of food. At the end of a revolution, it triggers a hall sensor which resets the circuit.
The best thing about this design? It’s been in service for ten years. [Larry’s] original video is a big contrast to his latest one, but it shows the same feeder doing the same job, all this time.
We love a good cat feeder, and it’s great to see one built with simple old-school parts, too. Video after the break.
Kitting out a full workshop can be expensive, but if you’re only working on small things, it can also be overkill. Indeed, if your machining tends towards the miniature, consider building yourself a series of tiny machines like [KendinYap] did. In the video below, you can see the miniature electric sander, table saw, drill press, and cut-off saw put through their paces.
Just because the machines are small, doesn’t mean they’re not useful. In fact, they’re kind of great for doing smaller jobs without destroying what you’re working on. The tiny belt sander in particular appeals in this case, but the same applies to the drill press as well. [KendinYap] also shows off a tiny table and circular saw. The machines are straightforward in their design, relying largely on 3D printed components. They’re all powered by basic DC brushed motors which are enough to get the job done on the small scale.
The build uses a 16×16 addressable LED matrix. [Jens] then ported some “Bouncy Bubbles” Processing code from Keith Peters to the Arduino Mega, and set it up to display on the matrix. An accelerometer was used to control the bouncing ball animations, while a second Arduino was then tapped to act as a musical synthesizer to add more vibes. The whole kit was then built into a 3D-printed housing with a nice hazy diffuser to give the LEDs a smoother, even look. [Jens] steps through how he got the diffuser just right, including a support structure that made all the difference to the aesthetic of the finished product. Getting diffusion right is key to making a nice LED project, and [Jens] got it very right here.
Once upon a time, RC planes were expensive models that took months to build and big money to equip with electronics. Since the 20th century though, powerful batteries have become cheap, as have servos and radio controllers. Combine them with a bit of old packing material and you can get a little RC trainer up and running for peanuts, as [Samm Sheperd] demonstrates.
[Samm] started referring to this as the “$5 trainer,” though he admits that it will cost more than that if you don’t have some bits and pieces laying around. He demonstrates how to cut cheap foamboard with a hot guitar string, and how to form it into a viable wing. That’s the most crucial part, with the fuselage and tail surfaces relatively simple by comparison. With that complete, it’s as simple as bolting on a motor, some servos, and control horns, and you’re up and running. You can even whip up a landing gear if you’re so inclined! Then, figure out your center of gravity, get it right, and then you’re pretty much ready to fly.
It’s a great primer on how to build a basic RC model, and if you do it right, it should have pretty forgiving handling, too. Plus, it’s so cheap that it should be easy to repair if you crash. Happy modelling! Video after the break.
The first step of designing the condiment cannon was deciding what it should fire. Little low-profile tubs of jelly ended up being the ideal. They were stout enough to survive high-speed flight, while their low height was good for aerodynamics. The cannon itself is built from metal and 3D-printed parts. Multiple iterations eventually landed on a flywheel launcher design with big brushless motors and large 6-inch discs. It sounds positively awful in action and can fling jam (jelly) packets at immense speed. From there, it was simply necessary to design a magazine feed system to enable high-speed full-auto jelly delivery.
If you’ve ever hucked ketchup packets at a brick wall, you’ve understood the joy of splattering condiments everywhere. This cannon is just a way to do that faster and more hilariously. We’ve seen other fun builds along these lines before, too. Video after the break.
Have you ever looked out the window at traffic and seen a giant crane driving alone the road? Have you ever wanted a little 3D printed version you could drive for yourself without the risk of demolishing your neighbors house? Well, [ProfessorBoots] has just the build for you.
The build, inspired by the Liebherr LTM 1300, isn’t just a little RC car that looks like a crane. It’s a real working crane, too! So you can drive this thing around, and you can park it up. Then you can deploy the fully working stabilizer booms like you’re some big construction site hot shot. From there, you can relish in the subtle joy of extending the massive three-foot boom while the necessary counterweight automatically locks itself in place. You can then use the crane to lift and move small objects to your heart’s content.
The video describes how the build works in intimate detail, from the gears and linkages all the way up to the grander assembly. It’s no simple beast either, with ten gearmotors, four servos, and two ESP32s used for control. If you really need to build one for yourself, [ProfessorBoots] sells his plans on his website.
[Scott Yu-Jan] is a big fan of the iPhone’s standby mode. Put the phone on charge horizontally, and it looks all stylish, with sleek widgets and clocks and stuff showing you information you presumably care about. [Scott] enjoyed this so much, in fact, he whipped up a custom charging dock to make the most of it.
The design was a collaboration with artist [Overwork], who mentioned the DN 40 alarm clock created by legendary designer [Dieter Rams]. [Overwork] sent [Scott] a draft inspired by that product, and he printed one up. It featured an integrated MagSafe charger to juice up the iPhone, and pressing into one side of the phone would pop it free. It was cool, but a little clumsy to use.
[Scott] liked the basic concept, but shows us how he iterated upon it to make it even nicer. He added in a wireless charger for AirPods in the back, gave the device adhesive feet, and a big chunky eject button to release the phone when desired.
Benchy is that cute little boat that everyone uses to calibrate their 3D printer. [Emily The Engineer] asked the obvious question—why isn’t it a real working boat? Then she followed through on the execution. Bravo, [Emily]. Bravo.
The full concept is straightforward, but that doesn’t make it any less fun. [Emily] starts by trying to get small Benchys to float, and then steadily steps up the size, solving problems along the way. By the end of it, the big Benchy is printed out of lots of smaller sections that were then assembled into a larger whole. This was achieved with glue and simply using a soldering iron to melt parts together. It’s a common technique used to build giant parts on smaller 3D printers, and it works pretty well.
The basic hull did okay at first, save for some stability problems. Amazingly, though, it was remarkably well sealed against water ingress. It then got a trolling motor, survived a capsizing, and eventually took to the open water with the aid of some additional floatation.
Magic Eye tubes were popular as tuning guides on old-school radio gear. However, the tubes, the 6U5 model in particular, have become rare and remarkably hard to come by of late. When the supply dried up, [Bjørner Sandom] decided to build a digital alternative instead.
The build relies on a small round IPS display, measuring an inch in diameter and with a resolution of 128×115 pixels. One can only presume it’s round but not perfectly so. It was then fitted with a 25mm glass lens in order to give it a richer, deeper look more akin to a real Magic Eye tube. In any case, a STM32F103CBT was selected to drive the display, with the 32-bit ARM processor running at a lovely 72 MHz for fast and smooth updates of the screen.
The screen, controller, and supporting circuitry are all built onto a pair of PCBs and installed in a 3D-printed housing that lives atop a tube base. The idea is that the build is a direct replacement for a real 6U5 tube. The STM32 controller receives the automatic gain control voltage from the radio set it’s installed in, and then drives the screen to behave as a real 6U5 tube would under those conditions.
By virtue of the smart design, smooth updates, and that nifty glass lens, the final product is quite a thing to behold. It really does look quite similar to the genuine article. If you’ve got a beloved old set with a beleagured magic eye, you might find this a project worth replicating. Video after the break.
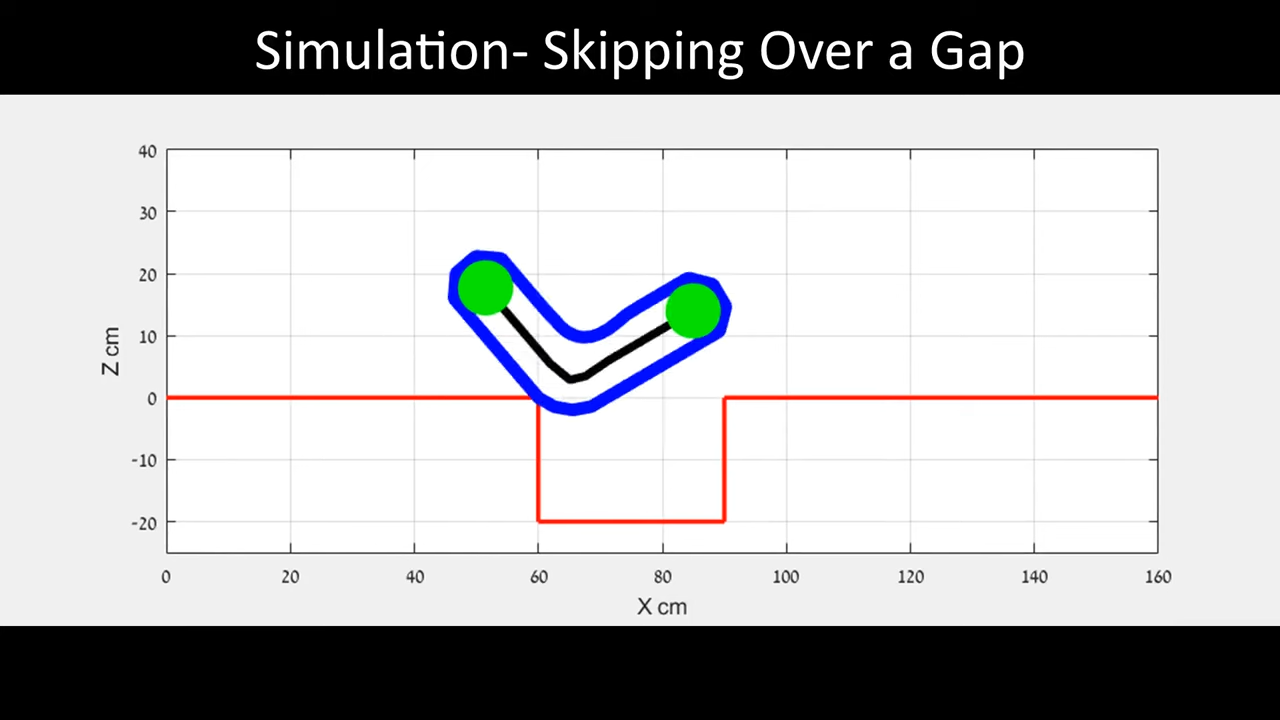
The robot looks simple, like some kind of tracked worm. As its motors turn, the track moves along as you would expect, propelling the robot along the ground. Its special feature, though, is that the track can bend itself up and down, just like a snake might as it rises up to survey a given area.
The little tracked robot can thus tilt itself up to climb steps, and even bend itself over small obstacles. It can even try and hold itself up high as it inches along to try and bridge its way over a gap.
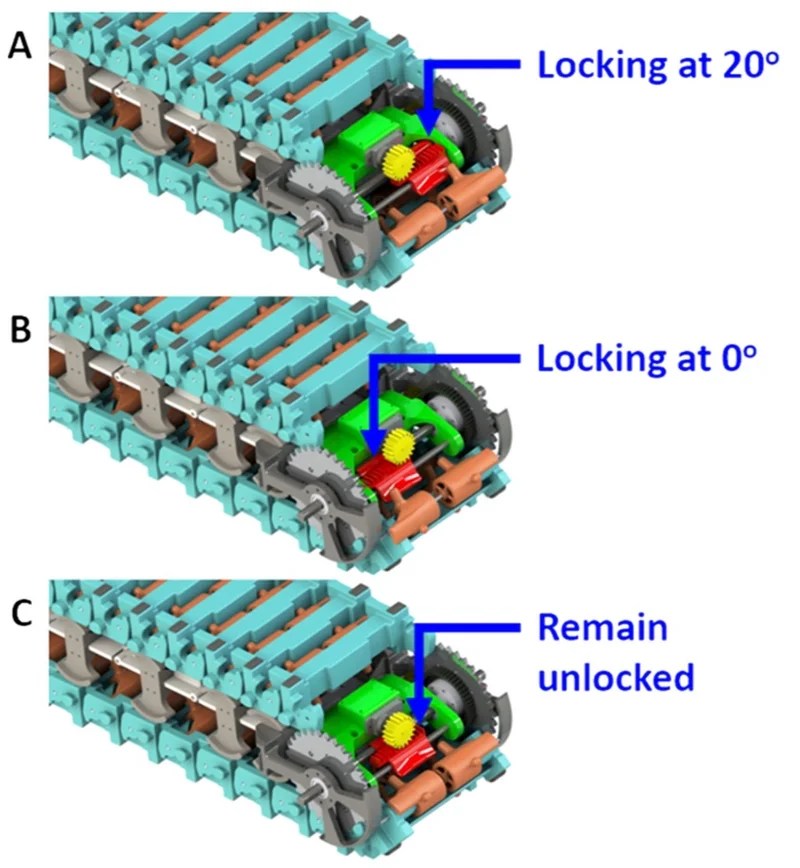
The robot can selectively lock each link (or not) as it passes by.
How does it achieve this? Well, the robot is able to selectively lock the individual links of its outer track in various orientations. As the links pass over the front of the robot, a small actuator is used to lock each link in a 20-degree orientation, or a straight orientation, or leave them loose.
The ability to lock multiple links into a continuous rigid structure allows the robot to rise up from the ground, form itself into a stiff beam, or conform to the ground as desired. A mechanism at the back of the robot unlatches the links as they pass by so the robot retains flexibility as it moves along.
Usually, when you need to sense something in a project, the answers are straightforward. Want to sense air temperature? There’s a sensor for that. Particulate content in the air? There’s a sensor for that, too. Someone sneaking up on you? Get yourself some passive infrared sensors (PIRs) and maybe a smart camera just to be sure.
But sometimes you can be sneaky instead, saving the cost of a sensor by using alternative techniques. Perhaps there’s a way to use the hardware you already have to determine what you need. Maybe you can use statistical methods to calculate the quantity you’re looking for from other measurements.
Today, we’ll examine a great example of a “pseudo-sensor” build in an existing commercial device, and examine how these techniques are often put to good use in industry.
Case Study
When they were introduced in 2009, Coca-Cola Freestyle dispensers were a step change in the way soft drinks were dispensed. Suddenly, you weren’t limited to five or six choices on the soda fountain. You could instead sample virtually the entire Coca Cola range, all on one machine! If you’re a big soda head, this was a very rad thing. If you were a maintenance tech for Coca Cola, though, you probably saw the machine differently — not as some godly fount of soda, but as a machine to be troubleshooted, repaired, and improved. Over time, it became obvious that the Freestyle unit had a high rate of Flow Control Module (FCM) replacements in the field. And yet, 50% of the FCMs returned to Coca Cola weren’t faulty. There was something strange going on.
The problem, as revealed in a presentation from the company, was that the Freestyle machine didn’t have a dedicated pressure sensor in the fluid line. If a machine had an FCM fault or a pressure loss, it would present much the same way. Thus, techs would often swap out a perfectly good FCM when the problem was actually elsewhere. The solution was obvious: there needed to be a way to sense pressure in the system, so techs could determine if an FCM was faulty or if the problem was a lack of pressure upstream.
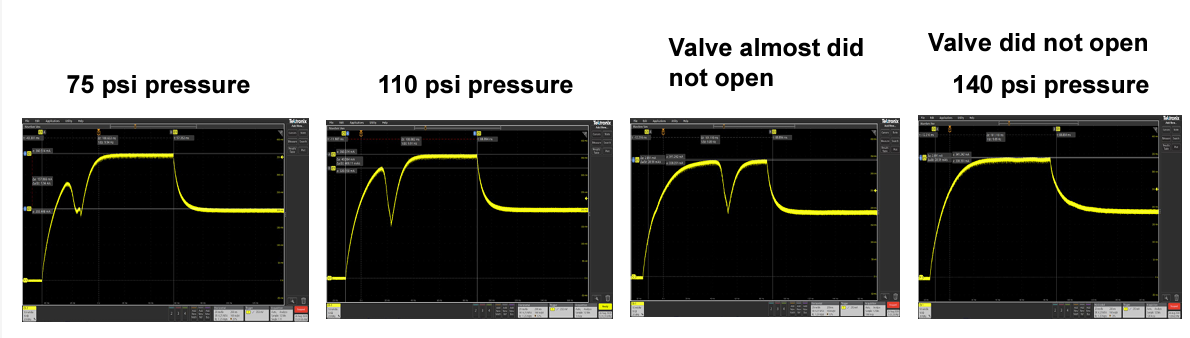
There’s a characteristic dip in the current flowing to the FCM valve when it opens—and it change with pressure.
To address this, an engineer might have specified an off-the-shelf pressure sensor, figured out how to retrofit it to the machine, and rolled them out in the wild. Instead, Coca-Cola developed an innovative (and presumably cheaper) solution: a pressure pseudo-sensor, largely using equipment already on the machine.
The pseudo pressure sensor operates by analyzing the relationship between electrical and mechanical work within the FCM. Basically, the FCM is a valve that opens to allow the flow of fluid through the machine. Thus, the pseudo-sensor monitors the current at which the valve starts to move, a value that correlates with the pressure inside the system. As pressure increases, a characteristic V-shaped drop in current is observed; this pattern shifts as pressure changes, allowing the system to estimate the pressure based on the observed current.
A complicated function ties pressure to the features of the FCM current curve.
To create the pseudo-sensor, a whole lot of data was collected from the Freestyle hardware. Over 5,000 drink pours were performed with a number of FCM modules, at pressures from 1 to 140 pounds per square inch (PSI) at 5 PSI intervals. The data collected during testing was then fed into MATLAB and Simulink in order to create a mathematical model. The aim was to link the peak size of the current feedback voltage dip measured by the current sensor, and link that to pressure. Sadly, a good reliable correlation was hard to come by.
More work ensued, which tied pressure to multiple timing and voltage features on the curve. These were fed into a multi-variable regression that spat out a monstrous model that calculated pressure from six features and 26 terms. It was messy, but far more accurate, and it did the job.
From there, it was a simple matter of deploying the model that measured FCM current and spat our pressure measurements. It was loaded on an ARM Cortex M microcontroller and put through 3,300 tests over 10 different FCMs and two different Freestyle controller boards. The model predicted the correct pressure within a bound of +/- 10 PSI a full 85% of the time.
Admittedly, that would be rubbish for a proper pressure sensor. However, for a simple pseudo-sensor that’s mostly just used to see if there’s pressure in the system? It’s pretty darn good. The pseudo-sensor software has since been deployed on Freestyle machines in the field, with work ongoing to further develop the system’s diagnostics using this new tool.
The pseudo-sensor actually does a pretty good job!
Other Examples
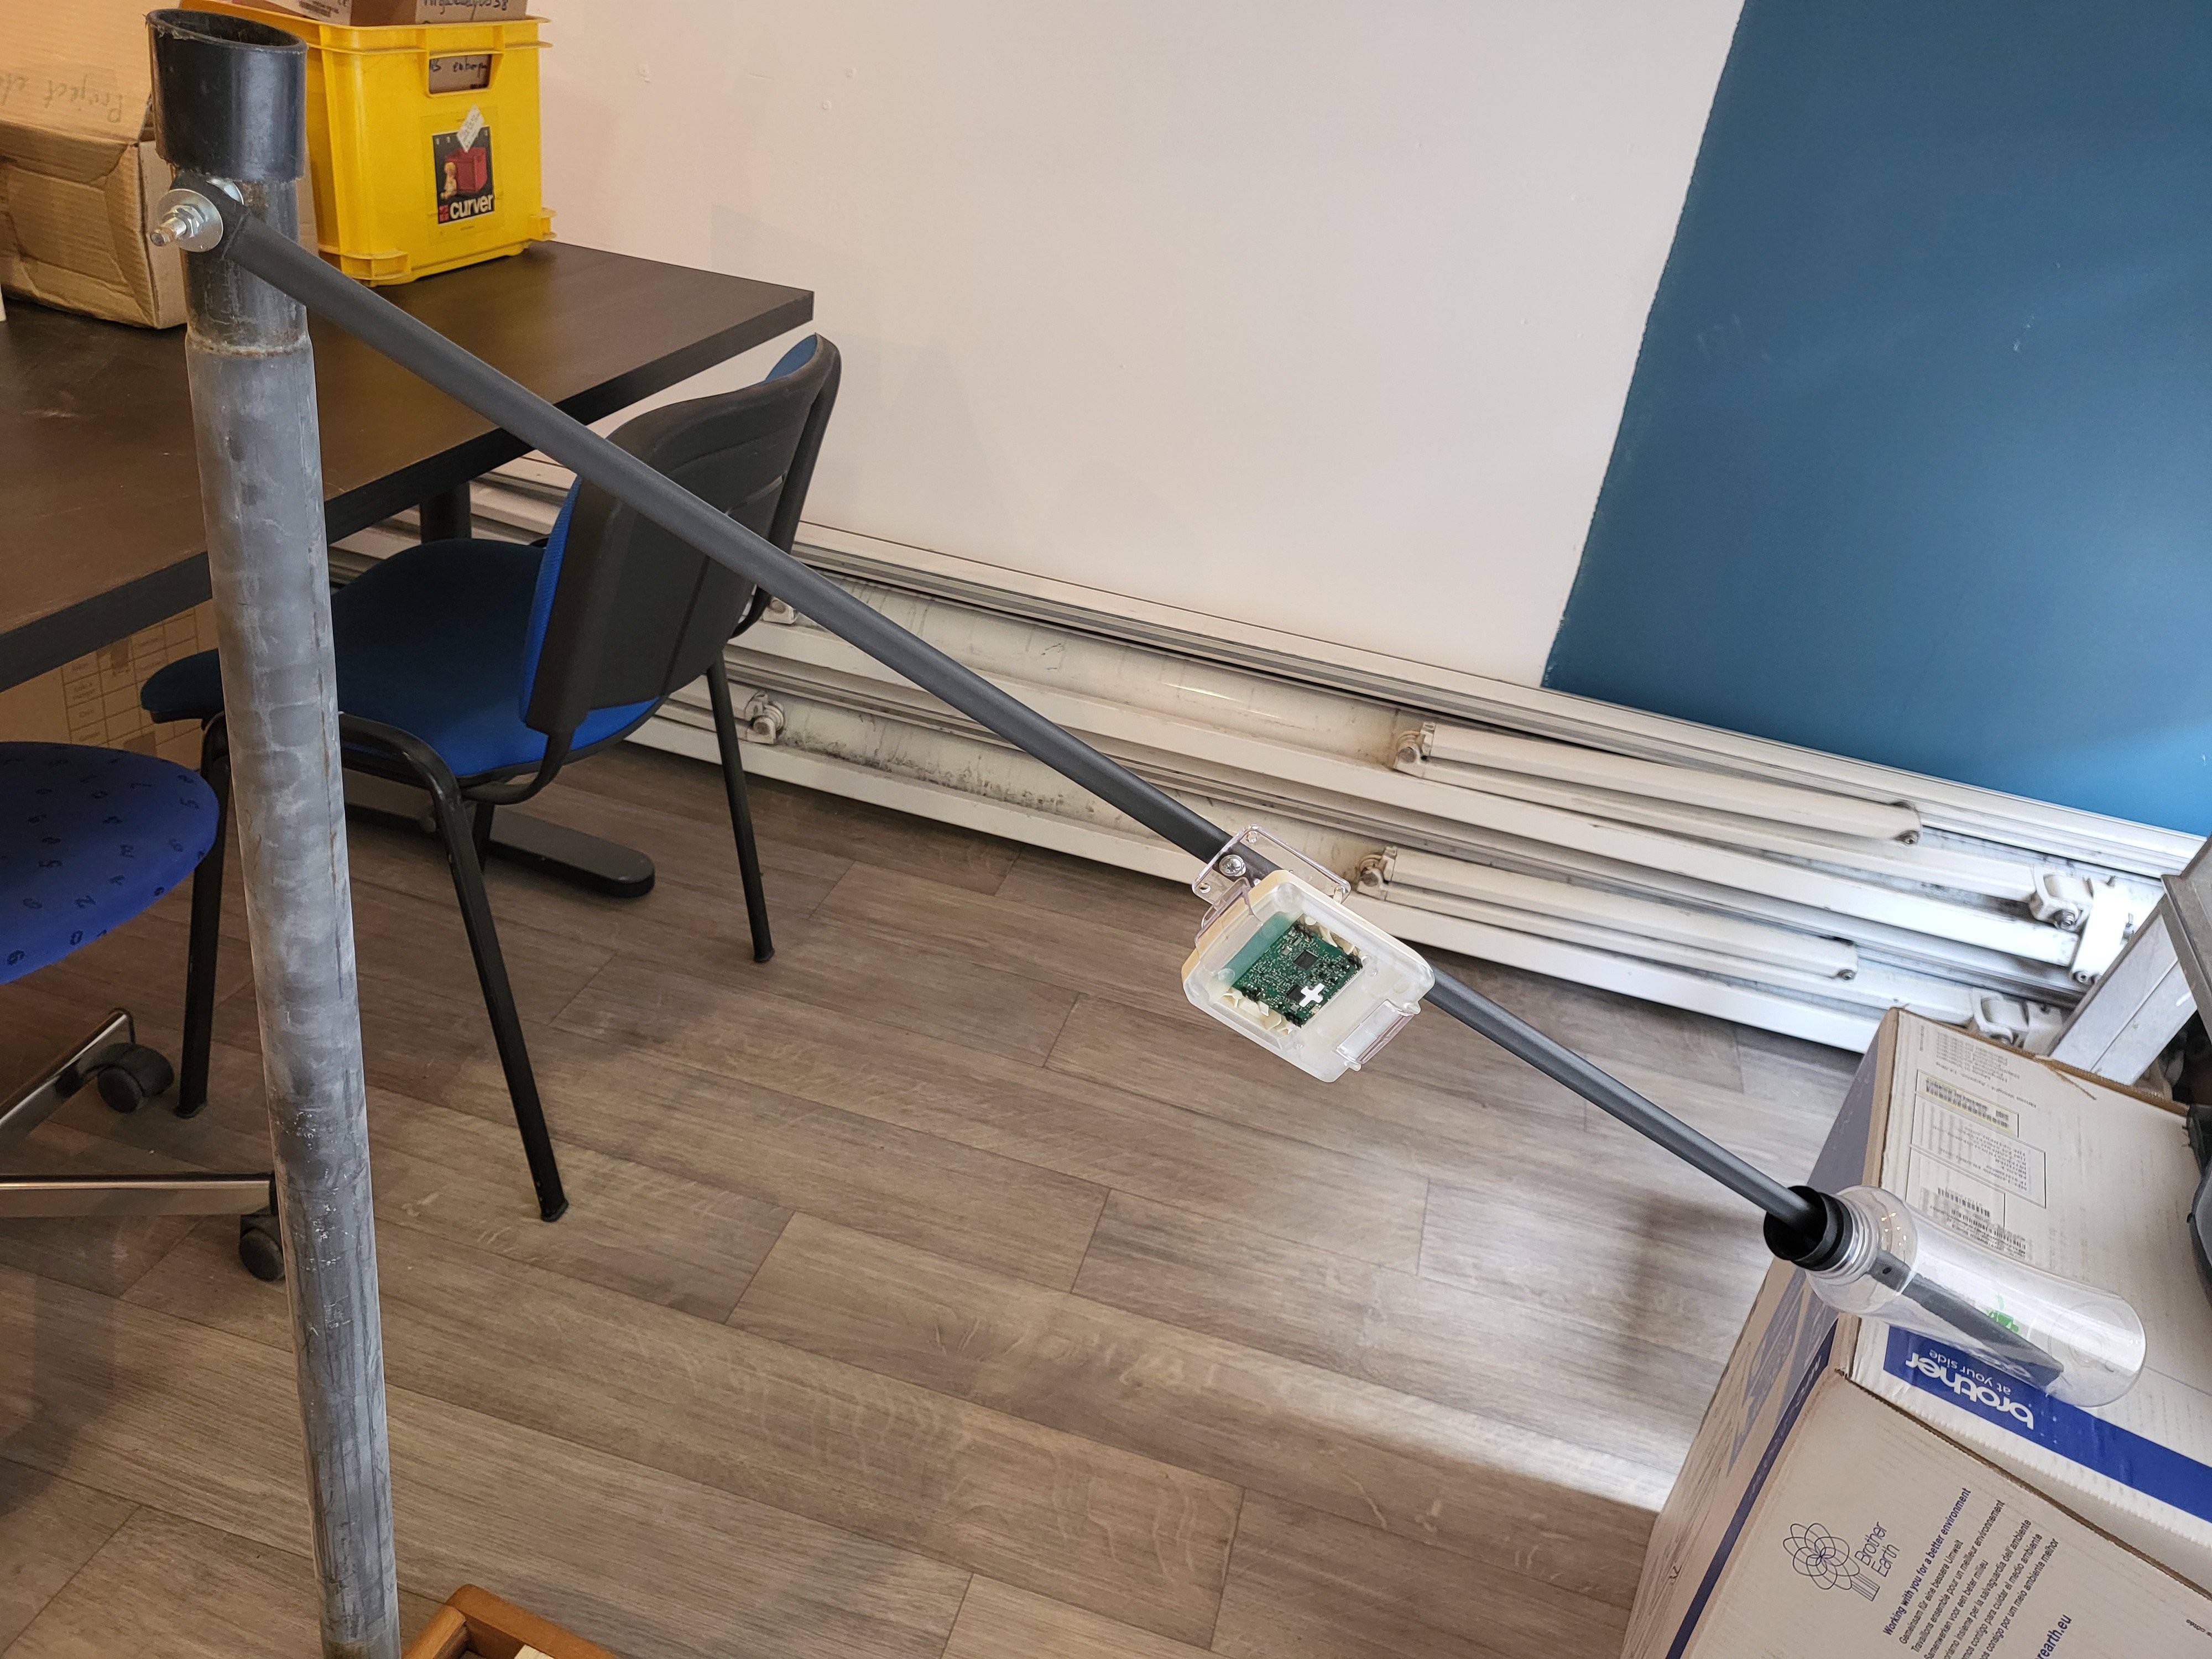
The simple fact is that you can often get by with indirect measurement techniques if you’re constrained by things like cost, complexity, or practicality. We’ve seen other work along these very lines before. Back in 2022, we covered the work of Brian Wyld, who wanted to measure the level of a body of water. Pressure and direct surface-level sensors were impractical, so he got creative. He built a rotating arm with a float on one side, and threw on a microcontroller board with an accelerometer included. The accelerometer readings were enough to allow him to figure out the angle of the float, and in turn, mathematically derive the water level as desired via simple geometry!
“We need to measure the water level but we only have an accelerometer!” “No problem.” Credit: Brian Wyld
We’ve also seen how this can go wrong. For example, capacitive sensors are often suggested for measuring soil moisture levels. The idea is that by measuring the capacitance of the soil, you can measure how much water content there is. The only problem is that moisture isn’t the only thing that changes the capacitance of the soil.
For these indirect techniques to work well, what you’re measuring needs to have a fairly direct correlation with what you’re trying to find out. Hence why Wyld’s float was a success — because the float angle is directly relevant to the water level. Similarly, in Coca-Cola’s case, pressure was what determined the change in the current curve of the Freestyle FCM. If the curve also changed significantly with ambient temperature or some other factor, it wouldn’t be possible to measure it and get out a reliable pressure value.
Ultimately, pseudo-sensors can be a useful tool to have in your engineering toolkit. They can let you achieve surprising feats with some mathematical insight and basic equipment. Just make sure there’s a strong basis for what you’re doing so you don’t end up with junk outputs that cause you more harm than good.
Magnetic levitation has not quite revolutionized the world of transit the way some of us might have hoped. It has, however, proven useful to [mrdiytechmagic], who has put the technology to grand use in making his levitating snail lamp.
The build is actually relatively complicated compared to some levitating toys you might have seen before. It uses a number of coils to produce a magnetic field to levitate the 3D printed plastic snail which contains the lighting element itself.
The actively controlled levitation base uses a magnetic sensor to detect the changing field as the snail moves above it. It then varies the current going to the various coils to keep the snail balanced and in place. Power is transmitted with a further larger coil, much as in a wireless phone charger. This is picked up by a circuit in the snail, and used to power the LEDs inside.
It might not have been our first choice, but having seen it in action, we can’t deny a levitating 3D printed snail is pretty impressive. If you’d prefer something slightly more befitting such a high-tech looking presentation, perhaps a hovering SpaceX Starship would be more your speed.
Monorails aren’t just the core reason why The Simpsons remains on air after thirty-six seasons, twenty-six of which are unredeemable garbage. They’re also an interesting example of oddball rail travel which has never really caught on beyond the odd gadgetbahn project here and there. [Hyperspace Pirate] recently decided to investigate the most interesting kind of monorail of all—the gyro stabilized type—on a small scale for our viewing pleasure.
The idea of a gyro-stabilized monorail is to use active stability systems to allow a train to balance on a single very thin rail. The benefits of this are questionable; one ends up with an incredibly expensive and complex rail vehicle that must always run perfectly or else it will tip over. However, it is charming to watch in action.
[Hyperspace Pirate] explains how the monorail vehicle uses control moment gyroscopes to keep itself upright. The video also explains the more common concept of reaction wheels so the two systems can be contrasted and compared. It all culminates in a wonderful practical demonstration with a small 3D printed version of a 20th-century gyro monorail running on a 24″ track.
If you’re studying mechanical engineering this is a great project to pore over to see theoretical principles put into obvious practice. Video after the break.