Vista Normal

Hay nuevos artículos disponibles. Pincha para refrescar la página.
Hoy — 10 Abril 2025Hackaday

Ask Hackaday: What’s a Sun-Like Star?

10 Abril 2025 at 14:00

Is a bicycle like a motorcycle? Of course, the answer is it is and it isn’t. Saying something is “like” something else presupposes a lot of hidden assumptions. In the category “things with two wheels,” we have a winner. In the category “things that require gasoline,” not so much. We’ve noticed before that news stories about astronomy often talk about “sun-like stars” or “Earth-like planets.” But what does that really mean? [Paul Gilster] had the same questions, if you want to read his opinion about it.

[Paul] mentions that even textbooks can’t agree. He found one that said that Centauri A was “sun-like” while Centauri B was sometimes considered sun-like and other times not. So while Paul was looking at the examples of press releases and trying to make sense of it all, we thought we’d just ask you. What makes a star like our sun? What makes a planet like our planet?

Part of the problem is we don’t really know as much as we would like about other planets and their stars. We know more than we used to, of course. Still, it would be like wondering if the motorcycle was like that distant point of light. Maybe.

This is one of those things that seems deceptively simple until you start thinking about it. Is a planet Earth-like if it is full of water? What if it is totally covered in water? What if there’s no life at all? But life isn’t it, either. Methane-breathing silicon-based life probably doesn’t live on Earth-like planets.

Maybe Justice Potter Stewart was on to something when he said, “I know it when I see it!” Unfortunately, that’s not very scientific.

So what do you think? What’s a sun-like star? What’s an Earth-like planet? Discuss in the comments.

Don’t even get us started on super-earths, whatever they are. We are learning more about our neighbors every day, though.

Clever Engineering Leaves Appliance Useless

Por: Tom Nardi
10 Abril 2025 at 11:00

Around these parts, we generally celebrate clever hacks that let you do more with less. So if somebody wrote in to tell us how they used multiplexing to drive the front panel of their latest gadget with fewer pins on the microcontroller than would normally be required, we’d be all over it. But what if that same hack ended up leading to a common failure in a piece of consumer hardware?

As [Jim] recently found out, that’s precisely what seems to be ailing the Meaco Arete dehumidifier. When his stopped working, some Internet searching uncovered the cause of the failure: if a segment in the cheap LED display dies and shorts out, the multiplexing scheme used to interface with the front panel essentially reads that as a stuck button and causes the microcontroller to lock up. He passed the info along to us as a cautionary tale of how over-optimization can come with a hidden cost down the line.

Judging by the thread from the Badcaps forum, the problem was identified last summer. But unless you had this particular dehumidifier and went searching for it, it’s not the kind of thing that you’d otherwise run into. The users start by going through the normal diagnostic steps, but come up short (no pun intended).

Given its simplicity, the front panel PCB was not an obvious failure point.

Eventually, user [CG2] resorts to buzzing out all the connections to the two digit seven-segment LED display on the front panel, and finds a dead short on one of the segments. After removing the display, the dehumidifier sprung back to life and everything worked as expected. It wasn’t hard to identify a suitable replacement display on AliExpress, and swapping it out brought the appliance back up to full functionality.

Now to be fair, a shorted out component is likely to cause havoc wherever it might be in the circuit, and as such perhaps it’s the lowest-bidder LED display with the unusually high failure rate that’s really to blame here. But it’s also more likely you’d interpret a dark display as a symptom of the problem rather than the cause, making this a particularly tricky failure to identify.

In any event, judging by how many people seem to be having the same problem, and the fact that there’s now an iFixit guide on how to replace the shorted display, it seems like this particular product was cost-optimized just a bit too far.

Everyone’s Talking GPMI, Should you?

Por: Jenny List
10 Abril 2025 at 08:00

The tech press has been full of announcements over the last day or two regarding GPMI. It’s a new standard with the backing of a range of Chinese hardware companies, for a high-speed digital video interface to rival HDMI. The Chinese semiconductor company HiSilicon have a whitepaper on the subject (Chinese language, Google Translate link), promising a tremendously higher data rate than HDMI, power delivery well exceeding that of USB-C, and interestingly, bi-directional data transfer. Is HDMI dead? Probably not, but the next few years will bring us some interesting hardware as they respond to this upstart.

Reading through pages of marketing from all over the web on this topic, it appears to be an early part of the push for 8k video content. There’s a small part of us that wonders just how far we can push display resolution beyond that of our eyes without it becoming just a marketing gimmick, but it is true to say that there is demand for higher-bandwidth interfaces. Reports mention two plug styles: a GPMI-specific one and a USB-C one. We expect the latter to naturally dominate. In terms of adoption, though, and whether users might find themselves left behind with the wrong interface, we would expect that far from needing to buy new equipment, we’ll find that support comes gradually with fallback to existing standards such as DisplayPort over USB-C, such that we hardly notice the transition.

Nearly a decade ago we marked the passing of VGA. We don’t expect to be doing the same for HDMI any time soon in the light of GPMI.

Making Liquid Oxygen: Far From Easy but Worth the Effort

10 Abril 2025 at 05:00

Normally, videos over at The Signal Path channel on YouTube have a certain vibe, namely teardowns and deep dives into high-end test equipment for the microwave realm. And while we always love to see that kind of content, this hop into the world of cryogenics and liquid oxygen production shows that [Shahriar] has other interests, too.

Of course, to make liquid oxygen, one must first have oxygen. While it would be easy enough to get a tank of the stuff from a gas supplier, where’s the fun in that? So [Shahriar] started his quest with a cheap-ish off-the-shelf oxygen concentrator, one that uses the pressure-swing adsorption cycle we saw used to great effect with DIY O2 concentrators in the early days of the pandemic. Although analysis of the machine’s output revealed it wasn’t quite as capable as advertised, it still put out enough reasonably pure oxygen for the job at hand.

The next step in making liquid oxygen is cooling it, and for that job [Shahriar] turned to the cryocooler from a superconducting RF filter, a toy we’re keen to see more about in the future. For now, he was able to harvest the Stirling-cycle cryocooler and rig it up in a test stand with ample forced-air cooling for the heat rejection end and a manifold to supply a constant flow of oxygen from the concentrator. Strategically placed diodes were used to monitor the temperature at the cold end, a technique we can’t recall seeing before. Once powered up, the cryocooler got down to the 77 Kelvin range quite quickly, and within an hour, [Shahriar] had at least a hundred milliliters of lovely pale blue fluid that passed all the usual tests.

While we’ve seen a few attempts to make liquid nitrogen before, this might be the first time we’ve seen anyone make liquid oxygen. Hats off to [Shahriar] for the effort.


Ask Hackaday: Vibe Coding

Por: Jenny List
10 Abril 2025 at 02:00

Vibe coding is the buzzword of the moment. What is it? The practice of writing software by describing the problem to an AI large language model and using the code it generates. It’s not quite as simple as just letting the AI do your work for you because the developer is supposed to spend time honing and testing the result, and its proponents claim it gives a much more interactive and less tedious coding experience. Here at Hackaday, we are pleased to see the rest of the world catch up, because back in 2023, we were the first mainstream hardware hacking news website to embrace it, to deal with a breakfast-related emergency.

Jokes aside, though, the fad for vibe coding is something which should be taken seriously, because it’s seemingly being used in enough places that vibe coded software will inevitably affect our lives.  So here’s the Ask Hackaday: is this a clever and useful tool for making better software more quickly, or a dangerous tool for creating software nobody quite understands, containing bugs which could cause a disaster?

Our approach to writing software has always been one of incrementally building something from the ground up, which satisfies the need. Readers will know that feeling of being in touch with how a project works at all levels, with a nose for immediately diagnosing any problems that might occur. If an AI writes the code for us, the feeling is that we might lose that connection, and inevitably this will lead to less experienced coders quickly getting out of their depth. Is this pessimism, or the grizzled voice of experience? We’d love to know your views in the comments. Are our new AI overlords the new senior developers? Or are they the worst summer interns ever?

Going to the Top with a Raspberry Pi Elevator

9 Abril 2025 at 23:00

[BorisDigital] was mesmerised by a modern elevator. He decided to see how hard it would be to design his own elevator based on Raspberry Pis. He started out with a panel for the elevator and a call panel for the elevator lobby. Of course, he would really need three call panels since he is pretending to have a three-floor building.

It all looks very professional, and he has lots of bells and whistles, including an actual alarm. With the control system perfected, it was time to think about the hydraulics and mechanical parts to make a door and an actual lift.

It is still just a model, but he does have 10A AC switches for the pumps. Everything talks via MQTT over WiFi. There’s also a web-based control dashboard. We didn’t count how many Pi boards are in the whole system, but it is definitely more than three.

If you are wondering why this was built, we are too. But then again, we never really need an excuse to go off on some project, so we can’t throw stones.

Want to see a more practical build? Check it out. Perhaps he’ll start on an escalator next.

FLOSS Weekly Episode 828: Incus Inception

9 Abril 2025 at 20:00

This week, Jonathan Bennett and Rob Campbell talk to Stéphane Graber about LXC, Linux Containers, and Incus! Why did Incus fork from LXD, why are Fortune 500 companies embracing it, and why might it make sense for your home lab setup? Watch to find out!

Did you know you can watch the live recording of the show right on our YouTube Channel? Have someone you’d like us to interview? Let us know, or contact the guest and have them contact us! Take a look at the schedule here.

Direct Download in DRM-free MP3.

If you’d rather read along, here’s the transcript for this week’s episode.

Places to follow the FLOSS Weekly Podcast:


Theme music: “Newer Wave” Kevin MacLeod (incompetech.com)

Licensed under Creative Commons: By Attribution 4.0 License

Ayer — 9 Abril 2025Hackaday

In 2025, The Philly Maker Faire Finds Its Groove

Por: Tom Nardi
9 Abril 2025 at 14:00

The first Philadelphia Maker Faire was extremely impressive, and seemed poised to be one of the premier maker events on the East Coast. Unfortunately, it had the misfortune of happening just a few months before COVID-19 made such events impossible. Robbed of all its momentum, the event tried out different venues after the shadow of the pandemic was gone, but struggled to meet the high bar set by that inaugural outing.

But after attending the the 2025 Philadelphia Maker Faire this past weekend, I can confidently say the organizers have moved the needle forward. This year marks the second time the event has been held at the Cherry Street Pier, a mixed-use public space with an artistic bent that not only lends itself perfectly to the spirit of Maker Faire but offers room for expansion in the future. The pier was packed with fascinating exhibits and excited attendees, and when the dust settled, everyone I spoke to was thrilled with how the day went and felt extremely positive about the future of the Faire.

Providing coverage of an event like this is always difficult, as there’s simply no way I could adequately describe everything there was to see and do. The following represents just a few of the projects that caught my eye; to see all that the Philadelphia Maker Faire has to offer, I’d strongly suggest you make the trip out in 2026.

Wasteworld Toys

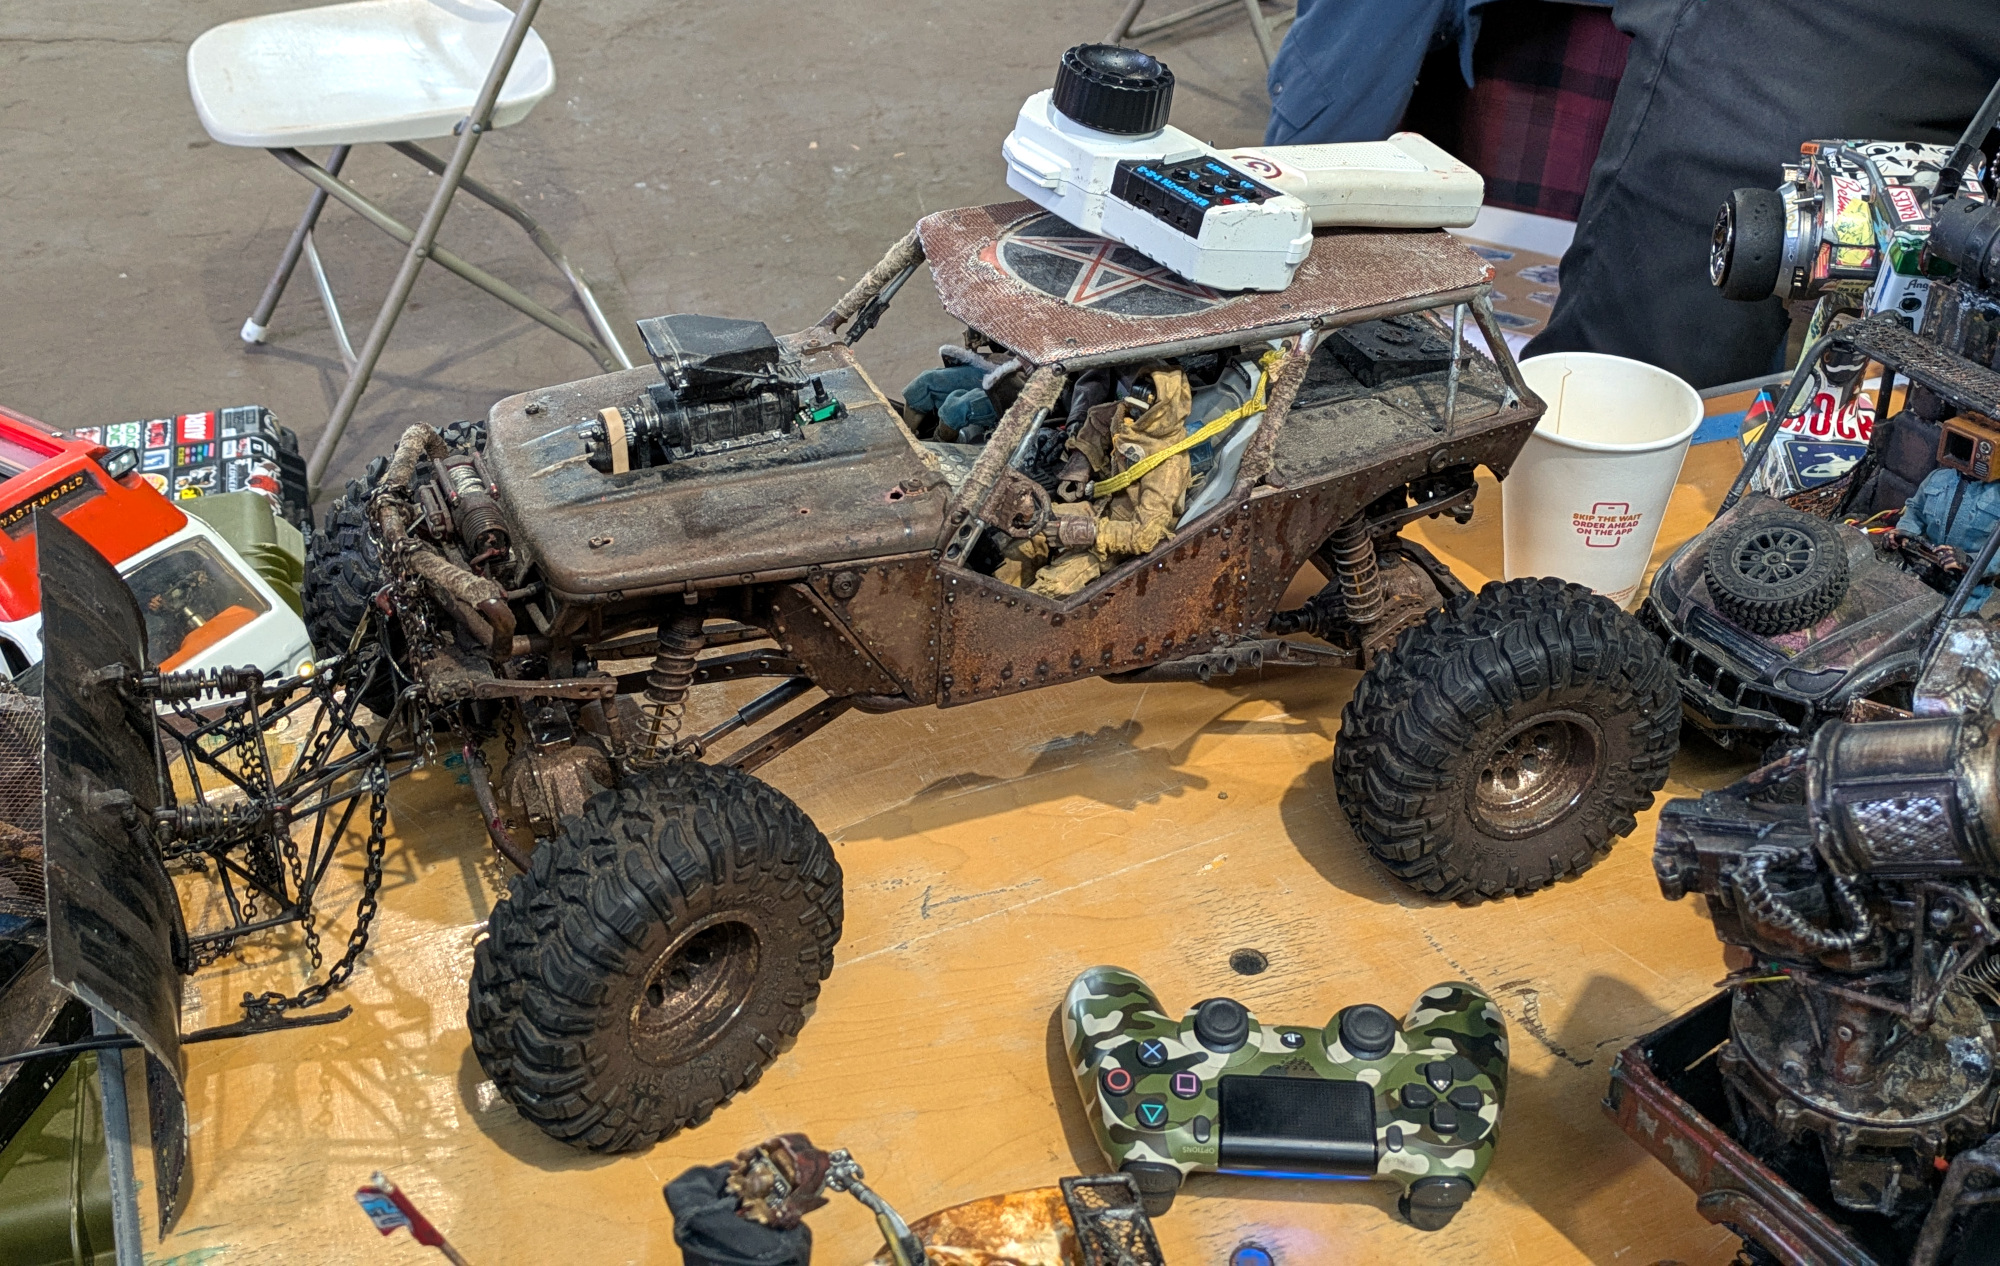
Of all the awesome projects I saw during the Faire, the one that stuck with me the most has to be Brett Houser’s Wasteworld Toys. This incredible collection of hand-made remote controlled vehicles invoke the look and feel of the Mad Max universe, but are populated with its own cast of post-apocalyptic characters that come from the depths of Brett’s obviously considerable imagination.

Whether your saw them as pieces of art or electronic marvels, it was impossible not to be impressed with the work Brett put into these builds. While there were some 3D printed parts and cannibalized model kits, much of the raw material used to build the vehicles and characters came from the trash. Brett has an eye for repurposing everyday objects, like taking the metal top from a disposable lighter and turning it into an armored faceplate for one of his Wasteworld warriors.

Beyond being able to simply drive them around, most of the vehicles had some secondary function. One was equipped with an Airsoft cannon, another had a functional flame-thrower, and there was even a mobile rocket launcher that actually fired tiny rockets. They weren’t all weapons of war though: there was a surveillance van that featured a tiny display showing nearby WiFi networks, and a tricked-out station wagon that had an emulated version of Contra running in the back that you could play with a Bluetooth PlayStation controller.

Many of the vehicles featured first person view (FPV) capabilities, with the cameras so expertly hidden on the vehicles and cybernetic characters that at first glance you assume they’re just part of the visual theme and not functional components. To make the experience even more immersive, several vehicles featured displays that were really only visible when looking through the FPV gear, such as digital readouts of the system’s battery voltage.

As impressive as the vehicles of Wasteworld Toys was, it was perhaps Brett himself who left the biggest impression on me. Humble, affable, and eager to share the intricate details of his work, he was even willing to hand the controls of his creations over to attendees, much to their delight. The Wasteworld couldn’t have asked for a better ambassador.

Myelin BCI Board

Hackaday readers may recall the OpenBCI project, which made some headlines about a decade ago with their relatively low-cost development boards for experimenting with brain-computer interfaces (BCIs). We covered a few projects that used their software and hardware, including a flying shark controlled by EEG signals.

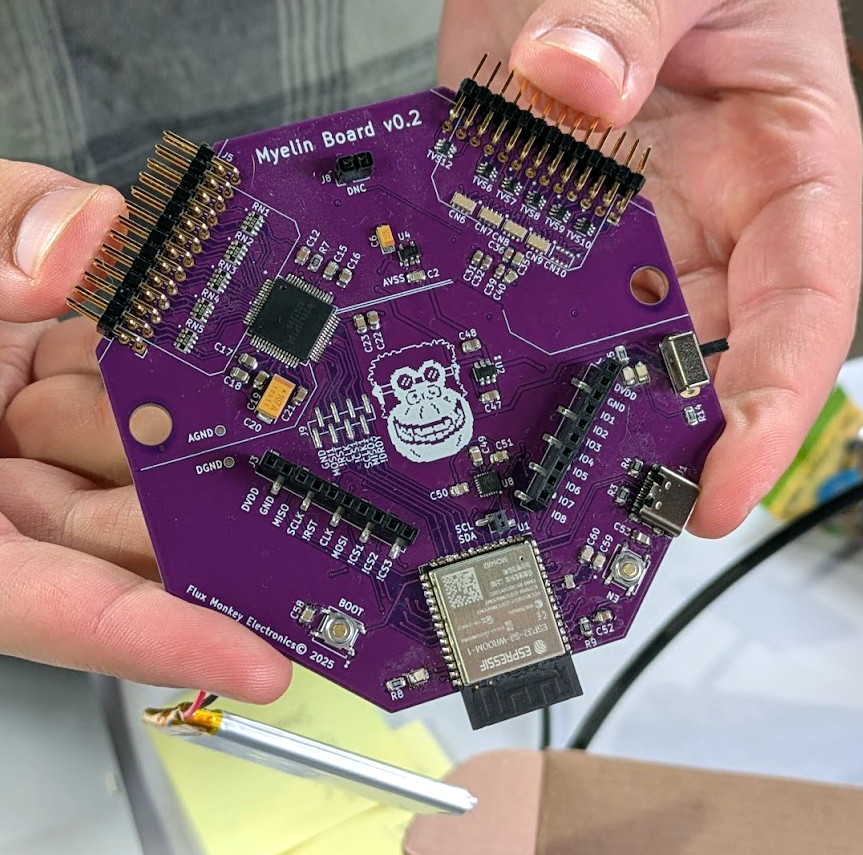
It turns out that OpenBCI has now turned their attention to some kind of mixed reality headset that costs as much as a new car, leaving the future of their more hobbyist friendly hardware in question. Which is why Mike Recine has been working on the Myelin, an open source hardware project that continues the legacy of OpenBCI’s early work. Powered by the ESP32, the battery-powered board can wirelessly link to your phone or computer to deliver 16 channels of EEG data.

Mike is hoping to launch a Kickstarter for the hardware soon, offering up assembled and ready-to-use Myelin boards. Kits are also on the horizon, and of course as an open source hardware project, spinning up your own board will be an option as well. The project doesn’t have much of an online presence currently, but interested parties can sign up to be notified when more information goes live.

A Cardboard Table Saw

The ChompSaw is advertised as a “kid-safe power tool for cutting cardboard” but it doesn’t take long to realize that’s selling the machine a bit short. There’s no blade in the machine, instead it uses a small metal piston to rapidly nibble away at the cardboard, a mechanism that co-founder Max Liechty says could be thought of as a “full-auto hole punch.” Even though there’s no blade, the business end of the ChompSaw is still under a protective cover that keeps anything thicker than 3 mm cardboard out. You couldn’t hurt yourself with this machine if you tried.

It rapidly rips through cardboard in any direction, making it easy to follow patterns and cut out complex shapes. Though it was designed primarily for common cardboard (think: all those Amazon boxes you’ve got stacked up), it can chew through other thin materials such as paper, foam, and plastic, opening up even more possibilities.

The ChompSaw brought in over $1 million during its 2023 Kickstarter campaign, and is available for purchase through their site. While it might not seem like the kind of machine we’d usually get excited about at Hackaday, its ability to cut through foam and other materials holds promise for more practical applications than rainy day arts and crafts. Plus, one should never underestimate the value of CAD: Cardboard Aided Design.

The Sights of Philly Maker Faire

The Road Ahead

In addition to the attendees and exhibitors, I also got the chance to talk to some of the folks behind the Philadelphia Maker Faire. It will probably come as no surprise to hear they all share a passion for discovering and showcasing local talent, and  are very excited about the future of the event. There was even some talk about coordinating efforts with other art and tech events in the area such as JawnCon.

Considering they were up against some dreary weather, the organizers were encouraged by the fantastic turnout. Similarly, the venue itself was more than up to the challenge, and should have no trouble supporting the event as it grows. Put simply, the Philadelphia Maker Faire has found its stride, and promises to be even bigger and better next year. If you’re in the Northeast US, this is an event you should keep on your calendar for 2026 and beyond.

Forget Propellers, Embrace Tentacle-based Locomotion

9 Abril 2025 at 11:00

Underwater robots face many challenges, not least of which is how to move around. ZodiAq is a prototype underwater soft robot (link is to research paper) that takes an unusual approach to this problem: multiple flexible appendages. The result is a pretty unconventional-looking device that can not only get around effectively, but can do so without disturbing marine life.

ZodiAq sports a soft flexible appendage from each of its twelve faces, but they aren’t articulated like you might think. Despite this, the device can crawl and swim.

With movement inspired by bacterial flagella, ZodiAq moves in an unusual but highly controllable way.

Each soft appendage is connected to a motor, which rotates the attached appendage. This low-frequency but high-torque rotation, combined with the fact that each appendage has a 45° bend to it, has each acting as a rotor. Rotation of the appendages acts on the surrounding fluid, generating thrust. When used together in the right way, these appendages allow the unit to move in a perfectly controllable manner.

This locomotion method is directly inspired by the swimming gait of bacterial flagella, which the paper mentions are regarded as the only example of a biological “wheel”.

How fast can it go? The prototype covers a distance of two body lengths every fifteen seconds. True, it’s no speed demon compared to a propeller, but it doesn’t disturb marine life or environments as it moves around. This method of movement has a lot going for it. It’s adaptable and doesn’t use all twelve appendages at once; so there’s redundancy built in. If some get damaged or go missing, it can still move, just slower.

ZodiAq‘s design strikes us as a very accessible concept, should any aspiring marine robot hackers wish to give it a shot. We’ve seen other highly innovative and beautiful underwater designs as well, like body-length undulating fins and articulated soft arms.

We do notice that since it lacks a “front” — it might be a challenge to decide how to mount something like a camera. If you have any ideas, share them in the comments.

Better Bearings Take the Wobble Out of Premium Scroll Wheel

9 Abril 2025 at 08:00

Sitting in front of a computer all day isn’t exactly what the firmware between our ears was tuned to do. We’re supposed to be hunting and gathering, not hunting and pecking. So anything that makes the computing experience a little more pleasurable is probably worth the effort, and this premium wireless scroll wheel certainly seems to fit that bill.

If this input device seems familiar, that’s because we featured [Engineer Bo]’s first take on this back at the end of 2024. That version took a lot of work to get right, and while it delivered high-resolution scrolling with a premium look and feel, [Bo] just wasn’t quite satisfied with the results. There were also a few minor quibbles, such as making the power switch a little more user-friendly and optimizing battery life, but the main problem was the one that we admit would have driven us crazy, too: the wobbling scroll wheel.

[Bo]’s first approach to the wobble problem was to fit a larger diameter bearing under the scroll wheel. That worked, but at the expense of eliminating the satisfying fidget-spinner action of the original — not acceptable. Different bearings yielded the same result until [Bo] hit on the perfect solution: a large-diameter ceramic bearing that eliminated the wobble while delivering the tactile flywheel experience.

The larger bearing left more room inside for the redesigned PCB and a lower-profile, machined aluminum wheel. [Bo] also had a polycarbonate wheel made, which looks great as is but would really be cool with internal LEDs — at the cost of battery life, of course. He’s also got plans for a wheel machined from wood, which we’ll eagerly await.

Salamander Robot is Squishy

9 Abril 2025 at 05:00

If you want to get started in microfluidic robotics, [soiboi soft’s] salamander is probably too complex for a first project. But it is impressive, and we bet you’ll learn something about making this kind of robot in the video below.

The pneumatic muscles are very impressive. They have eight possible positions using three sources of pressure. This seems like one of those things that would have been nearly impossible to fabricate in a home lab a few decades ago and now seems almost trivial. Well, maybe trivial isn’t the right word, but you know what we mean.

The soft robots use layers of microfluidic channels that can be made with a 3D printer. Watching these squishy muscles move in an organic way is fascinating. For right now, the little salamander-like ‘bot has a leash of tubes, but [soiboi] plans to make a self-contained version at some point.

If you want something modular, we’ve seen Lego-like microfluidic blocks. Or, grab the shrinky dinks.

Dozens of Solenoids Turn Vintage Typewriter into a Printer

9 Abril 2025 at 02:00

An electric typewriter is a rare and wonderful thrift store find, and even better if it still works. Unfortunately, there’s not as much use for these electromechanical beauties, so if you find one, why not follow [Konstantin Schauwecker]’s lead and turn it into a printer?

The portable typewriter [Konstantin] found, a Silver Reed 2200 CR, looks like a model from the early 1980s, just before PCs and word processing software would sound the death knell for typewriters. This machine has short-throw mechanical keys, meaning that a physical press of each key would be needed rather than electrically shorting contacts. Cue the order for 50 low-voltage solenoids, which are arranged in rows using 3D printed holders and aluminum brackets, which serve as heat sinks to keep the coils cool. The solenoids are organized into a matrix with MOSFET drivers for the rows and columns, with snubber diodes to prevent voltage spikes across the coils, of course. A Raspberry Pi takes care of translating an input PDF file into text and sending the right combination of GPIO signals to press each key.

The action of the space bar is a little unreliable, so page formatting can be a bit off, but other than that, the results are pretty good. [Konstantin] even managed to hook the printer up to his typewriter keyboard, which is pretty cool, too.

ASCII to Mainframe

8 Abril 2025 at 23:00

IBM mainframes are known for very unusual terminals. But IBM made many different things, including the IBM 3151 ASCII terminal, which uses a cartridge to emulate a VT220 terminal. [Norbert Keher] has one and explains in great detail how to connect it to a mainframe.

It had the 3151 personality cartridge for emulating multiple IBM and DEC terminals. However, the terminal would not start until he unplugged it. The old CRT was burned in with messages from an IBM 3745, which helped him work out some of the configuration.

If you’ve only used modern ASCII terminals, you might not realize that many terminals from IBM and other vendors used to use a block mode where the computer would dump a screen to the terminal. You could “edit” the screen (that is, fill in forms or enter lines). Then you’d send the whole screen back in one swoop. This is “block” mode, and some of the terminals the 3151 can emulate are character mode, and others are block mode, which explains its odd keyboard and commands.

[Norbert] gets the terminal running with a virtual mainframe, but along the way, he explains a lot about what’s going on. The video is about an hour long, but it is an hour well spent if you are interested in mainframe history.

Of course, you can always get the real deal to connect. If you don’t have your own virtual mainframe, you are missing out.

Designing A Tone Control Properly

Por: Jenny List
8 Abril 2025 at 20:00

Many years ago, audio equipment came with a tone control, a simple RC filter that would cut or boost the bass to taste. As time passed, this was split into two controls for bass and treble, and then finally into three for bass, mid, and treble. When audiophile fashion shifted towards graphic equalisers, these tone controls were rebranded as “3-band graphic equalisers”, a misleading term if ever we heard one. [Gabriel Dantas] designed one of these circuits, and unlike the simple passive networks found on cheap music centres of old, he’s doing a proper job with active filters.

The write-up is worth a read even if you are not in the market for a fancy tone control, for the basic primer it gives on designing an audio filter. The design contains, as you might expect, a low-pass, a bandpass, and a high-pass filter. These are built around TL072 FET-input op-amps, and an LM386 output stage is added to drive headphones.

The final project is built on a home-made PCB, complete with mains power supply. Audiophiles might demand more exotic parts, but we’re guessing that even with these proletarian components it will still sound pretty good. Probably better than the headphone amplifier featured in a recent project from a Hackaday writer, at least. There’s a build video, below the break.


AnteayerHackaday

Turning Old Cellphones into SBCs

8 Abril 2025 at 14:00

[David] sent us a tip about a company in Belgium, Citronics, that is looking to turn old cellphones into single-board computers for embedded Linux applications. We think it’s a great idea, and have long lamented how many pocket supercomputers simply get tossed in the recycling stream, when they could be put to use in hacker projects. So far, it looks like Citronics only has a prototyping breakout board for the Fairphone 2, but it’s a promising idea.

One of the things that’s stopping us from re-using old phones, of course, is the lack of easy access to the peripherals. On the average phone, you’ve got one USB port and that’s it. The Citronics dev provides all sorts of connectivity: 4x USB 2.0, 1x Ethernet 10/100M, and a Raspberry Pi Header (UART, SPI, I2C, GPIO). At the same time, for better or worse, they’ve done away with the screen and its touch interface, and the camera too, but they seem to be keeping all of the RF capabilities.

The whole thing runs Linux, which means that this won’t work with every phone out there, but projects like PostmarketOS and others will certainly broaden the range of usable devices. And stripping off the camera and screen has the secondary advantages of removing the parts that get most easily broken and have the least support from custom Linux distros.

We wish we had more details about the specifics of the break-out boards, but we like the idea. How long before we see an open-source implementation of something similar? There are so many cheap used and broken cellphones out there that it’s certainly a worthwhile project!

LayerLapse Simplifies 3D Printer Time-lapse Shots

Por: Tom Nardi
8 Abril 2025 at 11:00

We know you’ve seen them: the time-lapses that show a 3D print coming together layer-by-layer without the extruder taking up half the frame. It takes a little extra work compared to just pointing a camera at the build plate, but it’s worth it to see your prints materialize like magic.

Usually these are done with a plugin for OctoPrint, but with all due respect to that phenomenal project, it’s a lot to get set up if you just want to take some pretty pictures. Which is why [Whopper Printing] put together the LayerLapse. This small PCB is designed to trigger your DSLR or mirrorless camera once its remotely-mounted hall effect sensor detects the presence of a magnet.

The remote hall effect sensor.

The idea is that you just need to stick a small magnet to your extruder, add a bit of extra G-code that will park it over the sensor at the end of each layer, and you’re good to go. There’s even a spare GPIO pin broken out should you want to trigger something else on each layer of your print. Admittedly we can’t think of anything else right now that would make sense, other than some other type of camera, but we’re sure some creative folks out there could put this feature to use.

Currently, [Whopper Printing] is selling the LayerLapse as a finished product, though it does sound like a kit version is in the works. There’s also instructions for building a DIY version of the hardware using your microcontroller of choice. Whether you buy or build the hardware, the firmware is available under the MIT license for your tinkering pleasure.

Being hardware hackers, we appreciate the stand-alone nature of this solution. But if you’re already controlling your printer through OctoPrint, you’re probably better off just setting up one of the available time-lapse plugins.

Printed Robotic Arm Pumps Up With Brushless Motors

Por: Tom Nardi
8 Abril 2025 at 08:00

[JesseDarr] recently wrote in to tell us about their dynamic Arm for Robitc Mischief (dARM), a mostly 3D printed six degrees of freedom (6DOF) robotic arm that’s designed to be stronger and more capable than what we’ve seen so far from the DIY community.

The secret? Rather than using servos, dARM uses brushless DC (BLDC) motors paired with ODrive S1 controllers. He credits [James Bruton] and [Skyentific] (two names which regular Hackaday readers are likely familiar with) for introducing him to not only the ODrive controllers, but the robotics applications for BLDCs in the first place.

dARM uses eight ODrive controllers on a CAN bus, which ultimately connect up to a Raspberry Pi 4B with a RS485 CAN Hat. The controllers are connected to each other in a daisy chain using basic twisted pair wire, which simplifies the construction and maintenance of the modular arm.

As for the motors themselves, the arm uses three different types depending on where they are located, with three Eaglepower 8308 units for primary actuators, a pair of GB36-2 motors in the forearm, and finally a GM5208-24 for the gripper. Together, [JesseDarr] says the motors and gearboxes are strong enough to lift a 5 pound (2.2 kilogram) payload when extended in a horizontal position.

The project’s documentation includes assembly instructions for the printed parts, a complete Bill of Materials, and guidance on how to get the software environment setup on the Raspberry Pi. It’s not exactly a step-by-step manual, but it looks like there’s more than enough information here for anyone who’s serious about building a dARM for themselves.

If you’d like to start off by putting together something a bit easier, we’ve seen considerably less intimidating robotic arms that you might be interested in.

The 1980s Computer, French Style

Por: Jenny List
8 Abril 2025 at 05:00

Should you travel around Europe, you may notice that things in France are ever so slightly different. Not necessarily better or worse, simply that the French prefer to plough their own furrow rather than importing cultural tends from their neighbors.

In the 1980s this was evident in their home computers, because as well as a Minitel terminal in your house, you could have an all-French machine plugged into your TV. [Retro Krazy] has just such a machine — it’s a Matra Hachette Alice 32, and its red plastic case hides hardware any of us would have been proud to own back in the day.

At first sight it appears superficially similar to a Sinclair Spectrum, with its BASIC keywords next to the keys. But under that slightly calculator style AZERTY keyboard is an entirely different architecture, a Motorola 6803. The first Alice computer was a clone of a Radio Shack model, and while this one has no compatibility with its predecessor it retains some silicon choices. On the back are a series of DIN sockets, one for a SCART adapter, and more for serial connectivity and a cassette deck. The overall impression is of a well-engineered machine, even if that red color is a little garish.

The Alice hasn’t appeared here on its own before, but we have taken a look at French retrocomputers here in the past.

Simple Antenna Makes for Better ESP32-C3 WiFi

8 Abril 2025 at 02:00

We’ve seen tons of projects lately using the ESP32-C3, and for good reason. The microcontroller has a lot to offer, and the current crop of tiny dev boards sporting it make adding a lot of compute power to even the smallest projects dead easy. Not so nice, though, is the poor WiFi performance of some of these boards, which [Peter Neufeld] addresses with this quick and easy antenna.

There are currently a lot of variations of the ESP32-C3 out there, sometimes available for a buck a piece from the usual suspects. Designs vary, but a lot of them seem to sport a CA-C03 ceramic chip antenna at one end of the board to save space. Unfortunately, the lack of free space around the antenna makes for poor RF performance. [Peter]’s solution is a simple antenna made from a 31-mm length of silver wire. One end of the wire is formed into a loop by wrapping it around a 5-mm drill bit and bending it perpendicular to the remaining tail. The loop is then opened up a bit so it can bridge the length of the ceramic chip antenna and then soldered across it. That’s all it takes to vastly improve performance as measured by [Peter]’s custom RSSI logger — anywhere from 6 to 10 dBm better. You don’t even need to remove the OEM antenna.

The video below, by [Circuit Helper], picks up on [Peter]’s work and puts several antenna variants to further testing. He gets similarly dramatic results, with 20 dBm improvement in some cases. He does note that the size of the antenna can be a detriment to a project that needs a really compact MCU and tries coiling up the antenna, with limited success. He also did a little testing to come up with an optimal length of 34 mm for the main element of the antenna.

There seems to be a lot of room for experimentation here. We wonder how mounting the antenna with the loop perpendicular to the board and the main element sticking out lengthwise would work. We’d love to hear about your experiments, so make sure to ping us with your findings.

❌
❌