Vista Normal

Hay nuevos artículos disponibles. Pincha para refrescar la página.
AnteayerSalida Principal

How Facebook Killed Online Chat

Por: Lewin Day
29 Mayo 2024 at 14:00

In the early days of the internet, online conversations were an event. The technology was novel, and it was suddenly possible to socialize with a whole bunch of friends at a distance, all at once. No more calling your friends one by one, you could talk to them all at the same time!

Many of us would spend hours on IRC, or pull all-nighters bantering on MSN Messenger or AIM. But then, something happened, and many of us found ourselves having shorter conversations online, if we were having any at all. Thinking back to my younger days, and comparing them with today, I think I’ve figured out what it is that’s changed.

Deliberate Choices

Having the right nick, profile image, and personal message was a big part of looking cool on MSN Messenger. You needed something that would make you seem interesting, hip, and worth talking to. Song lyrics were common. Credit: Screenshot, MSN Messenger history

Twenty five years ago, a lot more of us were stuck getting by with dialup. The Internet wasn’t always on back then. You had to make the decision to connect to it, and sit at your computer to use it.

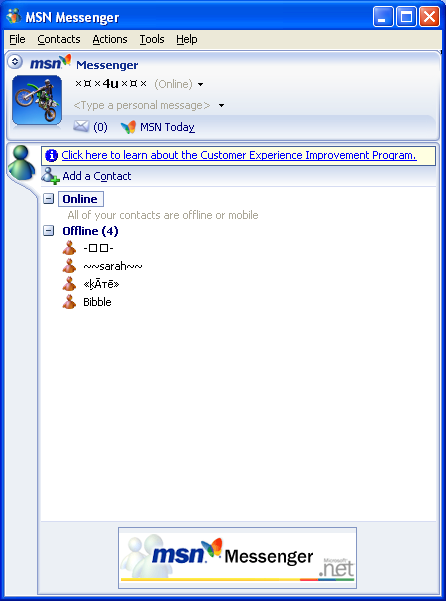
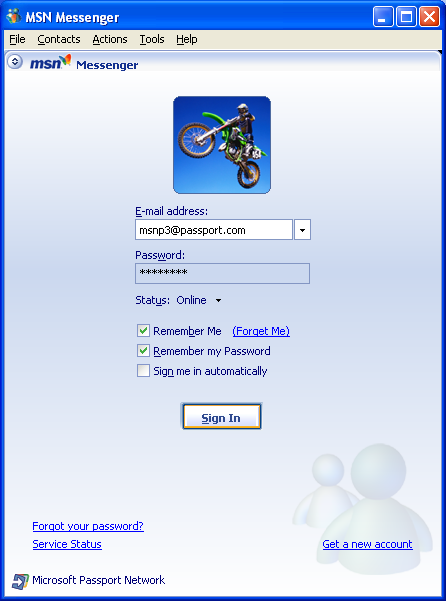
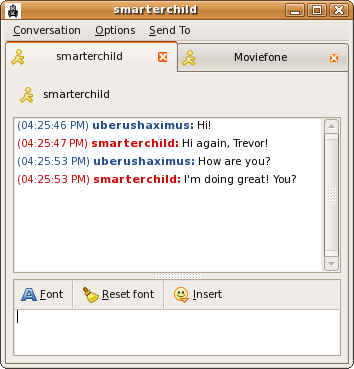
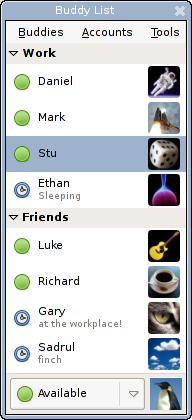
Similarly, logging into an IRC room was a deliberate action. It was a sign that you were setting aside time to communicate. If you were in a chat room, you were by and large there to talk. On AIM or MSN Messenger, it was much the same deal. If you wanted to have a chat, you’d leave your status on available. If you didn’t wanna talk, you’d set yourself to Busy or Away, or log off entirely.

This intentionality fostered meaningful interactions online. Back then, you’d sign in and you’d flick through your list of friends. If someone’s icon was glowing green, you knew they were probably up to talk. You might have a quick chat, or you could talk for hours. Indeed, logging on to a chatroom for an extended session was a pastime enjoyed by many.

If you were on Linux, or used multiple chat services, you might have experimented with multi-chat clients like Pidgin back in the day. Credit: Uberushaximus, GPL

Back then, people were making the conscious decision to set aside time to talk. Conversations were more focused and meaningful because both parties had set aside time to engage. This intentionality led to richer, more engaging discussions because participants were fully present.

Furthermore, the need to log in and out helped create a healthy boundary between life online and off. Users balanced their online interactions with other responsibilities and activities. There was a clear distinction between online and offline life, allowing for more complete engagement in both. When you logged off, that was it. There was no way for your online friends to get a message to you in real time, so your focus was fully on what was going on in front of you.

Critical Shift

T’was the endless march of technology that changed the meta. Broadband internet would keep our computers online round the clock. You could still log in and out of your chat apps, of course, and when you walked away from your computer, you were offline.

But technology didn’t stop there. Facebook came along, and tacked on Messenger in turn. The app would live on the smartphones in our pockets, while mobile data connections meant a message from the Internet could come through at any time.

If your buddies were green, you could hit ’em up for a chat! Facebook kind of has us all defaulting to available at all times, though, and it throws everything off. Credit: Pidgin.IM

Facebook’s always-on messaging was right there, tied to a website many of us were already using on the regular. Suddenly, booting up another app like AIM or MSN seemed archaic when we could just chat in the browser. The addition of the app to smartphones put Messenger everywhere we went. For many, it even started to supplant SMS, in addition to making other online chat platforms obsolete.

Always-on messaging seemed convenient, but it came with a curse. It’s fundamentally changed the dynamics of our online interactions, and not always for the better.

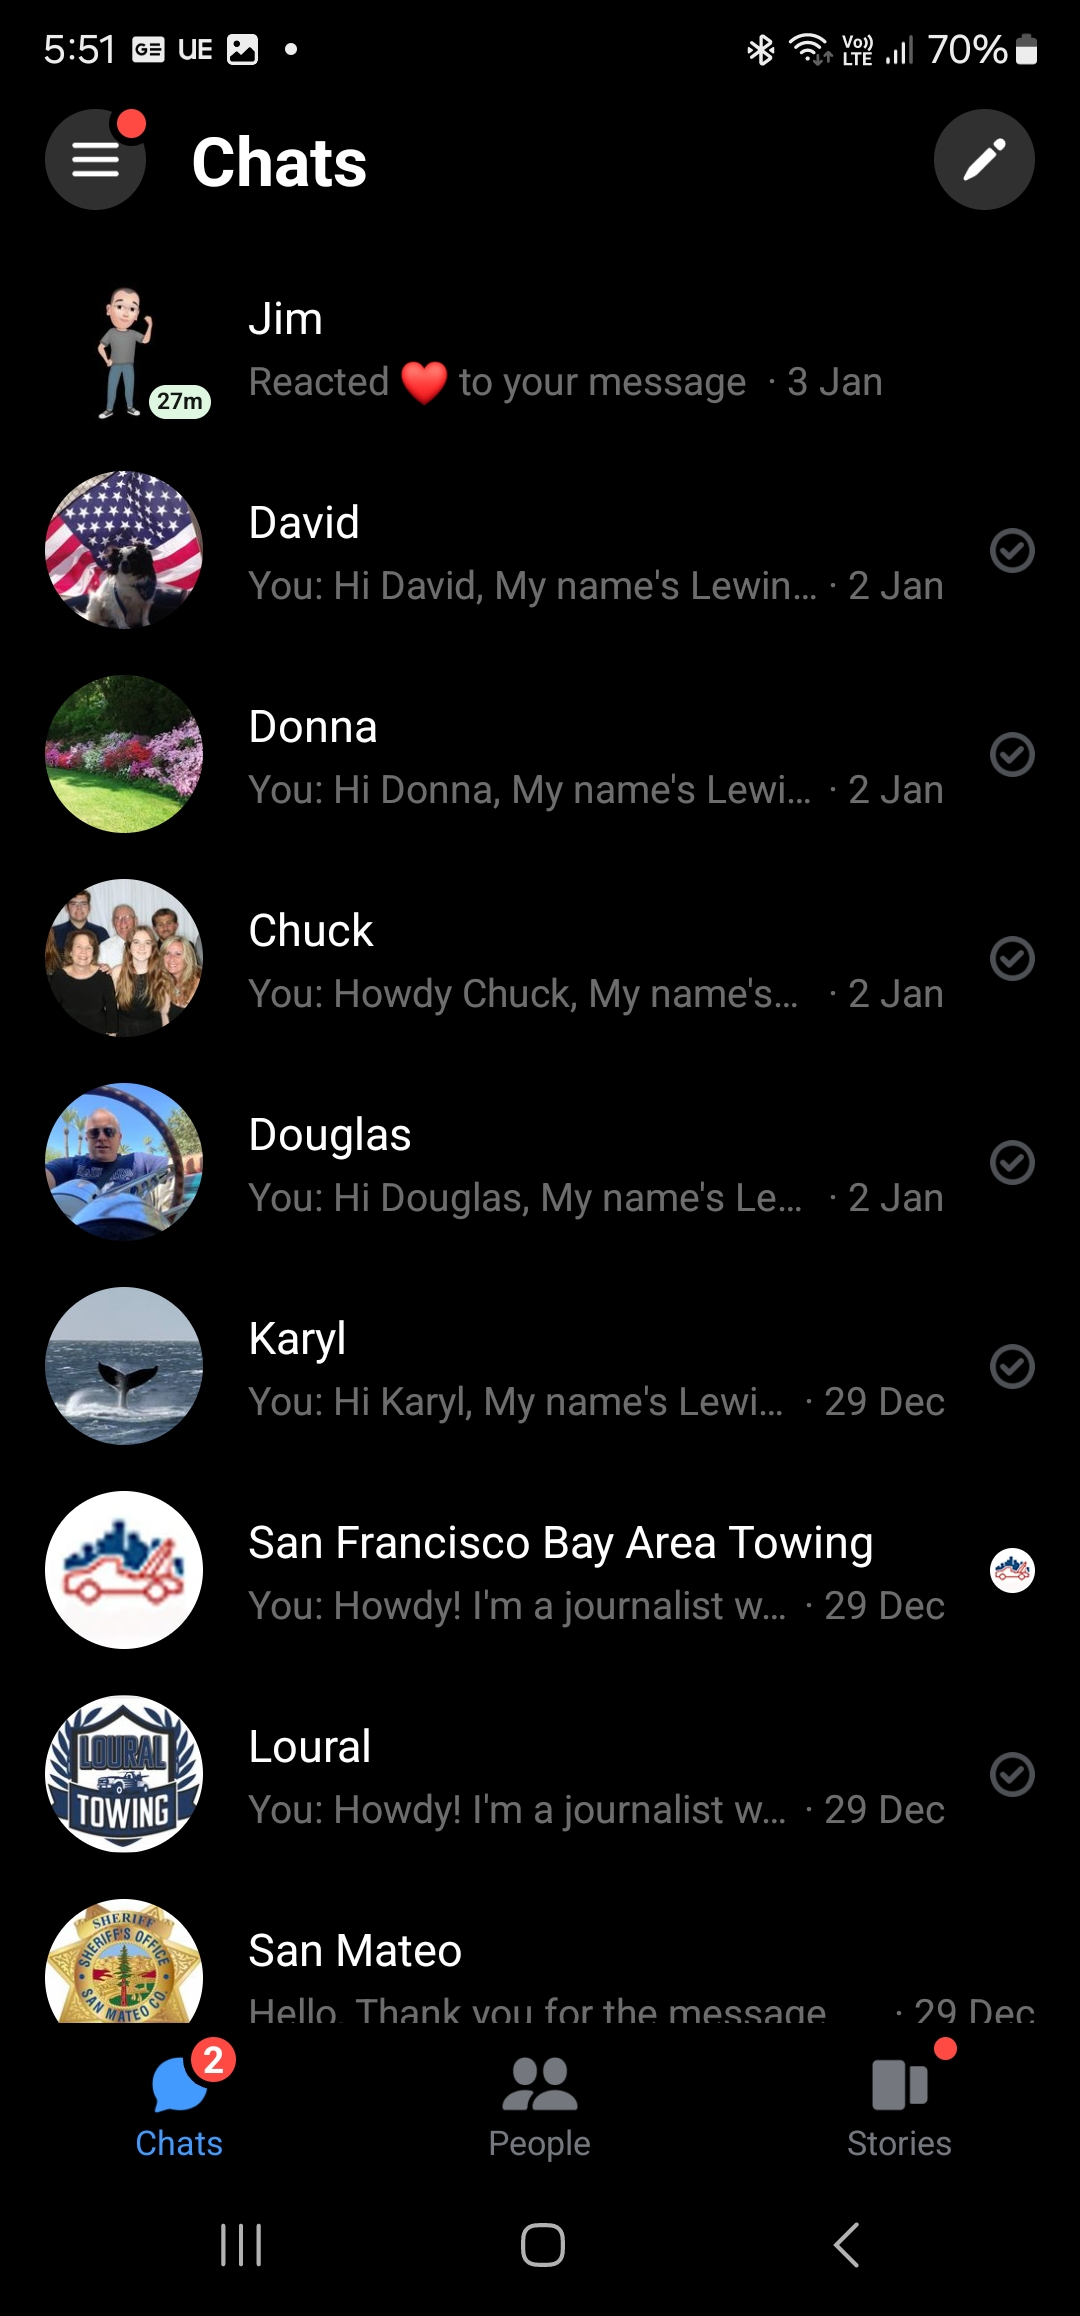
Perpetual availability means that there is a constant pressure to respond. In the beginning, Facebook implemented “busy” and “available” status messages, but they’re not really a thing anymore. Now, when you go to message a friend, you’re kind of left in to the dark as to what they’re doing and how they’re feeling. Maybe they’re chilling at home, and they’re down for a deep-and-meaningful conversation. Or maybe they’re working late at work, and they don’t really want to be bothered right now. Back in the day, you could seamlessly infer their willingness to chat simply by noting whether they were logged in or not. Today, you can’t really know without asking.

That has created a kind of silent pressure against having longer conversations on Facebook Messenger. I’m often reluctant to start a big conversation with someone on the platform, because I don’t know if they’re ready for it right now. Even when someone contacts me, I find myself trying to close out conversations quickly, even positive ones. I’m inherently assuming that they probably just intended to send me a quick message, and that they’ve got other things to do. The platform provides no explicit social signal that they’re happy to have a proper conversation. Instead, it’s almost implied that they might be messaging me while doing something else more important, because hey, Messenger’s on all the time. Nobody sits down to chat on Facebook Messenger these days.

Do any of these people want to chat? I can’t tell, because they’re always online!

It’s also ruining the peace. If you’ve got Messenger installed, notifications pop up incessantly, disrupting focus and productivity. Conversations that might have once been deep and meaningful are now often fragmented and shallow because half the time, someone’s starting them when you’re in the middle of something else. If you weren’t “logged on” or “available”, they’d wait until you were ready for a proper chat. But they can’t know that on Facebook Messenger, so they just have to send a message and hope.

In a more romantic sense, Facebook Messenger has also killed some of the magic. The ease of starting a conversation at any moment diminishes the anticipation that once accompanied online interactions. Plenty of older Internet users (myself included) will remember the excitement when a new friend or crush popped up online. You could freely leap into a conversation because just by logging on, they were saying “hey, wanna talk?” It was the equivalent social signal of seeing them walk into your local pub and waving hello. They’re here, and they want to socialize!

It’s true that we effectively had always-on messaging before Facebook brought it to a wider audience. You could text message your friends, and they’d get it right away. But this was fine, and in fact, it acted as a complement to online messaging. SMSs used to at least cost a little money, and it was generally time consuming to type them out on a limited phone keypad. They were fine if you needed to send a short message, and that was about it. Meanwhile, online messaging was better for longer, intentional conversations. You could still buzz people at an instant when you needed to, but SMS didn’t get in the way of proper online chats like Facebook Messenger would.

The problem is, it seems like we can’t really go back. As with so many technologies, we can try and blame the creators, but it’s not entirely fair. Messenger changed how we used online chat, but Facebook didn’t force us to do anything. Many of us naturally flocked to the platform, abandoning others like AIM and MSN in short order .We found  it more convenient in the short term, even if some of us have found it less satisfying in the long term.

Online platforms tend to figure out what we respond to on a base psychological level, and game that for every last drop of interaction and attention they can. They do this to sell ads and make money, and that’s all that really matters at the end of the day. Facebook’s one of the best at it. It’s not just online chat, either. Forums went the same way, and it won’t end there.

Ultimately, for a lot of us, our days of spending hours having great conversations online are behind us. It’s hard to see what could ever get the broader population to engage again in that way. Instead, it seems that our society has moved on, for the worse or for the better. For me, that’s a shame!

The Tragic Story Of The Ill-Fated Supergun

Por: Lewin Day
28 Mayo 2024 at 14:00

In the annals of ambitious engineering projects, few have captured the imagination and courted controversy quite like Gerald Bull’s Supergun. Bull, a Canadian artillery expert, envisioned a gun that could shoot payloads directly into orbit. In time, his ambition led him down a path that ended in both tragedy and unfinished business.

Depending on who you talk to, the Supergun was either a new and innovative space technology, or a weapon of war so dangerous, it couldn’t be allowed to exist. Ultimately, the powers that be intervened to ensure we would never find out either way.

First Shots Fired

Gerard Bull, pictured at the Space Research Institute at McGill University in 1964. Credit: CC BY-SA 3.0

Gerald Bull was born in 1928 in Ontario, Canada. After a tumultuous youth, his uncle was able to find him a place at the University of Toronto at the age of sixteen. Where his uncle suggested the medical school, Bull requested a position in the newly established aeronautical engineering course. After passing an interview, he was able to begin his tertiary studies in the field at the age of sixteen.

He would go on to graduate in 1948, a strictly average student that had done little to distinguish himself during his period at the university. However, his energy and passion would eventually see him admitted to further study at the Institute of Aerodynamics, where he studied the design of advanced wind tunnels.

This academic pursuit laid the groundwork for his future endeavors. While finishing his PhD in 1950, Bull would eventually be nominated for military work with the Defence Research Board. That led to his position with the Canadian Armament Research and Development Establishment, where he dived into the world of advanced artillery technology.

The Project HARP gun, abandoned in Barbados. Credit: Brohav, Public Domain

He began exploring the use of artillery guns for supersonic aerodynamic research, as a cheaper alternative to building high-speed wind tunnels. Later on, he would go on to develop the High Altitude Research Project (HARP), a joint Canadian-American initiative aimed at exploring ballistics at extremely high altitudes.

Kicking off in the 1960s, HARP’s most notable achievement was the creation of a massive gun capable of firing projectiles into the stratosphere, setting the stage for Bull’s lifelong obsession with superguns.

His early experiments with HARP demonstrated the potential of using artillery to reach the upper atmosphere, though the project was eventually shuttered due to financial and political pressures. The project developed a 16.4 inch (41.6 cm) smooth-bore gun which was installed for testing in Barbados.

By 1962, HARP was firing 330 pound (150 kilogram) finned projectiles at over 10,000 feet per second (3000 m/s), reaching altitudes of 215,000 feet (65 kilometers). The project was funded by using the projectiles to capture meteorological data in the upper atmosphere.

Aiming Higher

The seeds for Bull’s later work on the infamous Supergun were sown during these formative years. His desire was not just to shoot projectiles into the upper atmosphere, but to fire them so fast that they could actually reach orbit. His idea to achieve this was simple — he’d use a large gun to fire a projectile high into the atmosphere, where it would then ignite a rocket to boost its velocity further.

Bull’s SRC was in the arms trade, with the company desinging and manufacturing the GC-45 howitzer for multiple customers. Credit: Sturmvogel 66, CC BY-SA 3.0

Well, simple enough on paper, anyway. But achieving this feat was altogether more complex in reality. Bull began investigating the concept during his time at the HARP project. There, he developed rocket-assisted projectiles that could be fired from an artillery gun without damage to the solid fuel propellant.

Plans centered around a small multi-staged rocket called the Martlet. It was to be fired from a 16.4 inch (41.6 cm) gun that was assembled by joining two existing naval cannons together into one massive barrel a full 110 feet (33.5 meters) long. Sadly, HARP’s funding began to dry up towards the end of the 1960s, and a change of government sealed the project’s fate.

Bull ended up going out on his own, establishing the Space Research Corporation (SRC) to pursue his goals. The company operated as an artillery consultancy for international clients, including the Canadian and US military. He developed improved rifling techniques which helped give military artillery longer range and better accuracy. SRC and Bull would go on to sell shells and guns to states all around the world. On the side, he continued to develop his orbital gun technology.

A small barrel section from Project Babylon exists in the collection of the Imperial War Museum, Duxford. Credit: CC BY-SA 3.0

The culmination of Bull’s work came in the late 1980s with the Supergun project. After serving jail time in the US for dealing arms to South Africa, Bull had moved away from clients in the West, and had taken up work with China and Iraq. Ultimately, though, this gave him the opportunity to pursue his dream of an orbital launch gun once more.

Officially known as Project Babylon, it was commissioned by Saddam Hussein in 1988, while he was then the Iraqi defense secretary. The project’s goal was ostensibly to develop a supergun capable of launching satellites into orbit, potentially reducing the cost and complexity of space launches. The guns were intended to fire multi-stage rocket propelled shells that would be capable of reaching orbit.

Bull agreed to continue work on conventional military artillery pieces for the Iraqi government, in exchange for a $25 million payment towards Project Babylon. The project would see the construction of multiple “Baby Babylon” guns, each measuring 147 feet (44.8 meters) long with a caliber of 13.8 inches (35 cm).

Big Babylon

The ultimate goal, however, was the production of two mighty PC-2 Big Babylon guns. They would measure 512 feet (156 meters) long with a massive 39 inch (99 cm) bore. The PC-2 was intended to be capable of launching a 440 lb (200 kg) satellite into an orbital trajectory, carried by a 4,400 lb (2,000 kg) rocket-assisted projectile. Alternatively, it could have launched a 1,300 lb (600 kg) projectile over 620 miles (1,000 km). The final gun would have sat almost 328 feet (100 m) high at the tip, with the barrel suspended by cables from a large supporting frame. The barrel itself was to weigh 1,510 tons,  with the whole structure coming in at a hefty 2,100 tons in total.

Two segments of the Iraqi supergun, Big Babylon, are displayed at the Royal Armouries in Fort Nelson, Portsmouth. Credit: Geni, GFDL CC-BY-SA

The technical challenges were immense. Achieving the necessary muzzle velocity to reach orbit required unprecedented gun lengths and extremely durable materials to withstand the immense pressures involved. The initial construction of the Baby Babylon revealed problems with seals between multiple barrel segments. This was a complication from a a necessary engineering decision, as producing a single barrel at such large sizes was impractical.

Meanwhile, the political implications of the project drew international concern. Given the fraught political situation at the time, a large Iraqi gun project was not popular on the international stage. On paper, the gun’s applications for military use were limited. It was not possible to readily aim the gun, nor could it fire rapid salvos on a given target. It was impossible to move or hide, and it was extremely vulnerable to air attack.

Regardless of these practical limitations, few countries wanted Iraq to have such a potent gun in any way, shape or form. Furthermore, Bull was continuing to work on other Iraqi artillery projects, including Scud missile development. This only made him more unpopular with Iraq’s enemies.

The project’s demise was as dramatic as its ambition. In 1990, Bull was assassinated in Brussels as he approached his apartment’s front door. It followed a series of break-ins to his home, which were suggested to be a threat to the engineer to cease his work on the project. His death effectively ended Project Babylon. Supergun components, which had been in production across Europe, were seized by customs officers, and Bull’s staff in turn abandoned the project. Parts of the gun still exist today, after being donated to museums in the UK.

In the aftermath, the Supergun project remains a fascinating study of the interactions between ambition, technology and politics. Gerard Bull’s legacy is a testament to the limits of engineering, and the limits of our own ruling structures. While technically feasible, the Supergun could not be born, given the perceived geopolitical ramifications of such a weapon.

Gerard Bull’s story is a poignant chapter in the history of space exploration technology, marked by brilliant engineering marred by political intrigue and a tragic end. It serves as a reminder of the complexities involved when mixed-use technologies clash with political interests and national security concerns.

Hype Robot Rocks Out With The Twitch Chat

Por: Lewin Day
25 Mayo 2024 at 08:00

Have you ever wished for an automaton that can get the party started, raise the roof, and all that? You’ll want to meet [DJ Pfeif]’s Flippin Rhobot, then. He’s a hype bot from the world of Twitch streaming, and he apparently knows how to party.

Flippin Rhobot is controlled by an ESP32 that listens into the chat on [DJ Pfeif]’s stream. He’s got a vaguely humanoid form, and he can rotate on the spot and wave his arms in the air courtesy of a few servos. He’s also got a little computer terminal that displays the show’s “Hack the Planet” logo when he turns to face the screen. His body also features some addressable LEDs that flash and dance on command.

[DJ Pfeif] does a good job of explaining the project, and includes the code that laces everything together. Interfacing with Twitch chat can be fun, and we’ve featured a guide on doing just that before, too.

If you’re building your own roboticized hype machine, don’t hesitate to let us know. Otherwise, consider musing on the very idea of humanoid robots as a whole!

Building An 8-Color Automated Filament Changer

Por: Lewin Day
24 Mayo 2024 at 20:00

Multi-filament printing can really open up possibilities for your prints, even more so the more filaments you have. Enter the 8-Track from [Armored_Turtle], which will swap between 8 filaments for you!

The system is modular, with each spool of filament installed in a drybox with its own filament feeder .The dryboxes connect to the 8-Track changer via pogo pins for communication and power. While [Armored_Turtle] is currently using the device on a Voron printer, he’s designed it so that it can be easily modified to suit other printers. As it’s modular, it’s also not locked into running 8 filaments. Redesigning it to use more or less is easy enough thanks to its modular design.

The design hasn’t been publicly released yet, but [Armored_Turtle] states they hope to put it on Github when it’s ready. It’s early days, but we love the chunky design of those actively-heated drybox filament cassettes. They’re a great step up from just keeping filament hanging on a rod, and they ought to improve print performance in addition to enabling multi-filament switching.

We’ve seen some other neat work in this space before, too. Video after the break.

[Thanks to Keith Olson for the tip!]

Locate Faults With the Leakseeker-89R

Por: Lewin Day
24 Mayo 2024 at 08:00

Have you ever needed to hunt down a short circuit, but you’ve had no idea where it is or how it’s happening? As it turns out, there are tools to help in that regard. Enter the Leakseeker-89R.

The device is able to help hunt down short circuits that measure anywhere from 0 to 300 ohms. The device is typically used with two leads on a given pair of traces, and it has a display made up of red, yellow and green LEDs. As the leads are moved closer or farther from the short circuit, the display changes to indicate if you’re getting hotter or colder. There’s also a third lead that can be used to allow testing under more challenging conditions when there is a large capacitance in-circuit with the traces you’re testing.

Fundamentally, it’s basically a very accurate resistance meter, finely honed for the purpose of hunting down short circuits. We’ve featured similar tools before. They can be of great use for troubleshooting. Meanwhile, if you’re building your own test tools in your home lab, don’t hesitate to let us know! We’re always dying for hot tips on the best DIY lab equipment for saving time, frustration, and money.

Lightweight Haptic Gloves With Electro-Osmotic Pump Arrays

Por: Lewin Day
24 Mayo 2024 at 05:00

Now that we have decent VR goggles, the world is more desperate than ever for a decent haptic interface for interacting with computers. We might be seeing a new leap forward in this wild new haptic glove design from the Future Interfaces Group at Carnegie Mellon University.

Feeling different surfaces in VR is possible using this technology.

The glove gives each fingertip and thumb a small haptic pad. The pads are driven by electro-osmotic pumps, which are effectively solid-state. They use electricity to move fluid to create small dimples on the pad to provide haptic feedback to the user. The pads have 20 pixels per square centimeter, are quick and responsive, and can deform up to 0.5 mm in less than half a second.

The lightweight and self-contained electro-osmotic pads mean the haptic system can be far lighter and more practical than designs that use solenoids or other traditional technologies. The device is also high resolution enough that a user can feel pressure from a surface or the edges of an object in VR. If you watch the video, some of the demonstrations are quite revolutionary.

We’ve seen some other great haptics projects before too, like these low-cost force feedback gloves. Video after the break.

[Thanks to Keith Olson for the tip!]

Roboticized 3D Printer Has Been Developing Shock Absorbing Structures For Years

Por: Lewin Day
24 Mayo 2024 at 02:00

Imagine you want to iterate on a shock-absorbing structure design in plastic. You might design something in CAD, print it, then test it on a rig. You’ll then note down your measurements, and repeat the process again. But what if a robot could do all that instead, and do it for years on end? That’s precisely what’s been going on at Boston University.

Inside the College of Engineering, a robotic system has been working to optimize a shape to better absorb energy. The system first 3D prints a shape, and stores a record of its shape and size. The shape is then crushed with a small press while the system measures how much energy it took to compress. The crushed object is then discarded, and the robot iterates a new design and starts again.

The experiment has been going on for three years continuously at this point. The MAMA BEAR robot has tested over 25,000 3D prints, which now fill dozens of boxes. It’s not frivolous, either. According to engineer Keith Brown, the former record for a energy-absorbing structure was 71% efficiency. The robot developed a structure with 75% efficiency in January 2023, according to his research paper.

Who needs humans when the robots are doing the science on their own? Video after the break.

[Thanks to Frans for the tip!]

Almost Breaking The World Record For The Tiniest Humanoid Robot, But Not Quite

Por: Lewin Day
23 Mayo 2024 at 20:00

Did you know there is a Guinness World Record for the smallest humanoid robot? We didn’t either, but apparently this is a challenge attracting multiple competitors. [Lidor Shimoni] had a red hot go at claiming the record, but came up ever so slightly short. Or tall.

The former record holder was measured at 141 mm, so [Lidor] had to beat that. He set about building a humanoid robot 95 mm tall, relying on off-the-shelf parts and 3D-printed components of his own design. An ESP32 served as the brains of the operation, while the robot, named Tiny Titan, got big flat feet to make walking relatively stable and controlled. Small servos were stacked up to actuate the legs and create a suitably humanoid robot to claim the title.

Sadly, [Lidor] was pipped to the post. Some procrastinating in finishing the robot and documentation saw another rival with a 60mm robot take the record. It’s not 100% clear what Guinness requires for someone to take this record, but it seems to involve a robot with arms, legs, and some ability to walk.

Sometimes robots are more fun when they’re very small. If you’re developing your own record-breaking automatons, drop us a line won’t you?

Filming The Eclipse From 80,000 Feet

Por: Lewin Day
22 Mayo 2024 at 08:00

Watching an eclipse from the ground is pretty fun. Depending on where you live, you might even get a decent view. But what if you wanted a truly unique vantage point? You could replicate the work of [Tarik Agcayazi] and [kemfic], who set about filming the recent eclipse from an altitude of 80,000 feet.

That’s what the eclipse looks like from 80,000 feet.

The duo didn’t rent a high-performance aircraft from the US military. Instead, they relied on a high-altitude balloon carrying a glider with a camera payload. The idea was for the balloon to go up, and have the camera capture the eclipse. Then, it would be released so that it could glide back home in controlled flight. However, time constraints made that too hard. Instead, they simplified to a parachute recovery method.

The project video covers the development process, the balloon launch itself, and of course, the filming of the eclipse. High altitude balloon launches are stressful enough, but having a short eclipse as a target made everything even more difficult. But that just makes things more exciting!

The project builds on earlier work from the duo that we discussed back in 2017.

Mechanical 7-Segment Display Looks Clean

Por: Lewin Day
22 Mayo 2024 at 05:00

[Jens] wanted a subscriber counter for his YouTube channel. He could have gone with a simple OLED, LCD, or LED display, but he wanted something more tactile and interesting. So he built a mechanical 7-segment display instead!

Currently, [Jens]’s channel is in the four-digit subscriber range, so he planned to build a four-digit display. He started by searching for existing projects in this space, and came across the designs of [shiura] on Thingiverse. [shiura] had a 3D printed cam-driven 7-segment digit that runs on a single servo motor. Once armed with four of the digits, he hooked them up to a Pi Pico W to drive them all with four servo outputs. The Pico W is responsible for querying the channel subscriber count online, and updating the display in turn.

It’s a neat build, and [Jens] learned some things along the way—like how Super Lube seemed to ruin filament for him. Ultimately, the build came good, and it looks great. We’ve seen some other mechanical 7-segment builds before, too!

Ribbon Cable Repair Saves Touch ID

Por: Lewin Day
21 Mayo 2024 at 23:00

Some might consider a broken ribbon cable to be unsalvagable. They’re delicate and fragile as can be, and sometimes just fussing with them further is enough to cause additional damage. However, with the right set of skills, it’s sometimes possible to achieve the unthinkable. As [Master Liu] demonstrates, you can indeed repair a broken ribbon cable, even a tiny one.

The video concerns a ribbon cable linked to a Touch ID fingerprint sensor from an Apple device. It’s common to break these ribbon cables when repairing a phone, and doing so causes major problems. The Touch ID device is paired with the host phone, and cannot easily be replaced. Thus, repair is justified if at all possible.

The repair involves scraping back the outer coating on the two sections of ribbon cable to reveal the copper pads underneath. The copper is then coated with flux and solder to prepare them to be rejoined. Ultra-fine strands of wire are used to join the individual traces. Then, the repaired section is coated in some kind of sealant or epoxy to hold the joint together and protect it from failing again. The theory is easy, it’s just the execution that’s hard.

Ribbon cable repair is becoming one of our favorite topics of late. Sometimes you just need a steady hand and the guts to have a go. Video after the break.

Home Automation Terminal Has Great Post-Apocalyptic Look

Por: Lewin Day
21 Mayo 2024 at 20:00

If you use home automation these days, you’re probably used to using smart speakers, your smartphone, or those tabletop touchscreen devices. If you wanted something cooler and more personal, you could try building something like [Rick] did.

A Raspberry Pi 400 is the basis for the machine, and it still uses the original keyboard. It’s paired with a 3D-printed shell with a 7″ Waveshare HDMI touch display in it. The LCD is placed behind a Fresnel lens which provides some magnification. It displays a glowing blue command line which accepts text commands. It’s hooked up to the OpenAI API, so it’s a little smarter than just any old regular terminal. It’s hooked up to [Rick’s] home automation system, so he can use natural language queries to control lighting, music, and all the rest. Think Alexa or Siri, but in text form.

The design of the case, with its rounded edges, vents, and thick bezels gives it a strong retro-futuristic look, reminiscent of something out of Fallout. [Rick’s] neat application of weathering techniques helped a lot, too.

It reminds us of some of the cooler Pip Boy builds we’ve seen. Meanwhile, if you’ve got your own creative terminal build in the works, don’t hesitate to drop us a line!

Peeking Underground With Giant Flying Antennas

Por: Lewin Day
21 Mayo 2024 at 14:00

Helicopters are perhaps at their coolest when they’re being used as flying cranes — from a long dangling cable, they can carry everything from cars, to crates, to giant hanging saws.

What you might find altogether more curious are the helicopters that fly around carrying gigantic flat antenna arrays. When you spot one in the field, it’s not exactly intuitive to figure out what they’re doing, but these helicopters are tasked with important geological work!

Looking Down From Above

The SkyTEM survey system is one of the most well known in the AEM space. Credit: Geoscience Australia

In the popular imagination, the Earth’s magnetic field is useful for finding north with a compass. In day to day life, that barely comes up, and we don’t give the magnetic field much thought beyond that. However, the reality of Earth’s magnetic field is that it is variable all over the surface of our planet. By measuring it, we can gain great insight into what lies beneath our feet.

Magnetic surveys are an important tool in geology and archaeology. In the latter regard, they were perhaps best popularized by the TV show Time Team. The series would often employ geomagnetic surveys to discover artifacts or structures beneath the ground. The typical technique used on the show involved someone walking around a site with a magnetometer while logging the magnetic field strength as they went. By running the magnetometer in a grid pattern across a site, it was possible to build up a local map of the magnetic field, which could reveal anomalies lurking underground.

That’s all well and good if you wish to survey a small garden or perhaps a single field. If you want to survey a larger area, though, doing a survey on foot isn’t really practical. But you can apply the same techniques in the air at speed, and you can even extend them further, too!

You can do magnetic surveys much faster using a helicopter instead. The basic theory is the same, carrying a magnetic sensor over terrain allows the measurement of the local magnetic field. The difference is that a helicopter can move much faster and thus cover a greater area more quickly, albeit at somewhat reduced resolution. Magnetic field data is great, but there’s so much more that can be gained by exploring the electromagnetic spectrum, too.

A typical setup for helicopter-based geomagnetic surveys. To work at low frequencies, large antennas are needed. This rig transmits at a base frequency of just 25 Hz. Credit: Geoscience Australia Operations & Processing report

By transmitting radio waves from a giant antenna, it’s possible to excite eddy currents in the ground itself which can then be picked up by a sensitive receiver similarly dangling from the aircraft. A single aerial survey aircraft can carry both magnetic sensors and EM equipment on the same mission to gather both kinds of data at once.

Aerial electromagnetic surveys (AEM), as they are known, aren’t so much used for finding Roman coins or small structures under the ground. Instead, they’re used to better understand the makeup of the ground itself. An aerial survey can reveal electrically conductive materials in the ground, of which there are many.

Graphite, clays, sulfides, or salty groundwater all show up differently on an electromagnetic survey compared to non-conductive minerals or fresh water. These elements can be revealed by an antenna dangling from a helicopter, in combination with other geological data and careful analysis.

The Yarrabubba impact structure is the oldest known planetary impact structure on Earth. While much of the original crater has been eroded, the impact has left an anomaly that is readily visible on aeromagnetic surveys to this day. Credit: Erickson, Kirkland, Timms, Cavosie & Davison, CC-BY 4.0

Typical AEM missions involve flying at moderate speeds of 70 to 120 km/h along the ground, generally on a path of parallel lines to cover a given area. Altitudes are low, on the order of 100 meters or even less, to keep the antennas close to the ground. Excitation and receiver antennas usually measure tens of meters in diameter. AEM surveys can be remarkably sensitive. It’s possible to pick up variations in the conductivity of the soil up to several hundred meters deep with the right equipment. As you might expect, the local ground composition plays a role in what’s possible, too.

Often, an aerial study is designed to zero in on a particular geological feature or material of interest. Then, the survey area and equipment can be tuned to ideally reveal the expected contrast in conductivity or magnetic field.

Governments and private enterprises using the technique more commonly than you might think. For example, the California Department of Water Resources uses AEM surveys to hunt for underground aquifers. might be using an AEM survey to find an underground aquifer, or a conductive graphite seam deep in the ground.  The US Geological Survey uses the technique for all kinds of purposes, and has been doing so since the 1970s. It has looked for subsurface water and underground minerals, amongst other things. There’s an interactive tool for finding survey data, much of which is available to the public.

There is a great deal of mistrust in the wider public these days, with conspiracies around chemtrails, 5G cellular networks, and so many other similar topics. It won’t shock you to know that there are people that freak out when they see a helicopter hauling a gigantic antenna array at low altitude.

A conductivity survey reveals groundwater beneath the surface at Mt Saint Helens. Credit: USGS

For this reason, many government agencies specifically release documents to explain the purpose of AEM surveys, and to highlight that they pose no risk to the public, wildlife, or the natural environment itself. It may seem silly, but AEM survey craft do look a fair bit more sci-fi than most other flying vehicles, so the cautious approach is understandable.

You probably won’t spot an AEM survey craft in the suburbs, but if you’re out in some wide open natural area, you just might. If you’re really keen on seeing one in the flesh, though, you’re best advised to get yourself a geology degree and a job in the field. Then, you might even pick up the skills necessary to specify, execute, and interpret the results of an electromagnetic aerial survey. When you do, be sure to let the world know what you found out!

Pi Pico Helps Restring Badminton Rackets

Por: Lewin Day
21 Mayo 2024 at 02:00

Stringing a badminton racquet is a somewhat complicated job. It needs to be done well if the racquet is to perform well and the player is to succeed. To that end, [kuokuo] built a machine of their own to do that very task. Even better, they’ve made it open source so other hobbyists can benefit from their work.

The build is named PicoBETH, which stands for Pico Badminton Electronic Tension Head. It’s based around the Raspberry Pi Pico, as you might imagine. The Pico is charged with controlling the stringing procedure via a stepper motor and lead screw, while using a load cell to measure string tension during the process. A small two-line character LCD serves as the user interface, along with some buttons, LEDs and a buzzer for feedback. The electronic stringing gear is mounted on to a traditional manual drop-weight stringing machine to execute the process faster and more accurately, at least in theory.

Files are on Github for those that wish to explore the build further. It’s not the first stringing machine we’ve featured here, either! Video after the break.

Trying to Build A Communications Device With a 1-Pound Laser And a 7805

Por: Lewin Day
20 Mayo 2024 at 20:00

You can get a red laser diode pretty cheap these days—as cheap as £1 in fact. [Beamer] had purchased one himself, but quickly grew bored with just pointing it at the walls. He decided to figure out if he could use it for some kind of communication, and whipped up a circuit to test it out.

To do the job, he designed a modulator circuit that could drive the laser without damaging it. The build is based around the common 7805 regulator and the venerable 555 timer IC. The 555 is set to pulse at a given rate with the usual array of capacitors and resistors. Its output directly drives the input of a 7805 regulator. It’s set up as a constant current source in order to deliver the correct amount of current to run the laser. The receiver is based around a photodiode, which should prove fairly straightforward.

[Beamer]’s still working on the full setup, but plans to use the laser’s pulses to drive a varying analog meter or something similar. Not every communications method has to send digital data, and it’s good to remember that! Video after the break.

Single-Stage-to-Orbit: The Launch Technology We Wish Was Real

Por: Lewin Day
20 Mayo 2024 at 14:00

Reaching orbit around Earth is an incredibly difficult feat. It’s a common misconception that getting into orbit just involves getting very high above the ground — the real trick is going sideways very, very fast. Thus far, the most viable way we’ve found to do this is with big, complicated multi-stage rockets that shed bits of themselves as they roar out of the atmosphere.

Single-stage-to-orbit (SSTO) launch vehicles represent a revolutionary step in space travel. They promise a simpler, more cost-effective way to reach orbit compared to traditional multi-stage rockets. Today, we’ll explore the incredible potential offered by SSTO vehicles, and why building a practical example is all but impossible with our current technology.

A Balancing Act

The SSTO concept doesn’t describe any one single spacecraft design. Instead, it refers to any spacecraft that’s capable of achieving orbit using a single, unified propulsion system and without jettisoning any part of the vehicle.

The Saturn V shed multiple stages on its way up to orbit. That way, less fuel was needed to propel the final stage up to orbital velocity. Credit: NASA

Today’s orbital rockets shed stages as they expend fuel. There’s one major reason for this, and it’s referred to as the tyranny of the rocket equation. Fundamentally, a spacecraft needs to reach a certain velocity to attain orbit. Reaching that velocity from zero — i.e. when the rocket is sitting on the launchpad — requires a change in velocity, or delta-V. The rocket equation can be used to figure out how much fuel is required for a certain delta-V, and thus a desired orbit.

The problem is that the mass of fuel required scales exponentially with delta-V. If you want to go faster, you need more fuel. But then you need even more fuel again to carry the weight of that fuel, and so on. Plus, all that fuel needs a tank and structure to hold it, which makes things more difficult again.

Work out the maths of a potential SSTO design, and the required fuel to reach orbit ends up taking up almost all of the launch vehicle’s weight. There’s precious mass left over for the vehicle’s own structure, let alone any useful payload. This all comes down to the “mass fraction” of the rocket. A SSTO powered by even our most efficient chemical rocket engines would require that the vast majority of its mass be dedicated to propellants, with its structure and payload being tiny in comparison. Much of that is due to Earth’s nature. Our planet has a strong gravitational pull, and the minimum orbital velocity is quite high at about 7.4 kilometers per second or so.

Stage Fright

Historically, we’ve cheated the rocket equation through smart engineering. The trick with staged rockets is simple. They shed structure as the fuel burns away. There’s no need to keep hauling empty fuel tanks into orbit. By dropping empty tanks during flight, the remaining fuel on the rocket has to accelerate a smaller mass, and thus less fuel is required to get the final rocket and payload into its intended orbit.

The Space Shuttle sheds its boosters and external fuel tank on its way up to orbit, too. Credit: NASA

So far, staged rockets have been the only way for humanity to reach orbit. Saturn V had five stages, more modern rockets tend to have two or three. Even the Space Shuttle was a staged design: it shed its two booster rockets when they were empty, and did the same with its external liquid fuel tank.

But while staged launch vehicles can get the job done, it’s a wasteful way to fly. Imagine if every commercial flight required you to throw away three quarters of the airplane. While we’re learning to reuse discarded parts of orbital rockets, it’s still a difficult and costly exercise.

The core benefit of a SSTO launch vehicle would be its efficiency. By eliminating the need to discard stages during ascent, SSTO vehicles would reduce launch costs, streamline operations, and potentially increase the frequency of space missions.

Pushing the Envelope

It’s currently believed that building a SSTO vehicle using conventional chemical rocket technology is marginally possible. You’d need efficient rocket engines burning the right fuel, and a light rocket with almost no payload, but theoretically it could be done.

Ideally, though, you’d want a single-stage launch vehicle that could actually reach orbit with some useful payload. Be that a satellite, human astronauts, or some kind of science package. To date there have been several projects and proposals for SSTO launch vehicles, none of which have succeeded so far.

Lockheed explored a spaceplane concept called VentureStar, but it never came to fruition. Credit: NASA

One notable design was the proposed Skylon spacecraft from British company Reaction Engines Limited. Skylon was intended to operate as a reusable spaceplane fueled by hydrogen. It would take off from a runway, using wings to generate lift to help it to ascend to 85,000 feet. This improves fuel efficiency versus just pointing the launch vehicle straight up and fighting gravity with pure thrust alone. Plus, it would burn oxygen from the atmosphere on its way to that altitude, negating the need to carry heavy supplies of oxygen onboard.

Once at the appropriate altitude, it would switch to internal liquid oxygen tanks for the final acceleration phase up to orbital velocity. The design stretches back decades, to the earlier British HOTOL spaceplane project. Work continues on the proposed SABRE engine (Syngergetic Air-Breathing Rocket Engine) that would theoretically propel Skylon, though no concrete plans to build the spaceplane itself exist.

The hope was that efficient aerospike rocket engines would let the VentureStar reach orbit in a single stage.

Lockheed Martin also had the VentureStar spaceplane concept, which used an innovative “aerospike” rocket engine that maintained excellent efficiency across a wide altitude range. The company even built a scaled-down test craft called the X-33 to explore the ideas behind it. However, the program saw its funding slashed in the early 2000s, and development was halted.

McDonnell Douglas also had a crack at the idea in the early 1990s. The DC-X, also known as the Delta Clipper, was a prototype vertical takeoff and landing vehicle. At just 12 meters high and 4.1 meters in diameter, it was a one-third scale prototype for exploring SSTO-related technologies

It would take off vertically like a traditional rocket, and return to Earth nose-first before landing on its tail. The hope was that the combination of single-stage operation and this mission profile would provide extremely quick turnaround times for repeat launches, which was seen as a boon for potential military applications. While its technologies showed some promise, the project was eventually discontinued when a test vehicle caught fire after NASA took over the project.

McDonnell Douglas explored SSTO technologies with the Delta Clipper. Credit: Public domain

Ultimately, a viable SSTO launch vehicle that can carry a payload will likely be very different from the rockets we use today. Relying on wings to generate lift could help save fuel, and relying on air in the atmosphere would slash the weight of oxidizer that would have to be carried onboard.

However, it’s not as simple as just penning a spaceplane with an air-breathing engine and calling it done. No air breathing engine that exists can reach orbital velocity, so such a craft would need an additional rocket engine too, adding weight. Plus, it’s worth noting a reusable launch vehicle would also still require plenty of heat shielding to survive reentry. One could potentially build a non-reusable single-stage to orbit vehicle that simply stays in space, of course, but that would negate many of the tantalizing benefits of the whole concept.

Single-stage-to-orbit vehicles hold the promise of transforming how we access space by simplifying the architecture of launch vehicles and potentially reducing costs. While there are formidable technical hurdles to overcome, the ongoing advances in aerospace technology provide hope that SSTO could become a practical reality in the future. As technology marches forward in materials, rocketry, and aerospace engineering in general, the dream of a single-stage path to orbit remains a tantalizing future goal.


Featured Image: Skylon Concept Art, ESA/Reaction Engines Ltd

Running Four Brushless Motors With A Single Pi Pico

Por: Lewin Day
17 Mayo 2024 at 08:00

Sometimes, you have to drive four motors, and you need to do so with a certain level of control. You could throw a lot of parts at the problem, but you don’t necessarily have to. As [Shaun Crampton] demonstrates, you can run four brushless DC motors with a single Pi Pico.

[Shaun] set about developing a brushless motor controller from scratch with the Pico, relying on its PIO hardware and the TI DRV8313 — a handy three phase motor driver. Before he knew it, he was implementing field oriented control (FOC) in MicroPython, only to find that it was a little too slow for proper motor control work. He soon switched to C for the lower overheads, and was readily driving a brushless motor with his own code. Before long, he’d implemented torque limiting and PID speed control. He was even able to optimize things to the point where he had four motors hanging off a single Pi Pico, complete with Hall sensors for feedback.

The full story is well worth reading, as it goes from “Hello, World” all the way to the end of the project. If you’ve never experienced the joy of your own code getting a motor to spin, you might enjoy following in [Shaun’s] footsteps. Files are on GitHub for the curious.

We’ve seen a lot of motor controllers around here, many of which draw heavily from other projects online. It’s a great way to learn the basics of what is a very well established field. Meanwhile, if you’re cooking up your own project in this space, do drop us a line!

MIDI Spoon Piano Is Exactly What You Think It Is

Por: Lewin Day
16 Mayo 2024 at 23:00

Pianos traditionally had keys made out of ivory, but there’s a great way to avoid that if you want to save the elephants. You can build a keyboard using spoons, as demonstrated by [JCo Audio]. 

The build relies on twelve metal spoons to act as the keys of the instrument. They’re assembled into a wooden base in a manner roughly approximating the white and black keys of a conventional piano keyboard, using 3D-printed inserts to hold them in place. They’re hooked up to a Raspberry Pi Pico via a Pico Touch 2 board, which allows the spoons to be used as capacitive touch pads. Code from [todbot] was then used to take input from the 12 spoons and turn it into MIDI data. From there, hooking the Pi Pico up to a PC running some kind of MIDI synth is enough to make sounds.

It’s a simple build, but a functional one. Plus, it lets you ask your friends if they’d like to hear you play the spoons. The key here is to make a big show of hooking your instrument up to a laptop while explaining you’re not going to play the spoons a la the folk instrument, but you’re going to play a synth instead. Then you should use the spoon keyboard to play emulated spoon samples anyway. It’s called doubling down. Video after the break.

Big Server Fan Becomes Fume Extractor

Por: Lewin Day
16 Mayo 2024 at 20:00

[Anthony Kouttron] wanted a fume extractor for his personal electronics lab, but he didn’t like the look of the cheap off-the-shelf units that he found. Ultimately, he figured it couldn’t be that hard to build own portable fume extractor instead.

The build is based around a mighty 110-watt centrifugal fan from an IBM server that’s rated at approximately 500 CFM. It’s a hefty unit, and it should be, given that it retails at over $200 on DigiKey. [Anthony] paired this fan with off-the-shelf HEPA and activated carbon filters. These are readily available from a variety of retailers. He didn’t want to DIY that part of the build, as the filter selection is critical to ensuring the unit actually captures the bad stuff in the air. He ended up building a custom power supply for the 12-volt fan, allowing it to run from common drill batteries for practicality’s sake.

Few of us have need for such a beefy fume extractor on the regular. Indeed, many hobbyists choose to ignore the risk from soldering or 3D printing fumes. Still, for those that want a beefy fume extractor they can build themselves, it might be worth looking over [Anthony]’s initial work.

We’ve seen some other great DIY fume extractors before, too. Even those that use drill batteries! If you’ve been cooking up your own solution, don’t hesitate to drop us a line!

❌
❌