Vista Normal

Hay nuevos artículos disponibles. Pincha para refrescar la página.
AnteayerSalida Principal

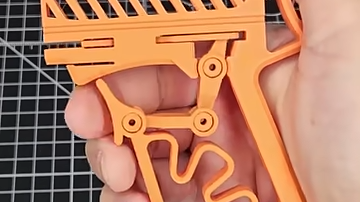
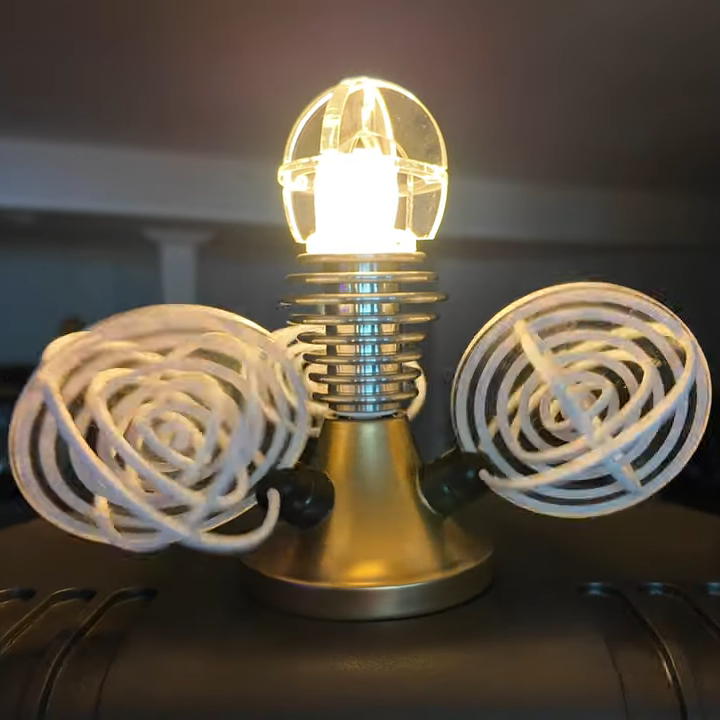
Turbine Blower 3D Prints Every Part, Including Triple Planetary Gears

29 Junio 2025 at 11:00

There was a time when print-in-place moving parts were a curiosity, but [Tomek] shows that things are now at a point where a hand-cranked turbine blower with integrated planetary gears can be entirely 3D printed. Some assembly is needed, but there is no added hardware beyond the printed parts. The blower is capable of decent airflow and can probably be optimized even further. Have a look at it work in the video below.

Every piece being 3D printed brings a few advantages. Prefer the hand crank on the other side? Simply mirror everything. Want a bigger version? Just scale everything up. Because all of the fasteners are printed as well as the parts, there’s no worry about external hardware no longer fitting oversized holes after scaling things up (scaling down might run into issues with tolerances, but if you manage an extra-small version, we’d love to hear about it).

There are a few good tips that are worth keeping in mind when it comes to print-in-place assemblies with moving parts. First, changing the seam location for each layer to ‘Random’ helps make moving parts smoother. This helps prevent the formation of a seam line, which can act as a little speed bump that gets in the way of smooth movement.

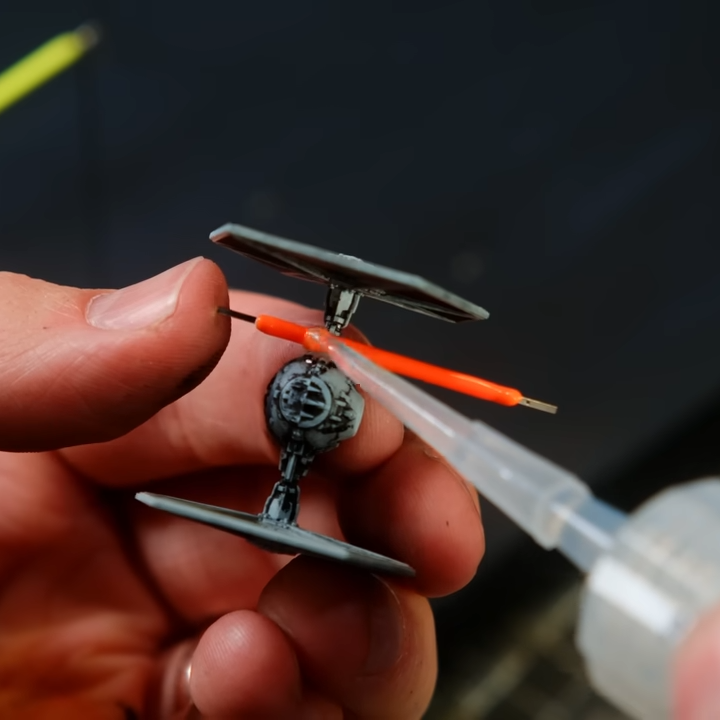
The other thing that helps is lubrication. A plastic-safe lubricant like PTFE-based Super Lube is a handy thing to have around the workshop and does wonders for smoothing out the action of 3D-printed moving parts. And we can attest that rubbing candle wax on mating surfaces works pretty well in a pinch.

One downside is that the blower is noisy in operation. 3D printed gears (and even printed bearings) can be effective, but do contribute to a distinct lack of silence compared to their purpose-built versions.

Still, a device like this is a sign of how far 3D printing has come, and how it enables projects that would otherwise remain an idea in a notebook. We do love 3D-printed gears.

Minecraft Clone Manages With Nothing But HTML + CSS

25 Junio 2025 at 08:00

Can a 3D Minecraft implementation be done entirely in CSS and HTML, without a single line of JavaScript in sight? The answer is yes!

True, this small clone is limited to playing with blocks in a world that measures only 9x9x9, but the fact that [Benjamin Aster] managed it at all using only CSS and pure HTML is a fantastic achievement. As far as proofs of concept go, it’s a pretty clever one.

The project consists of roughly 40,000 lines of HTML radio buttons and labels, combined with fewer than 500 lines of CSS where the real work is done. In a short thread on X [Benjamin] explains that each block in the 9x9x9 world is defined with the help of tens of thousands of <label> and <input type="radio"> elements to track block types and faces, and CSS uses that as a type of display filter. Clicking a block is clicking a label, and changing a block type (“air” or no block is considered a type of block) switches which labels are visible to the user.

Viewing in 3D is implemented via CSS animations which apply transforms to what is displayed. Clicking a control starts and stops the animation, resulting in a view change. It’s a lot of atypical functionality for plain HTML and CSS, showing what is possible with a bit of out-of-the-box thinking.

[Simon Willison] has a more in-depth analysis of CSS-Minecraft and how it works, and the code is on GitHub if you want a closer look.

Once you’re done checking that out and hungry for more cleverness, don’t miss Minecraft in COBOL and Minecraft Running in… Minecraft.

Spiral Connector Makes Fastener-Free Assemblies

20 Junio 2025 at 11:00

[Anton Gaia]’s SPIRAL sculpture resembles an organizer or modern shelving unit, but what’s really interesting is how it goes together. It’s made entirely from assembling copies of a single component (two, if you count the short ‘end pieces’ as separate) without a fastener in sight. [Anton] made the 3D model available, so check it out for yourself!

The self-similar design of the joint, based on the golden spiral, makes a self-supporting joint that requires neither glue nor fasteners.

The ends of each part form a tight, spiral-shaped joint when assembled with its neighbors. Parts connect solely to themselves without any need of fasteners or adhesives.

The end result is secure, scalable, and with a harmonious structure that is very pleasing to look at. Small wonder [Anton] used it as the basis for artistic work. You can see more pictures here.

The design of the joint is based on the golden spiral (which it turns out is also be a pretty useful chicken coop architecture.)

The parts lend themselves quite well to 3D printing, and we’d like to take a moment to appreciate that [Anton] shared the .step file instead of just an STL. STEP (or STP) files can be imported meaningfully into CAD programs, making it much easier to incorporate the design into one’s own work. STEP is also supported natively in many 3D printer slicers, so there’s no need to convert formats just to print them.

A brief video describing SPIRAL is embedded just below, with a closer look at how the pieces fit together.

Flopped Humane “AI Pin” Gets an Experimental SDK

19 Junio 2025 at 11:00

The Humane AI Pin was ambitious, expensive, and failed to captivate people between its launch and shutdown shortly after. While the units do contain some interesting elements like the embedded projector, it’s all locked down tight, and the cloud services that tie it all together no longer exist. The devices technically still work, they just can’t do much of anything.

The Humane AI Pin had some bold ideas, like an embedded projector. (Image credit: Humane)

Since then, developers like [Adam Gastineau] have been hard at work turning the device into an experimental development platform: PenumbraOS, which provides a means to allow “untrusted” applications to perform privileged operations.

As announced earlier this month on social media, the experimental SDK lets developers treat the pin as a mostly normal Android device, with the addition of a modular, user-facing assistant app called MABL. [Adam] stresses that this is all highly experimental and has a way to go before it is useful in a user-facing sort of way, but there is absolutely a workable architecture.

When the Humane AI Pin launched, it aimed to compete with smartphones but failed to impress much of anyone. As a result, things folded in record time. Humane’s founders took jobs at HP and buyers were left with expensive paperweights due to the highly restrictive design.

Thankfully, a load of reverse engineering has laid the path to getting some new life out of these ambitious devices. The project could sure use help from anyone willing to pitch in, so if that’s up your alley be sure to join the project; you’ll be in good company.

Tune In to “Higher Lower”, the Minimal Handheld Electronic Game

4 Junio 2025 at 11:00

[Tommy] has a great write-up about designing and building a minimalistic handheld electronic game called
“Higher Lower”. It’s an audio-driven game in which the unit plays two tones and asks the player to choose whether the second tone was higher in pitch, or lower. The game relies on 3D printed components and minimal electronics, limiting player input to two buttons and output to whatever a speaker stuck to an output pin from an ATtiny85 can generate.

Fastener-free enclosure means fewer parts, and on the inside are pots for volume and difficulty. We love the thoughtful little tabs that hold the rocker switch in place during assembly.

Gameplay may be straightforward, but working with so little raises a number of design challenges. How does one best communicate game state (and things like scoring) with audio tones only? What’s the optimal way to generate a random seed when the best source of meaningful, zero-extra-components entropy (timing of player input) happens after the game has already started? What’s the most efficient way to turn a clear glue stick into a bunch of identical little light pipes? [Tommy] goes into great detail for each of these, and more.

In addition to the hardware and enclosure design, [Tommy] has tried new things on the software end of things. He found that using tools intended to develop for the Arduboy DIY handheld console along with a hardware emulator made for a very tight feedback loop during development. Being able to work on the software side without actually needing the hardware and chip programmer at hand was also flexible and convenient.

We’ve seen [Tommy]’s work before about his synth kits, and as usual his observations and shared insights about bringing an idea from concept to kit-worthy product are absolutely worth a read.

You can find all the design files on the GitHub repository, but Higher Lower is also available as a reasonably-priced kit with great documentation suitable for anyone with an interest. Watch it in action in the video below.

Add Wood Grain Texture to 3D Prints – With a Model of a Log

3 Junio 2025 at 11:00

Adding textures is a great way to experiment with giving 3D prints a different look, and [PandaN] shows off a method of adding a wood grain effect in a way that’s easy to play around with. It involves using a 3D model of a log (complete with concentric tree rings) as a print modifier. The good news is that [PandaN] has already done the work of creating one, as well as showing how to use it.

The model of the stump — complete with concentric tree rings — acts as a modifier for the much-smaller printed object (in this case, a small plate).

In the slicer software one simply uses the log as a modifier for an object to be printed. When a 3D model is used as a modifier in this way, it means different print settings get applied everywhere the object to be printed and the modifier intersect one another.

In the case of this project, the modifier shifts the angle of the fill pattern wherever the models intersect. A fuzzy skin modifier is used as well, and the result is enough to give a wood grain appearance to the printed object. When printed with a wood filament (which is PLA mixed with wood particles), the result looks especially good.

We’ve seen a few different ways to add textures to 3D prints, including using Blender to modify model surfaces. Textures can enhance the look of a model, and are also a good way to hide layer lines.

In addition to the 3D models, [PandaN] provides a ready-to-go project for Bambu slicer with all the necessary settings already configured, so experimenting can be as simple as swapping the object to be printed with a new 3D model. Want to see that in action? Here’s a separate video demonstrating exactly that step-by-step, embedded below.

This BB Shooter Has a Spring, But Not For What You Think

2 Junio 2025 at 08:00

[It’s on my MIND] designed a clever BB blaster featuring a four-bar linkage that prints in a single piece and requires no additional hardware. The interesting part is how it turns a trigger pull into launching a 6 mm plastic BB. There is a spring, but it only acts as a trigger return and plays no part in launching the projectile. So how does it work?

There’s a spring in this BB launcher, but it’s not used like you might expect.

The usual way something like this functions is with the trigger pulling back a striker of some kind, and putting it under tension in the process (usually with the help of a spring) then releasing it. As the striker flies forward, it smacks into a BB and launches it. We’ve seen print-in-place shooters that work this way, but that is not what is happening here.

With [It’s on my MIND]’s BB launcher, the trigger is a four-bar linkage that transforms a rearward pull of the trigger into a forward push of the striker against a BB that is gravity fed from a hopper. The tension comes from the BB’s forward motion being arrested by a physical detente as the striker pushes from behind. Once that tension passes a threshold, the BB pops past the detente and goes flying. Thanks to the mechanical advantage of the four-bar linkage, the trigger finger doesn’t need to do much work. The spring? It’s just there to reset the trigger by pushing it forward again after firing.

It’s a clever design that doesn’t require any additional hardware, and even prints in a single piece. Watch it in action in the video, embedded just below.

A Simple Tip for Gluing Those LED Filaments

29 Mayo 2025 at 23:00

[Boylei] shows that those little LED filament strips make great freeze-frame blaster shots in a space battle diorama. That’s neat and all, but what we really want to highlight is a simple tip [Boylei] shares about working with these filament strips: how to glue them.

Glue doesn’t stick to LED filament strips, so put on a small piece of heat-shrink and glue to that instead.

The silicone (or silicone-like) coating on these LED filament strips means glue simply doesn’t stick. To work around this, [Boylei] puts a piece of clear heat shrink around the filament, and glues to that instead. If you want a visual, you can see him demonstrate at 6:11. It’s a simple and effective tip that’s certainly worth keeping in mind, especially since filament strips invite so many project ideas.

When LED filament strips first hit the hobbyist market they were attractive, but required high operating voltages. Nowadays they are not only cheaper, but work at battery-level voltages and come in a variety of colors.

These filaments have only gotten easier to work with over the years. Just remember to be gentle about bending them, and as [Boylei] demonstrates, a little piece of clear shrink tubing is all it takes to provide a versatile glue anchor. So if you had a project idea involving them that didn’t quite work out in the past, maybe it’s time to give it another go?

Tool Turns SVGs into Multicolor 3D Prints

29 Mayo 2025 at 05:00

Want to turn a scaled vector graphic into a multicolor 3D print, like a sign? You’ll want to check out [erkannt]’s svg2solid, a web-based tool that reads an SVG and breaks the shapes up by color into individual STL files. Drag those into your slicer (treating them as a single object with multiple parts) and you’re off to the races.

This sign was printed face-down on a textured build plate. The colors only need to be a few layers deep.

This is especially handy for making 3D printed versions of things like signs, and shown here is an example of exactly that.

It’s true that most 3D printer software supports the .svg format natively nowadays, but that doesn’t mean a tool like this is obsolete. SVG is a 2D format with no depth information, so upon import the slicer assigns a arbitrary height to all imported elements and the user must make any desired adjustments manually. For example, a handy tip for making signs is to make the “background” as thick as desired but limit colored elements to just a few layers deep. Doing so minimizes filament switching while having no impact on final visual appearance.

Being able to drag SVGs directly into the slicer is very handy, but working with 3D models has a certain “what you see is what you get” element to it that can make experimentation or alternate applications a little easier. Since svg2solid turns an SVG into discrete 3D models (separated by color) and each with user-defined heights, if you find yourself needing that then this straightforward tool is worth having in your bookmarks. Or just go straight to the GitHub repository and grab your own copy.

On the other hand, if you prefer your 3D-printed signs to be lit up in a faux-neon style then here’s how to do that in no time at all. Maybe there’s a way to mix the two approaches? If you do, be sure to use our tips line to let us know!

Behold Self-Synchronizing, Air-Flopping Limbs That Hop and Swim

23 Mayo 2025 at 11:00

Dutch research institute [AMOLF] shows off a small robot capable of walking, hopping, and swimming without any separate control system. The limbs synchronize thanks to the physical interplay between the robot’s design and its environment. There are some great videos on that project page, so be sure to check it out.

A kinked soft tube oscillates when supplied with continuous air.

Powered by a continuous stream of air blown into soft, kinked tubular limbs, the legs oscillate much like the eye-catching “tube man” many of us have seen by roadsides. At first it’s chaotic, but the movements rapidly synchronize into a meaningful rhythm that self-synchronizes and adapts. On land, the robot does a sort of hopping gait. In water, it becomes a paddling motion. The result in both cases is a fast little robot that does it all without any actual control system, relying on physics.

You can watch it in action in the video, embedded below. The full article “Physical synchronization of soft self-oscillating limbs for fast and autonomous locomotion” is also available.

Gait control is typically a nontrivial problem in robotics, but it doesn’t necessarily require a separate control system. Things like BEAM robotics and even the humble bristlebot demonstrate the ability for relatively complex behavior and locomotion to result from nothing more than the careful arrangement of otherwise simple elements.

MCP Blender Addon Lets AI Take the Wheel and Wield the Tools

18 Mayo 2025 at 08:00

Want to give an AI the ability to do stuff in Blender? The BlenderMCP addon does exactly that, connecting open-source 3D modeling software Blender to Anthropic’s Claude AI via MCP (Model Context Protocol), which means Claude can directly use Blender and its tools in a meaningful way.

MCP is a framework for allowing AI systems like LLMs (Large Language Models) to exchange information in a way that makes it easier to interface with other systems. We’ve seen LLMs tied experimentally into other software (such as with enabling more natural conversations with NPCs) but without a framework like MCP, such exchanges are bespoke and effectively stateless. MCP becomes very useful for letting LLMs use software tools and perform work that involves an iterative approach, better preserving the history and context of the task at hand.

Unlike the beach scene above which used 3D assets, this scene was created from scratch with the help of a reference image.

Using MCP also provides some standardization, which means that while the BlenderMCP project integrates with Claude (or alternately the Cursor AI editor) it could — with the right configuration — be pointed at a suitable locally-hosted LLM instead. It wouldn’t be as capable as the commercial offerings, but it would be entirely private.

Embedded below are three videos that really show what this tool can do. In the first, watch it create a beach scene using assets from a public 3D asset library. In the second, it creates a scene from scratch using a reference image (a ‘low-poly cabin in the woods’), followed by turning that same scene into a 3D environment on a web page, navigable in any web browser.

Back in 2022 we saw Blender connected to an image generator to texture objects, but this is considerably more capable. It’s a fascinating combination, and if you’re thinking of trying it out just make sure you’re aware it relies on allowing arbitrary Python code to be run in Blender, which is powerful but should be deployed with caution.

Blurry Image Placeholders, Generated With Minimal CSS

2 Mayo 2025 at 02:00

Low-quality image placeholders (LQIPs) have a solid place in web page design. There are many different solutions but the main gotcha is that generating them tends to lean on things like JavaScript, requires lengthy chunks of not-particularly-human-readable code, or other tradeoffs. [Lean] came up with an elegant, minimal solution in pure CSS to create LQIPs.

Here’s how it works: all required data is packed into a single CSS integer, which is decoded directly in CSS (no need for any JavaScript) to dynamically generate an image that renders immediately. Another benefit is that without any need for wrappers or long strings of data this method avoids cluttering the HTML. The code is little more than a line like <img src="…" style="--lqip:567213"> which is certainly tidy, as well as a welcome boon to those who hand-edit files.

The trick with generating LQIPs from scratch is getting an output that isn’t hard on the eyes or otherwise jarring in its composition. [Lean] experimented until settling on an encoding method that reliably delivered smooth color gradients and balance.

This method therefore turns a single integer into a perfectly-serviceable LQIP, using only CSS. There’s even a separate tool [Lean] created to compress any given image into the integer format used (so the result will look like a blurred version of the original image). It’s true that the results look very blurred but the code is clean, minimal, and the technique is easily implemented. You can see it in action in [Lean]’s interactive LQIP gallery.

CSS has a lot of capability baked into it, and it’s capable of much more than just styling and lining up elements. How about trigonometric functions in CSS? Or from the other direction, check out implementing a CSS (and HTML) renderer on an ESP32.

A Dual Mirror System For Better Cycling Safety

1 Mayo 2025 at 11:00

Rear-view mirrors are important safety tools, but [Mike Kelly] observed that cyclists (himself included) faced hurdles to using them effectively. His solution? A helmet-mounted dual-mirror system he’s calling the Mantis Mirror that looks eminently DIY-able to any motivated hacker who enjoys cycling.

One mirror for upright body positions, the other for lower positions.

Carefully placed mirrors eliminate blind spots, but a cyclist’s position changes depending on how they are riding and this means mirrors aren’t a simple solution. Mirrors that are aligned just right when one is upright become useless once a cyclist bends down. On top of that, road vibrations have a habit of knocking even the most tightly-cinched mirror out of alignment.

[Mike]’s solution was to attach two small mirrors on a short extension, anchored to a cyclist’s helmet. The bottom mirror provides a solid rear view from an upright position, and the top mirror lets one see backward when in low positions.

[Mike] was delighted with his results, and got enough interest from others that he’s considering a crowdfunding campaign to turn it into a product. In the meantime, we’d love to hear about it if you decide to tinker up your own version.

You can learn all about the Mantis Mirror in the video below, and if you want to see the device itself a bit clearer, you can see that in some local news coverage.

Gaze Upon Robby The Robot’s Mechanical Intricacy

1 Mayo 2025 at 08:00

One might be tempted to think that re-creating a film robot from the 1950s would be easy given all the tools and technology available to the modern hobbyist, but as [Mike Ogrinz]’s quest to re-create Robby the Robot shows us, there is a lot moving around inside that domed head, and requires careful and clever work.

The “dome gyros” are just one of the complex assemblies, improved over the original design with the addition of things like bearings.

Just as one example, topping Robby’s head is a mechanical assembly known as the dome gyros. It looks simple, but as the video (embedded below) shows, re-creating it involves a load of moving parts and looks like a fantastic amount of work has gone into it. At least bearings are inexpensive and common nowadays, and not having to meet film deadlines also means one can afford to design things in a way that allows for easier disassembly and maintenance.

Robby the Robot first appeared in the 1956 film Forbidden Planet and went on to appear in other movies and television programs. Robby went up for auction in 2017 and luckily [Mike] was able to take tons of reference photos. Combined with other enthusiasts’ efforts, his replica is shaping up nicely.

We’ve seen [Mike]’s work before when he shared his radioactive Night Blossoms which will glow for decades to come. His work on Robby looks amazing, and we can’t wait to see how it progresses.

Read Motor Speed Better By Making The RP2040 PIO Do It

29 Abril 2025 at 23:00

A quadrature encoder provides a way to let hardware read movement (and direction) of a shaft, and they can be simple, effective, and inexpensive devices. But [Paulo Marques] observed that when it comes to reading motor speeds with them, what works best at high speeds doesn’t work at low speeds, and vice versa. His solution? PicoEncoder is a library providing a lightweight and robust method of using the Programmable I/O (PIO) hardware on the RP2040 to get better results, even (or especially) from cheap encoders, and do it efficiently.

The results of the sub-step method (blue) resemble a low-pass filter, but is delivered with no delay or CPU burden.

The output of a quadrature encoder is typically two square waves that are out of phase with one another. This data says whether a shaft is moving, and in what direction. When used to measure something like a motor shaft, one can also estimate rotation speed. Count how many steps come from the encoder over a period of time, and use that as the basis to calculate something like revolutions per minute.

[Paulo] points out that one issue with this basic method is that the quality depends a lot on how much data one has to work with. But the slower a motor turns, the less data one gets. To work around this, one can use a different calculation optimized for low speeds, but there’s really no single solution that handles high and low speeds well.

Another issue is that readings at the “edges” of step transitions can have a lot of noise. This can be ignored and assumed to average out, but it’s a source of inaccuracy that gets worse at slower speeds. Finally, while an ideal encoder has individual phases that are exactly 50% duty cycle and exactly 90 degrees out of phase with one another. This is almost never actually the case with cheaper encoders. Again, a source of inaccuracy.

[Paulo]’s solution was to roll his own method with the RP2040’s PIO, using a hybrid approach to effect a “sub-step” quadrature encoder. Compared to simple step counting, PicoEncoder more carefully tracks transitions to avoid problems with noise, and even accounts for phase size differences present in a particular encoder. The result is a much more accurate calculation of motor speed and position without any delays. Most of the work is done by the PIO of the RP2040, which does the low-level work of counting steps and tracking transitions without any CPU time involved. Try it out the next time you need to read a quadrature encoder for a motor!

The PIO is one of the more interesting pieces of functionality in the RP2040 and it’s great to see it used in a such a clever way. As our own Elliot Williams put it when he evaluated the RP2040, the PIO promises never having to bit-bang a solution again.

Weird And Wonderful VR/MR Text Entry Methods, All In One Place

29 Abril 2025 at 08:00

Are you a developer or experimenter pondering options for text entry in virtual or mixed reality? If that’s the case (or you’re merely curious) then here’s the resource you need: TEXT, or the Text Entry for XR Trove. It’s a collection of all the things people have tried when it comes to creating text entry interfaces for virtual and mixed reality (VR/MR) systems, all in a searchable list, complete with animated demonstrations.

There are a lot of different ways to approach this problem, ranging from simple to strange.

VR and MR are new frontiers, and optimal interfaces are still very much a work in progress. If one wishes to avoid reinventing the wheel, it’s a good idea to research prior art. This resource makes it very easy to browse all the stuff people have tried when it comes to text entry.

It’s also fun just to browse and see what kinds of unusual solutions people have come up with that go pretty far beyond “floating over-sized virtual keyboard”. Lenstouch for example involves tapping directly on the touch-sensitive front of the headset, and PalmType reminds us somewhat of the Palm Pilot’s Graffiti system.

It’s a treasure trove of creativity with a nice, searchable interface. Have you come up with your own, or know of a method that isn’t there? Submit it to the collection so others can find it. And if you’re in the process of cooking something up yourself, we have some DIY handwriting recognition resources you might find useful.

Save Cells from the Landfill, Get a Power Bank For Your Troubles

27 Abril 2025 at 11:00

A hefty portable power bank is a handy thing to DIY, but one needs to get their hands on a number of matching lithium-ion cells to make it happen. [Chris Doel] points out an easy solution: salvage them from disposable vapes and build a solid 35-cell power bank. Single use devices? Not on his watch!

[Chris] has made it his mission to build useful things like power banks out of cells harvested from disposable vapes. He finds them — hundreds of them — on the ground or in bins (especially after events like music festivals) but has also found that vape shops are more than happy to hand them over if asked. Extracting usable cells is most of the work, and [Chris] has refined safely doing so into an art.

Disposable vapes are in all shapes and sizes, but cells inside are fairly similar.

Many different vapes use the same cell types on the inside, and once one has 35 identical cells in healthy condition it’s just a matter of using a compatible 3D-printed enclosure with two PCBs to connect the cells, and a pre-made board handles the power bank functionality, including recharging.

We’d like to highlight a few design features that strike us as interesting. One is the three little bendy “wings” that cradle each cell, ensuring cells are centered and held snugly even if they aren’t exactly the right size.  Another is the use of spring terminals to avoid the need to solder to individual cells. The PCBs themselves also double as cell balancers, providing a way to passively balance all 35 cells and ensure they are at the same voltage level during initial construction. After the cells are confirmed to be balanced, a solder jumper near each terminal is closed to bypass that functionality for final assembly.

The result is a hefty power bank that can power just about anything, and maybe the best part is that it can be opened and individual cells swapped out as they reach the end of their useful life. With an estimated 260 million disposable vapes thrown in the trash every year in the UK alone, each one containing a rechargeable lithium-ion cell, there’s no shortage of cells for an enterprising hacker willing to put in a bit of work.

Power banks not your thing? [Chris] has also created a DIY e-bike battery using salvaged cells, and that’s a money saver right there.

Learn all about it in the video, embedded below. And if you find yourself curious about what exactly goes on in a lithium-ion battery, let our own Arya Voronova tell you all about it.

Tiny, Hackable Telepresence Robot for under $100? Meet Goby

18 Abril 2025 at 05:00

[Charmed Labs] are responsible for bringing numerous open-source hardware products to fruition over the years, and their latest device is an adorably small robotic camera platform called Goby, currently crowdfunding for its initial release. Goby has a few really clever design features and delivers a capable (and hackable) platform for under 100 USD.

Goby embraces its small size, delivering what its creators dub “tinypresence” — or the feeling of being there, but on a very small scale. Cardboard courses, LEGO arenas, or even tabletop gaming scenery hits different when experienced from a first-person perspective. Goby is entirely reprogrammable with nothing more than a USB cable and the Arduino IDE, while costing less than most Arduino starter kits.

Recharging happens by driving over the charger, then pivoting down so the connectors (the little blunt vampire fangs under and to each side of the camera) come into contact with the charger.

One of the physical features we really like is the tail-like articulated caster at the rear. Flexing this pivots Goby up or down (and can even flip Goby completely over), allowing one to pan and tilt the view without needing to mount the camera on a gimbal. It also comes into play for recharging; Goby simply moves over the disc-shaped charger and pivots down to make contact.

At Goby‘s heart is an ESP32-S3 and OmniVision OV2640 camera sensor streaming a live video feed (and driving controls) with WebRTC. Fitting the WebRTC stack onto an ESP32 wasn’t easy, but opens up possibilities beyond just media streaming.

Goby is set up to make launching an encrypted connection as easy as sharing a URL or scanning a QR code. The link is negotiated between bot and client with the initial help of an external server, and once a peer-to-peer connection is established, the server’s job is done and it is out of the picture. [Charmed Labs]’s code for this functionality — named BitBang — is in beta and destined for an open release as well. While BitBang is being used here to make it effortless to access Goby remotely, it’s more broadly intended to make web access for any ESP32-based device easier to implement.

As far as tiny remote camera platforms go, it might not be as small as rebuilding a Hot Wheels car into a micro RC platform, but it’s definitely more accessible and probably cheaper, to boot. Check it out at the Kickstarter (see the first link in this post) and watch it in action in the video, embedded just below the page break.

DIY AI Butler Is Simpler and More Useful Than Siri

15 Abril 2025 at 23:00

[Geoffrey Litt] shows that getting an effective digital assistant that’s tailored to one’s own needs just needs a little DIY, and thanks to the kinds of tools that are available today, it doesn’t even have to be particularly complex. Meet Stevens, the AI assistant who provides the family with useful daily briefs. The back end? Little more than one SQLite table and a few cron jobs.

A sample of Stevens’ notebook entries, both events and things to simply remember.

Every day, Stevens sends a daily brief via Telegram that includes calendar events, appointments, weather notes, reminders, and even a fun fact for the day. Stevens isn’t just send-only, either. Users can add new entries or ask questions about items through Telegram.

It’s rudimentary, but [Geoffrey] already finds it far more useful than Siri. This is unsurprising, as it has been astutely observed that big tech’s digital assistants are designed to serve their makers rather than their users. Besides, it’s also fun to have the freedom to give an assistant its own personality, something existing offerings sorely lack.

Architecture-wise, the assistant has a notebook (the single SQLite table) that gets populated with entries. These entries come from things like reading family members’ Google calendars, pulling data from a public weather API, processing delivery notices from the post office, and Telegram conversations. With a notebook of such entries (along with a date the entry is expected to be relevant), generating a daily brief is simple. After all, LLMs (Large Language Models) are amazingly good at handling and formatting natural language. That’s something even a locally-installed LLM can do with ease.

[Geoffrey] says that even this simple architecture is super useful, and it’s not even a particularly complex system. He encourages anyone who’s interested to check out his project, and see for themselves how useful even a minimally-informed assistant can be when it’s designed with ones’ own needs in mind.

❌
❌